Magento 2 is a powerful eCommerce platform, but sometimes its default features might not fully meet your business needs. In such cases, third-party modules and customizations become important to extend Magento 2’s capabilities. One great way to improve the functionality of Magento 2 entities is by using extension attributes.
Magento 2 Extension attributes let you add extra, complex data to an existing entity without changing the core code. This makes them incredibly useful for developers who need to customize Magento 2 to fit specific business requirements. This guide will show you how to add extension attributes to an entity in Magento 2.
What are Extension Attributes in Magento 2?
Extension attributes in Magento 2 allow developers to add custom data to existing entities without changing the core code. These attributes help extend the default functionality of Magento 2, making it easier to add extra information. This is especially useful when working with third-party modules, as it lets developers customize entities and APIs without altering the core system. Extension attributes offer a flexible and upgrade-safe way to add custom features to your Magento 2 store.
What is the Difference Between Custom Attributes and Extension Attributes?
In Magento 2, both custom attributes and extension attributes allow you to add extra data to entities, but they are used in different ways and have different purposes.
- Custom Attributes are part of the entity’s main data structure. They store simple values like strings, numbers, or yes/no options. These attributes are defined in the entity’s model, can be easily accessed and updated, and are typically stored in the database table for that entity. You can use custom attributes in the admin panel, API, and elsewhere.
- Extension Attributes, on the other hand, are used to add extra functionality to existing entities without changing their core structure. These attributes do not appear in the entity’s database table and are typically used to store more complex or additional data that isn’t needed for every entity. Extension attributes are especially helpful when working with third-party modules or when you want to add custom data without affecting the underlying system.
In short, custom attributes are used for basic data that’s essential to the entity, while extension attributes let you add extra, flexible data without changing the core Magento setup.
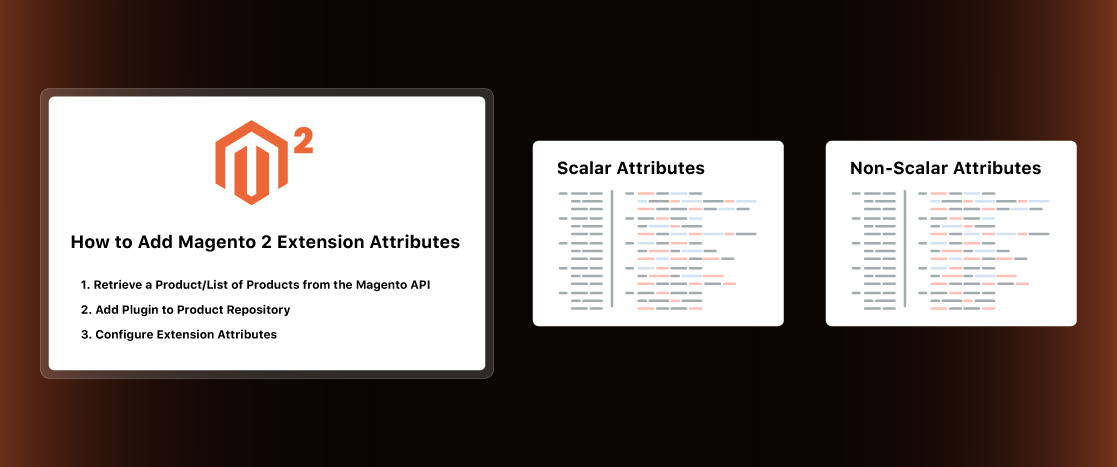
How to Add Magento 2 Extension Attributes? (Step-by-Step)
Adding extension attributes to an entity in Magento 2 can be broken down into three main steps:
- Retrieve a Product/List of Products from the Magento API
- Add Plugin to Product Repository
- Configure Extension Attributes
Let’s explore each step in detail.
Retrieve a Product/List of Products from the Magento API
First, you must retrieve the product or list of products from the Magento API. This is done by requesting an API to the appropriate service, typically the Product Repository. The response from the API request will return objects that include structure for both custom attributes and extension attributes.
For example, the structure of a product response might look like this:
<product>
    <id>1</id>
    <sku>some-sku</sku>
    <custom_attributes><!-- Custom Attributes Data --></custom_attributes>
    <extension_attributes><!-- Extension Attributes Data --></extension_attributes>
</product>
Similarly, if you request a list of products, the structure will look like this:
<products>
    <item>
        <id>1</id>
        <sku>some-sku</sku>
        <custom_attributes><!-- Custom Attributes Data --></custom_attributes>
        <extension_attributes><!-- Extension Attributes Data --></extension_attributes>
    </item>
    <item>
        <id>2</id>
        <sku>some-sku-2</sku>
        <custom_attributes><!-- Custom Attributes Data --></custom_attributes>
        <extension_attributes><!-- Extension Attributes Data --></extension_attributes>
    </item>
</products>
This is where you’ll later add your extension attributes.
Add Plugin to Product Repository
You need to use a plugin in the Product Repository to add extension attributes. Plugins allow you to extend or modify the behavior of public methods in Magento 2 classes. In this case, you’ll create an after-plugin that adds your custom data to the extension attributes of the product entity.
Here’s an example of how to create an afterGet plugin:
public function afterGet(
    \Magento\Catalog\Api\ProductRepositoryInterface $subject,
    \Magento\Catalog\Api\Data\ProductInterface $entity
) {
    $ourCustomData = $this->customDataRepository->get($entity->getId());
    $extensionAttributes = $entity->getExtensionAttributes();
    $extensionAttributes->setOurCustomData($ourCustomData);
    $entity->setExtensionAttributes($extensionAttributes);
    return $entity;
}
In this plugin:
- First, the existing extension attributes are retrieved using getExtensionAttributes().
- Then, your custom data is added to these attributes.
- Finally, the modified extension attributes are set back to the entity using setExtensionAttributes().
You can create similar plugins for afterGetList and afterSave methods to handle multiple products or save operations.
Configure Extension Attributes
Now that you have set up the plugin, the next step is configuring the extension attributes. This configuration will differ based on whether your attributes are scalar or non-scalar.
Scalar Attributes
Scalar attributes represent simple data types such as strings or integers. Here’s how to configure scalar extension attributes:
<config xmlns:xsi="http://www.w3.org/2001/XMLSchema-instance" xsi:noNamespaceSchemaLocation="urn:magento:framework:Api/etc/extension_attributes.xsd">
    <extension_attributes for="Magento\Catalog\Api\Data\ProductInterface">
        <attribute code="first_custom_attribute" type="Magento\SomeModule\Api\Data\CustomDataInterface" />
        <attribute code="second_custom_attribute" type="Magento\SomeModule\Api\Data\CustomDataInterface" />
    </extension_attributes>
</config>
The resulting product structure will include custom attributes like this:
<product>
    <id>1</id>
    <sku>some-sku</sku>
    <custom_attributes><!-- Custom Attributes Data --></custom_attributes>
    <extension_attributes>
        <first_custom_attribute>1</first_custom_attribute>
        <second_custom_attribute>2</second_custom_attribute>
    </extension_attributes>
</product>
Non-scalar Attributes
Non-scalar attributes represent more complex data types, such as arrays or objects. Here’s how to configure non-scalar extension attributes:
<config xmlns:xsi="http://www.w3.org/2001/XMLSchema-instance" xsi:noNamespaceSchemaLocation="urn:magento:framework:Api/etc/extension_attributes.xsd">

    <extension_attributes for="Magento\Catalog\Api\Data\ProductInterface">

        <attribute code="our_custom_data" type="Magento\SomeModule\Api\Data\CustomDataInterface[]" />

    </extension_attributes>

</config>
The resulting product structure will look like this:
<product>
    <id>1</id>
    <sku>some-sku</sku>
    <custom_attributes><!-- Custom Attributes Data --></custom_attributes>
    <extension_attributes>
        <our_custom_data>
            <first_custom_attribute>1</first_custom_attribute>
            <second_custom_attribute>2</second_custom_attribute>
        </our_custom_data>
    </extension_attributes>
</product>
Conclusion
Adding extension attributes in Magento 2 is a great way to customize and enhance the functionality of entities without changing the core code. By following the steps in this guide—retrieving products from the Magento API, adding a plugin to the Product Repository, and configuring extension attributes—you can easily implement custom attributes to meet your business needs.
Related Topics:


Related Tutorials


10 Best Free Magento 2 Themes and Templates for a Responsive Online Store (2025)