How to Upload Multiple Images and Files in Laravel with Validation
Uploading multiple images and files in Laravel is a common requirement for many web applications, such as content management systems, e-commerce platforms, or user profile pages. However, managing multiple file uploads with proper validation can be challenging, especially for developers new to Laravel’s file handling features.
In this tutorial, we will learn how to upload multiple images and files in Laravel, using validation to ensure the files are secure and meet the requirements. We’ll cover everything from setting up your Laravel project and configuring the file system to creating database tables for storing file metadata. Additionally, we’ll discuss best practices for validating file types, handling errors, and securely storing the uploaded files. So, let’s get started.
Setting Up Your Laravel Project
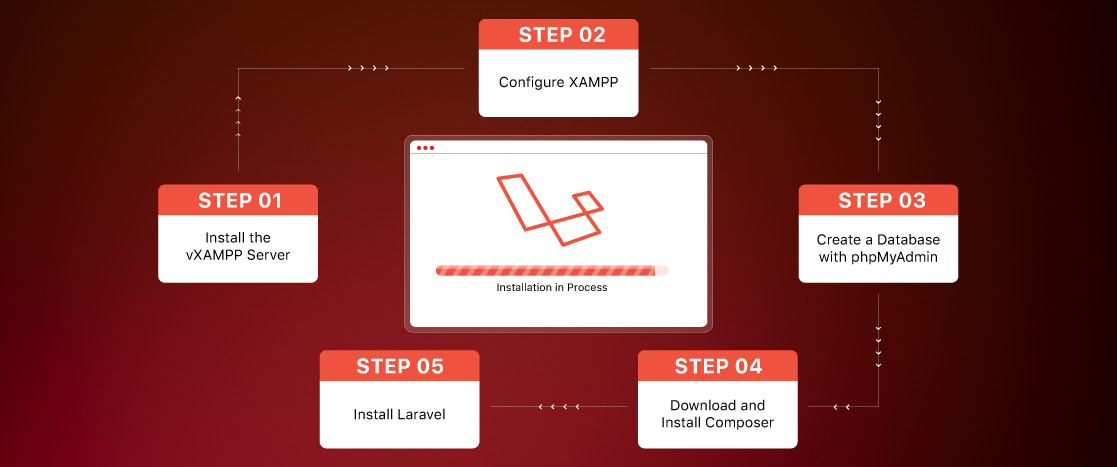
Before working on the file upload functionality, ensure you have a Laravel project ready. Follow the instructions to set up your Laravel project, or follow this complete guide on how to set up Laravel on localhost.
- Install Laravel: If you don’t have a Laravel project yet, you can create one using Composer, a tool for managing PHP dependencies. Run this command in your terminal to create a new Laravel project:
composer create-project –prefer-dist laravel/laravel multiple-file-upload
This will create a new Laravel project called multiple-file-upload.
- Navigate to the Project Folder: After the installation is complete, go to the project folder by running:
cd multiple-file-upload
- Start the Development Server: To make sure everything is working, start the Laravel development server with this command:
php artisan serve
Now, open your browser and go to http://127.0.0.1:8000 to see the Laravel app running.
Configuring the File System
Laravel’s file system controls how your application stores and retrieves files. By default, Laravel supports local storage, Amazon S3, and other cloud services. Let’s configure Laravel to store files locally.
- Modify the config/filesystems.php file: Open the config/filesystems.php file in your Laravel project. Inside this file is the disks array, which defines the storage configurations for different storage options (local, public, S3, etc.).
Find the configuration for the public disk and modify it to store files in the public/uploads directory. Your updated configuration should look like this:
‘disks’ => [
‘public’ => [
‘driver’ => ‘local’, // Use local storage
‘root’ => public_path(‘uploads’), // Store files in the ‘public/uploads’ directory
‘url’ => env(‘APP_URL’).’/uploads’, // URL for accessing the uploaded files
‘visibility’ => ‘public’, // Make files publicly accessible
],
],
This ensures that uploaded files are stored in the public/uploads directory and can be accessed publicly via URLs like http://127.0.0.1:8000/uploads/{filename}.
- Create a symbolic link: Laravel uses symbolic links to make files stored in the storage folder accessible via the public directory. By default, the storage folder is not directly accessible through the web, but we can create a symbolic link to allow public access.
To create the symbolic link, run this Artisan command:
php artisan storage:link
This command will create a symbolic link from the public/storage directory to the storage/app/public directory. Now, files stored on the public disk will be accessible via a URL like http://127.0.0.1:8000/storage/{filename}.
Creating the Upload Controller
Now, let’s create a controller to handle the file upload process. This controller will validate files, store them, and return appropriate responses. Follow the steps below to create the upload controller.
- Generate the Controller: Use Laravel’s Artisan command to generate a new controller. Run the following command in your terminal:
php artisan make:controller FileUploadController
This will create a new controller file called FileUploadController.php. You can find it in the app/Http/Controllers directory of your Laravel project.
After running the command, the controller will be located at:
app/Http/Controllers/FileUploadController.php
Handling Multiple File Uploads in the Controller
In the FileUploadController, we will write the logic to manage the file upload process. This includes validating the uploaded files, storing them in the correct directory, and optionally returning their file paths to be displayed to the user.
Controller Code:
namespace App\Http\Controllers;
use Illuminate\Http\Request;
use Illuminate\Support\Facades\Storage;
class FileUploadController extends Controller
{
public function upload(Request $request)
{
// Validate the uploaded files
$request->validate([
‘files.*’ => ‘required|mimes:jpg,jpeg,png,pdf,doc,docx|max:2048’, // Validate file types and size
]);
// Retrieve all the files uploaded by the user
$uploadedFiles = $request->file(‘files’);
// Store the files and collect their paths
$filePaths = [];
foreach ($uploadedFiles as $file) {
// Store each file in the ‘uploads’ folder within the public disk
$path = $file->store(‘uploads’, ‘public’);
// Collect the file path for later use (optional)
$filePaths[] = $path;
}
// After successful upload, return a success message and the file paths to the view
return back()->with(‘success’, ‘Files uploaded successfully!’)->with(‘paths’, $filePaths);
}
}
Explanation of the Code:
- File Validation: The validate() method ensures each uploaded file meets the following conditions.
- The file must be one of these types: JPG, JPEG, PNG, PDF, DOC, DOCX.
- The file size must not exceed 2MB (max:2048).
- The files.* syntax applies the validation to each file in the array of uploaded files.
- File Storage: The store() method saves each file to the uploads directory within the public disk. The public disk points to your project’s public/storage folder, where the files will be stored.
- Returning File Paths: After storing the files, the store() method returns the path of each uploaded file. These paths are stored in the $filePaths array. This array is then passed to the view, allowing you to display clickable links to the uploaded files.
Building the Upload Form
Now that the file upload logic is set up in the controller, we must create a form where users can select and upload multiple files. This form will allow users to choose files and submit them to the server for processing. Follow these steps to create the blade view.
- Create the Blade Template: In the resources/views directory, create a new Blade template file called upload.blade.php. This file will contain the HTML structure for the file upload form.
- Blade Template Code:
<!DOCTYPE html>
<html lang=”en”>
<head>
<meta charset=”UTF-8″>
<meta name=”viewport” content=”width=device-width, initial-scale=1.0″>
<title>Multiple File Upload in Laravel</title>
</head>
<body>
<h1>Upload Multiple Files</h1>
<!– Display success message if files are uploaded –>
@if(session(‘success’))
<div>
<p>{{ session(‘success’) }}</p>
</div>
@endif
<!– File upload form –>
<form action=”{{ route(‘upload’) }}” method=”POST” enctype=”multipart/form-data”>
@csrf
<label for=”files”>Choose files to upload:</label>
<input type=”file” name=”files[]” multiple>
<button type=”submit”>Upload Files</button>
</form>
<!– Display uploaded files as links –>
@if(session(‘paths’))
<h2>Uploaded Files:</h2>
<ul>
@foreach(session(‘paths’) as $path)
<li><a href=”{{ Storage::url($path) }}” target=”_blank”>{{ basename($path) }}</a></li>
@endforeach
</ul>
@endif
</body>
</html>
Explanation of the Code:
- Form Structure:
- The enctype=”multipart/form-data” attribute is required to upload files. It ensures that the browser sends files and the form data in the correct format.
- The multiple attributes on the file input (<input type=”file” name=”files[]” multiple>) allow users to select multiple files at once.
- The @csrf directive generates a CSRF token, which protects the form from cross-site request forgery attacks.
- Displaying Uploaded Files:
- After a successful upload, the paths to the uploaded files are saved in the session and displayed below the form.
- The Storage::url($path) function generates a public URL for each uploaded file. The basename($path) function extracts the file name from the full path to display as the clickable link.
- The target=”_blank” attribute opens the file in a new tab when the user clicks the link.
Setting Up Routes
Next, we need to set up the routes to display the upload form and process the file uploads.
- Add Routes in routes/web.php: Open the routes/web.php file in your Laravel project and add the following routes to display the form and process the file uploads.
use App\Http\Controllers\FileUploadController;
Route::get(‘/upload’, function () {
return view(‘upload’); // Displays the upload form
});
Route::post(‘/upload’, [FileUploadController::class, ‘upload’])->name(‘upload’); // Processes the file uploads
Explanation:
- The First Route (/upload): This route handles the GET request and displays the file upload form. When users visit the /upload URL, the upload.blade.php view is shown, allowing them to select and upload files.
- The Second Route (/upload with POST): This route handles the POST request when the user submits the form. It calls the upload method in the FileUploadController to validate, store, and return the uploaded files. The route is named upload, making it easy to reference in your views, such as when setting the form’s action.
Validating File Uploads
The validation process ensures that only valid files are uploaded to the server. Laravel’s built-in validation system automatically checks each file based on our set rules. An error message will be displayed if any file doesn’t meet the criteria.
- Required Files: The user must provide each file, and the required rule ensures that no file is left empty.
- File Types: Only specific types of files are allowed to be uploaded. The mimes rule ensures that the uploaded files must be one of the following types: JPG, JPEG, PNG, PDF, DOC, DOCX. This ensures that only the allowed file formats are uploaded.
- File Size: Each file must be no larger than 2MB. The max:2048 rule sets this limit (2048 KB = 2MB). A file that is too large will not be accepted.
How Validation Works:
Laravel automatically checks the files against these rules. If a file doesn’t meet the validation requirements (for example, if it’s too large or unsupported type), an error will be returned, and the user will be told that their file upload was unsuccessful. This helps ensure that only valid files are uploaded and stored.
Displaying Uploaded Files
After the files are successfully uploaded, their paths are stored in the session. The Blade view retrieves these paths and displays them as clickable links, making it easy to access the uploaded files.
Code in the Blade Template:
@if(session(‘paths’))
<h2>Uploaded Files:</h2>
<ul>
@foreach(session(‘paths’) as $path)
<li><a href=”{{ Storage::url($path) }}” target=”_blank”>{{ basename($path) }}</a></li>
@endforeach
</ul>
@endif
Explanation:
- Session Data: After the upload is successful, the session(‘paths’) retrieves the file paths of the uploaded files stored in the session.
- Loop Through the Paths: The @foreach loop goes through each file path in the session.
- Displaying File Links:
- Storage::url($path) generates a URL pointing to the public location of each uploaded file.
- The basename($path) function extracts the file name from the path and displays it as the clickable link text.
- The target=”_blank” attribute ensures that the file opens in a new browser tab when the user clicks on a link.
This code generates a list of clickable links for each uploaded file. The user can click any link to open the corresponding file in a new tab.
Securing File Uploads
Ensuring the security of file uploads is essential to protect your system from malicious attacks and to maintain its integrity. Here are some best practices you should follow:
1. File Validation
Always validate the files users upload to prevent harmful files from being uploaded. Key validation checks include:
- File Type: Only allow specific file types (e.g., images, PDFs, documents) by checking the file’s MIME type.
- File Size: Set a maximum file size limit to prevent large files from overloading your server.
- File Extension: Make sure the file extension matches the MIME type to avoid spoofing (where a file looks like a different type).
2. Unique Filenames
To avoid overwriting existing files and ensure each file has a unique name, generate a unique filename for every upload. You can do this by:
- Using uniqid(): This function generates a unique ID based on the current timestamp, which helps create unique filenames.
- Using Str::uuid(): If you need a more random and complex identifier, you can use Laravel’s helper Str::uuid() to generate a universally unique identifier (UUID).
Example:
$filename = uniqid() . ‘.’ . $file->getClientOriginalExtension();
3. Avoid Storing Files in the Public Folder
Although it may seem convenient to store files directly in the public folder, it’s safer to store them in the storage folder and use symbolic links to make them publicly accessible. This approach helps:
- Organize File Storage: Keeps your storage structure tidy and separate from the public-facing parts of your application.
- Increase Security: This feature prevents sensitive or executable files from being stored in the public folder, reducing the risk of unintended exposure.
To create a symbolic link between the storage folder and the public folder, run this Artisan command:
php artisan storage:link
This creates a link from public/storage to storage/app/public, so files can be accessed via a URL like http://your-app-url/storage/{filename} but remain outside the public folder for better security.
4. Limit File Upload Permissions
Make sure that your server has restricted permissions for file uploads. Files should be stored with limited permissions to prevent users from accessing or modifying files they shouldn’t.
Testing the File Upload Feature
Once everything is set up, you should test the file upload feature to ensure it works as expected. Here’s how to test it:
- In your terminal, run this command to start the Laravel development server:
php artisan serve
This will start the server, which will usually run at http://127.0.0.1:8000.
- Open your web browser and go to:
http://127.0.0.1:8000/upload
This will open the page where users can upload files.
- On the upload page, select multiple files using the file upload form. Once you’ve selected the files, click the “Upload Files” button to submit them to the server.
After uploading, the page should display a success message and clickable links to the files. Click these links to open the files in a new browser tab.
Conclusion
In conclusion, setting up a secure and efficient system for uploading multiple images and files in Laravel is simple when you follow the proper steps. Following the guide, you can ensure your files are appropriately validated, stored, and displayed while keeping your application secure. Each step, from setting up your Laravel project to handling validation, creating routes, and securing file storage, is essential in building a reliable and user-friendly file upload feature. By following best practices such as validating file types, limiting file sizes, and securing storage locations, you can protect your app from potential risks and give users a smooth experience.


