With the growing popularity of Magento ecommerce stores, there’s an inevitable boom in the integrations between Magento and other platforms.
A critical aspect of having an ecommerce store is having content that serves as an engagement point and contributes to SEO.
This is where blogs come into play, and what better platform to create a blog on than WordPress? But is it possible to merge a WordPress blog with Magento?
Yes! Using a simple extension, you can integrate your Magento store with a WordPress blog.
Let’s see how a simple Magento WordPress integration works.
Magento WordPress Integration Guide
To integrate your Magento store with WordPress, you will need a Magento module.
Luckily, there are free, third-party modules available, like FishPig, that can work with both the Community and Enterprise versions of Magento.
We will first install WordPress and set up the blog, install FishPig, and then adjust the blog’s settings according to the Magento store.
Let’s begin.
Installing WordPress
The first step is to install and download WordPress. It is recommended to do this manually; however, you can also go for the one-click deployment through Devrims.
Follow these steps for installing WordPress:
- Visit the WordPress website and download the recent version. You will get a zip file with all the files required for the application.
- Upload it into the root of your Magento store and extract it. This will create a folder named WordPress, and it will have all the files for your site. Rename this to ‘wordpress’ or ‘wp’, whichever is easier for you.
Now, let’s do some configurations. Open a web browser, type in your Magento store URL in the search bar, and add the folder name next to it. For example:
“example.com/wp”
Press enter and it should return the WordPress installation page if the previous steps were followed correctly.
Next, you will need to follow the steps on the installation page. In the database settings, you can either create a new database or use your existing Magento database. This is doable because WordPress has a separate table prefix by default with the name wp_. It ensures that Magento data does not get mixed with WordPress data. Furthermore, you can change the prefix name to your liking as well.
If you don’t know where to find the database, open the $MagentoRoot/app/etc/local.xml file. All database files will be there.
Once the installation is complete, you will have a working WordPress blog on your Magento site. However, the integration is not complete yet. The next step is to install the Magento WordPress integration extension, FishPig.
Install the Magento WordPress Extension
There is a free extension to integrate Magento and WordPress called FishPig.
Before installing the extension, make sure you have disabled the compiler and cache to avoid any errors. You can re-enable them afterward.
Configuring the Extension
To adjust the extension settings, log in to the Magento Admin panel and navigate to WordPress settings. Here, you will need to configure two sections: Integration and Database.
Database

In the first section, if you selected the existing database when installing WordPress, select Yes. Next, add the prefix you specified in the table prefix section, for example, wp_.
If you have created a new database for WordPress, select No and add the correct database name and prefix. Once done, click on the “Save Config” button.
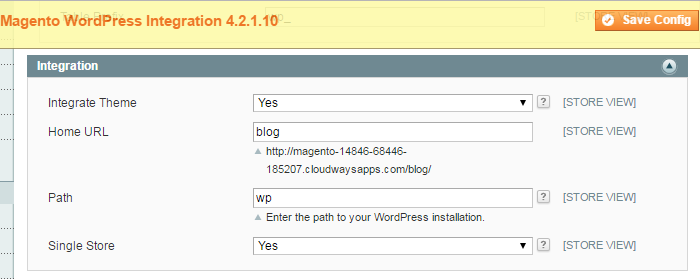
Integration

In the “Integrate Theme” section, select Yes if you want to use the same theme for WordPress as the Magento store. If you select No, the themes will not be integrated.
Next, in the “Home URL” section, add the name you want to give the blog. The name you add here will be added to the base Magento URL. If you enter “blog” here, the link will become: “example.com/blog”.
Finally, in the Path field, you must specify the installation path. We used “wp” as the folder name where files are installed. Simply enter that and then click on the “Save Config” button. We don’t have to worry about the last section.
Configure WordPress for Magento
To configure WordPress, we will also have to adjust the settings of WordPress Admin. Simply navigate to the General Settings from the sidebar, Settings > General.
Here, we will first check the WordPress Address (URL) box. This should have the URL where WordPress is installed. If the Magento URL is example.com, then the URL here has to be example.com/wp.

Next, check the Site Address (URL) section. This will have the URL of the front end of your WordPress blog. Usually, the Site Address and WordPress Address are the same. But because this is a Magento WordPress integration, the link will have the Magento URL plus the Home URL we set earlier in the Magento WordPress integration module. If the Magento URL is example/com and the Home URL is a blog, then the Site Address will be example.com/blog.

Once you’ve checked these URLs and made any required changes, click “Save Changes” on the bottom and viola! Your WordPress blog is integrated with your Magento store.
Conclusion
We hope this article helped you understand how to integrate WordPress with Magento.
Magento WordPress integration is crucial to get the best of both CMSs. We used the FishPig module to merge the WordPress blog with the Magento store. Once you are done with the integration, both sites should work together.
For more such guides, views, information, and more, stay tuned to our blog.


