Overview
The checkout page is one of the essential pages in your WooCommerce store, where you have the last chance to convince the buyer to make a purchase.
Stats says 68.81% of eCommerce shopping carts are abandoned. One of the reasons that users leave our website and visit someone else’s website is because they see too many checkout fields and don’t have that time to fill them, or maybe they don’t have much knowledge., so they left our website and visited someone else’s websites.
This tutorial will educate you on how to edit the woocommerce checkout page in different ways.
Why customize the WooCommerce checkout page in WordPress?
Many situations can make you think you need to customize your woocommerce checkout page. Customizing a page and optimizing it per requirements will increase the conversion rate that will automatically be the reason for more sales.
When you installed WooCommerce for the first time, the necessary pages were automatically created, including the checkout page for WooCommerce. You can see the preview of this page by going to the checkout page. An example is given below:
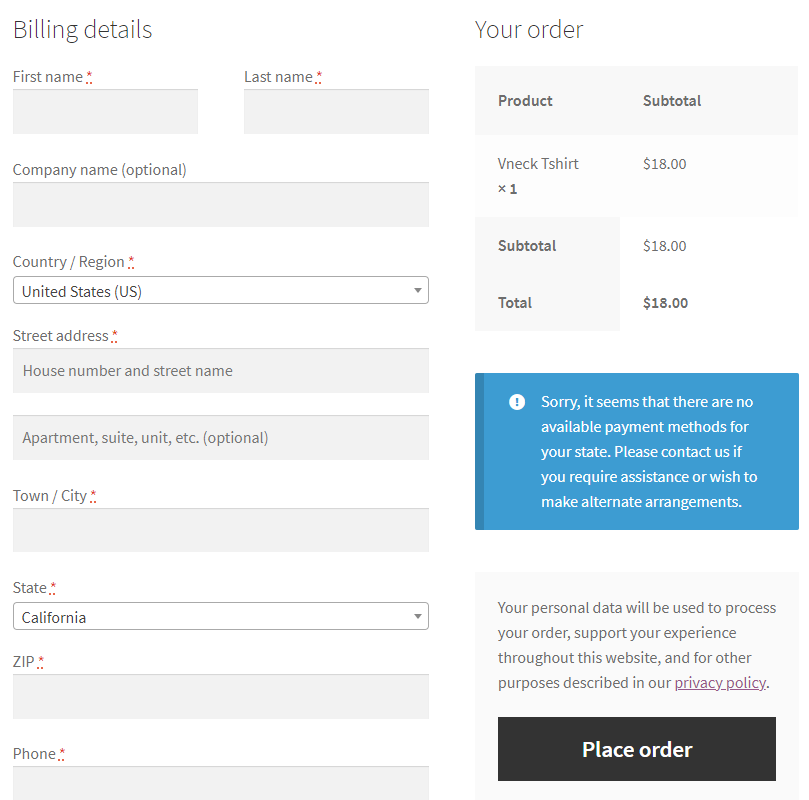
By default, WooCommerce asks customers to add their necessary information such as first name, last name, billing details, company name, address, phone number, email address, privacy policy statement, and order notes.
These are the essential elements that customers should fill out before buying anything.
However, some fields are not necessary on the WooCommerce checkout page.
If the default page is not looking suitable from the design perspective; as a store owner, you should change the default page and make your page attractive.
According to some research, 70-85% of carts are abandoned because of the many fields on the checkout page; it can happen. It means the majority of your buyers are leaving without making any purchase.
By customizing your store’s checkout page, you can solve this issue and benefit from more sales.
A customized page will leave a good impression on the users/buyers, which can help make them long-term customers, which is again a plus point.
The checkout page is the last stage where customers either buy a product or abandon your site altogether.
That’s why you need to make sure that your page is well-designed and well-functioning, and fully customized, so whenever customers come and want to buy, they can easily buy.
I am mentioning some of the best ways to provide your customer with a better experience.
- Creating a one-page checkout
- Changing input field labels and button text
- Requiring specific fields to be filled out
- Directly linking products to the checkout page
- Changing the design and page template
- Adding, removing, or rearranging fields
- Automatically triggering free shipping if offered
If you use these tactics on your site, you will not lose your customers.
How to Skip Cart Page & Go Straight to Checkout Page in WooCommerce?
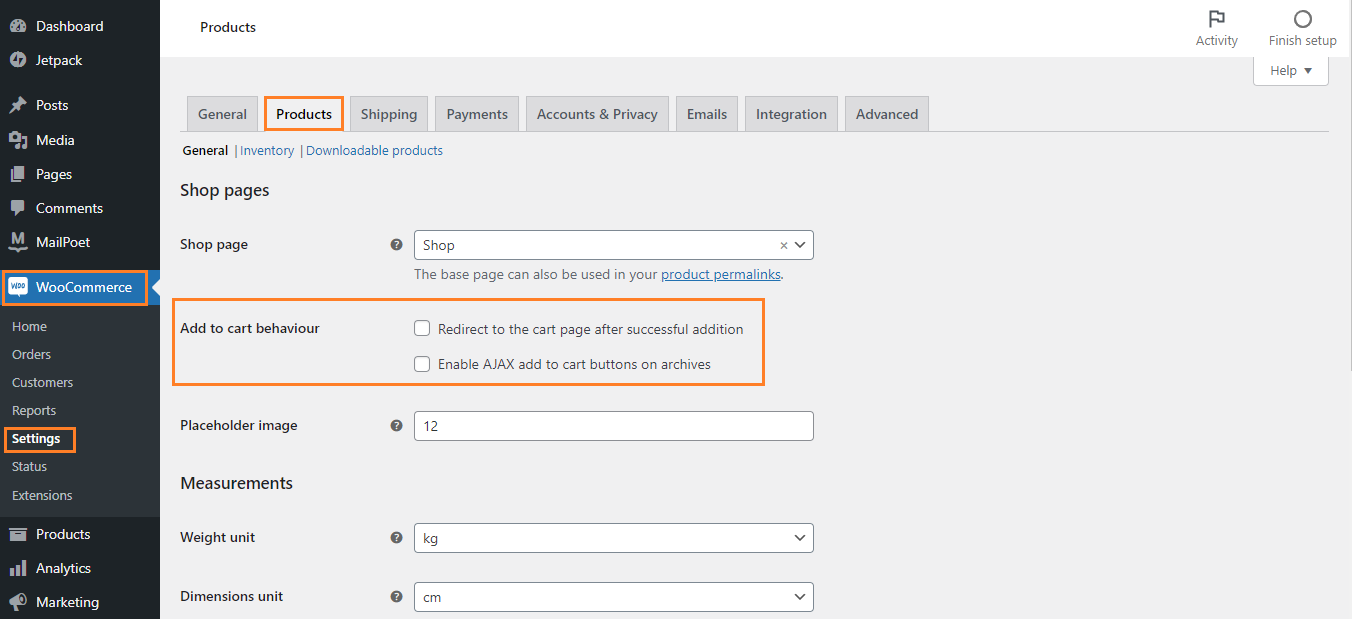
A user can skip the process by directly going straight to the checkout page. Here are some steps to follow:
- Go to the “Setting” option on your WordPress dashboard inside the “WooCommerce” section.
- Click on the “Products” tab. (Dashboard: WooCommerce >> Setting >> Products).
- Uncheck both boxes, “Redirect to the cart page after successful addition” and “Enable AJAX to add to cart buttons on archives” of the “Add to cart behavior” option.
- Now, you need to add a code snippet into the “functions.php” file inside the “theme” folder. This code will add a filter to redirect straight to the checkout page.
add_filter(‘add_to_cart_redirect’, ‘cw_redirect_add_to_cart’);
function cw_redirect_add_to_cart() {
global $woocommerce;
$cw_redirect_url_checkout = $woocommerce->cart->get_checkout_url();
return $cw_redirect_url_checkout;
}
- Once the code is added, click action for redirect operation will be enabled. To change the button tag from “Add to cart” to “Go to checkout,” add the below filter code.
add_filter( ‘woocommerce_product_single_add_to_cart_text’, ‘cw_btntext_cart’ );
add_filter( ‘woocommerce_product_add_to_cart_text’, ‘cw_btntext_cart’ );
function cw_btntext_cart() {
    return __( ‘Go To Checkout’, ‘woocommerce’ );
}
In this way, you can skip the cart page and go straight to the checkout page.
If you are not familiar with coding skills, you can also use the “WooCommerce Direct Checkout” plugin. Install and activate the plugin and allow users direct access to the checkout page.
How to customize your WooCommerce checkout page in WordPress?
When you edit the WooCommerce checkout page, you bring your personality to the page. You can customize via code snippets or with the help of plugins which we’ve discussed below. By default, WooCommerce has the following fields to offer: whichever option you decide.
- Billing details
- First name
- Last name
- Company name
- Country
- Address
- City
- District
- Postcode
- Email address
- Order notes (If any)
You can add or remove fields according to your requirements using the following methods.
Customize the checkout page with a plugin
If you don’t have technical skills or want to perform this task without coding, you can go with the plugins.
WooCommerce Checkout Manager Plugin
The “WooCommerce Checkout Manager” is one of the best plugins to manage the checkout page. It is easy to use and allows you to customize the page.
Install and activate the WooCommerce Checkout Manager Plugin and follow these steps.
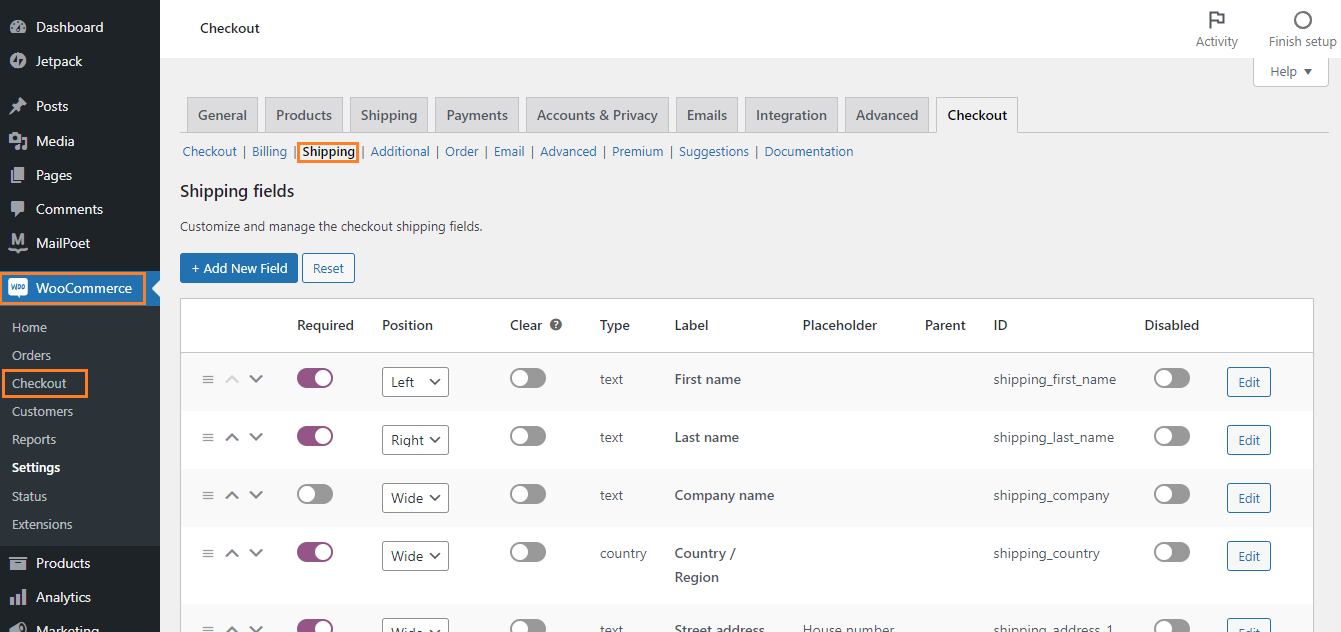
- To add or hide fields, go to the “Checkout” section of the “WooCommerce” dashboard.
- Click on the “Shipping” tab; you will find a list of fields; you can disable or enable any field you want.
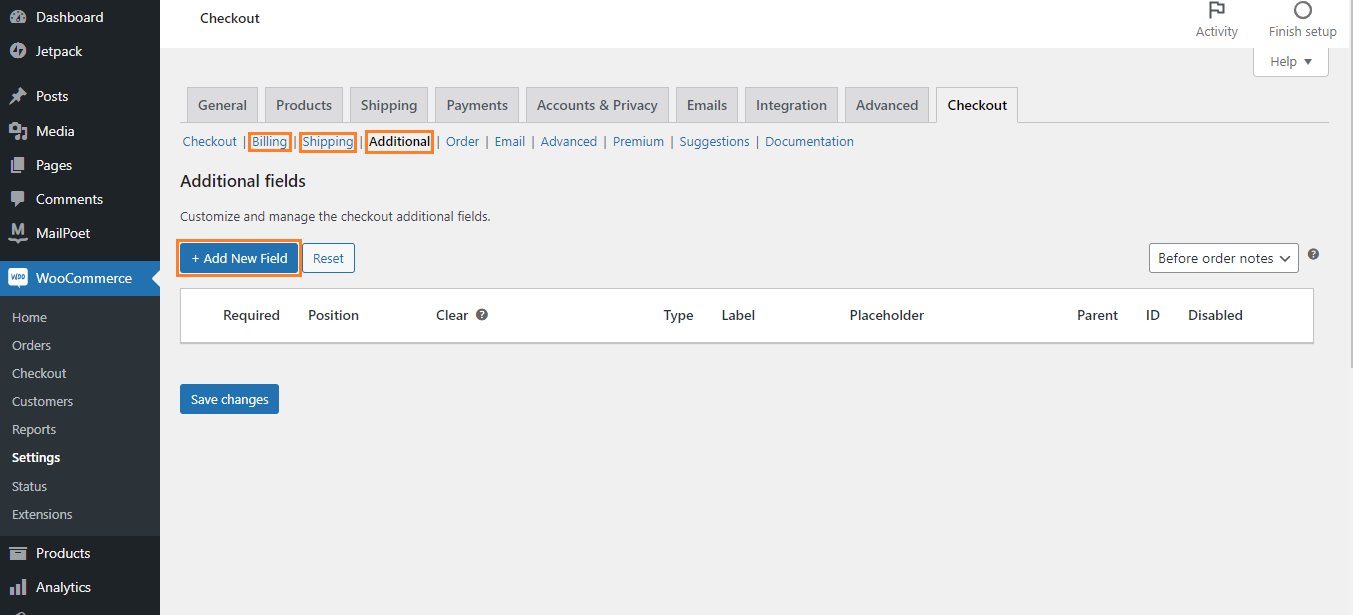
To add custom fields:
- Go to the “Billing,” “Shipping,” or “Additional” tab and click on the “Add New Field” Button and add any custom field you want.
- Once you click on the “Add New Field” button, you will see a form. Fill-up the form according to your field requirement.
- Click on Save.
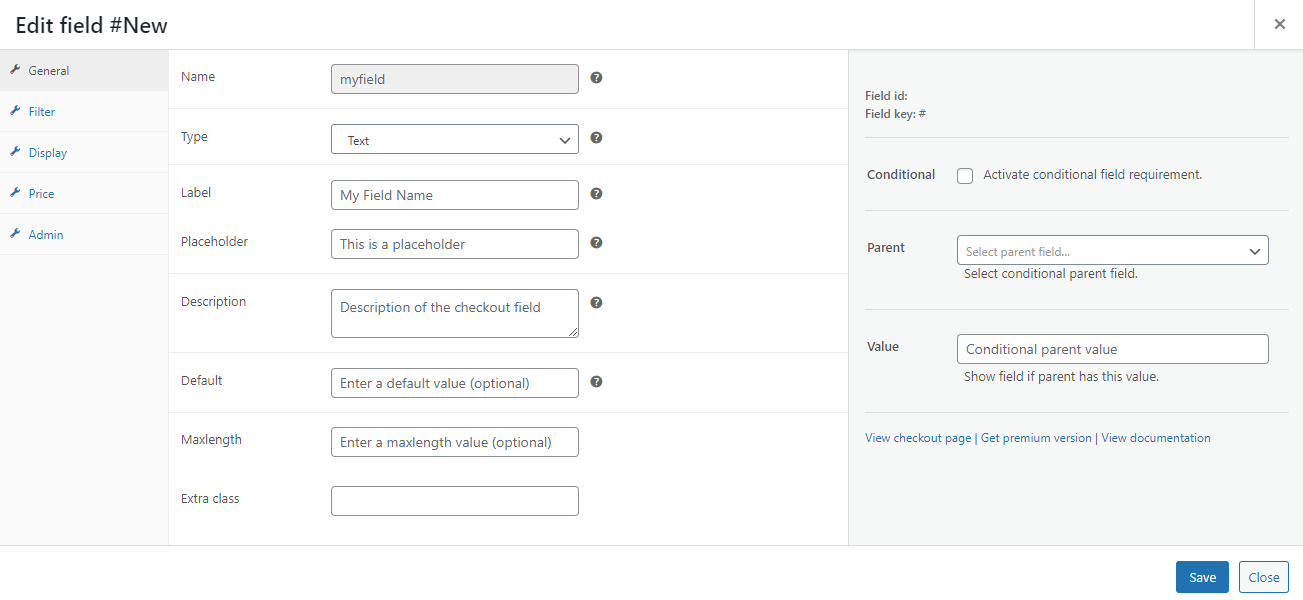
Set filter, display, price, and everything as you want. In this way, using the “WooCommerce Checkout Manager” plugin, you can customize the checkout page.
CartFlows Plugin
The “CartFlows” plugin allows you to optimize your checkout flow. It is a perfect choice for any store.
- Install and activate this plugin and follow these steps to customize the page.
- Go to the “Flows” option of the “CartFlows” section on the dashboard. (CartFlows >> Flows)
- Click on the “Add New” Button.

- It will take you to the all templates list, where you can create a template of your own, or you can choose an already available template and customize it according to your needs.
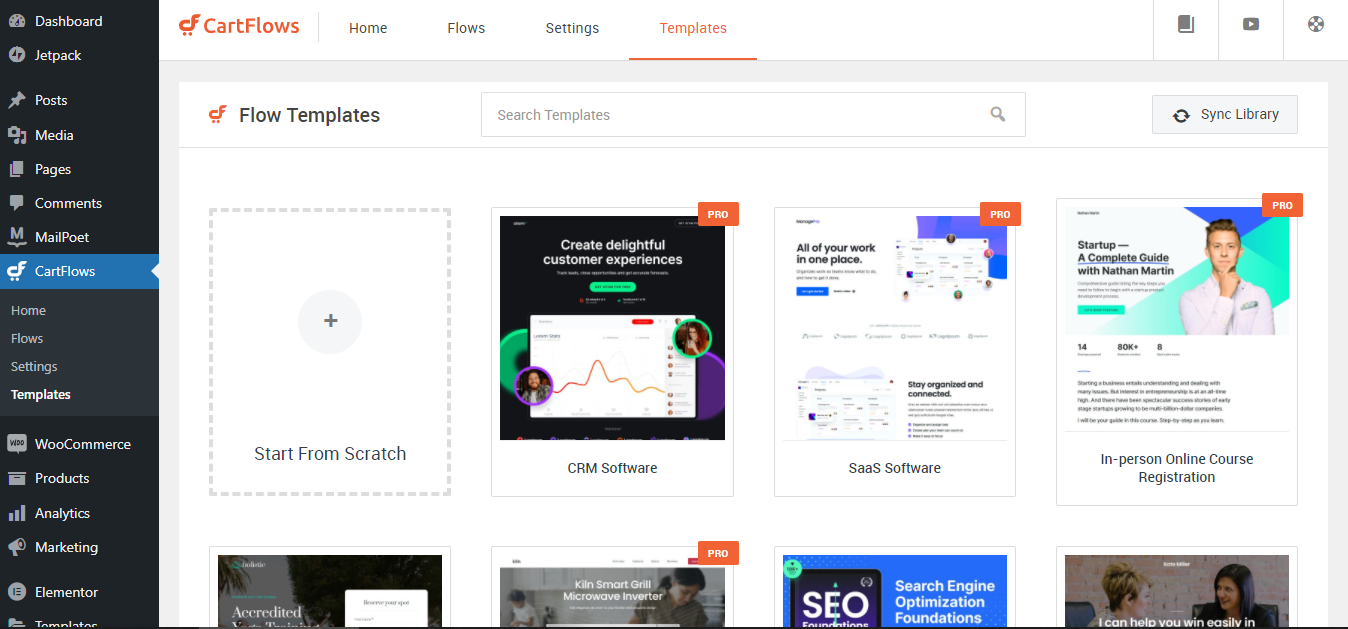
Let’s create or design a page.
- Click on “Start From Scratch”
- Give a name and click on “Design Your Flow.” You will see three pages; you can edit them. Or you can also add new pages by clicking on “Add New Step.”

- To customize the checkout page, click on the Edit option of the checkout page.
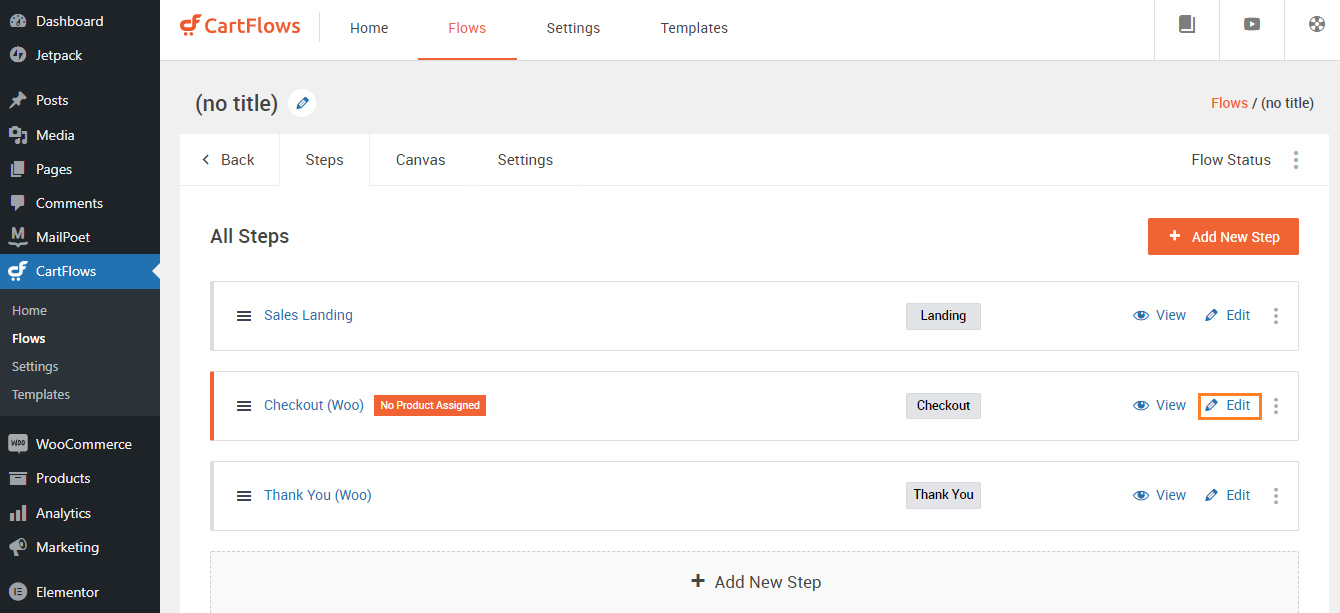
- Now, click on the “Products” tab and check the “Enable Product Options” box. Do not forget to save the changes.
- Click on the “Setting” tab and copy the Shortcode.
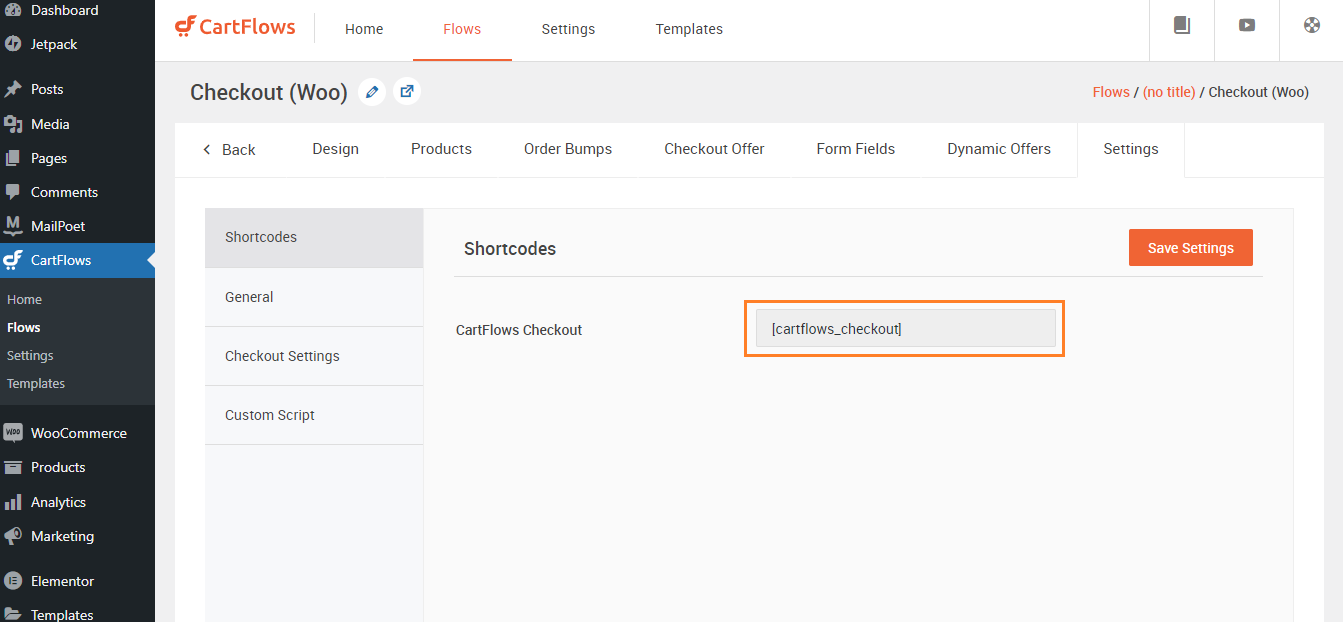
- Now, paste the Shortcode at the page where you want this design to appear.
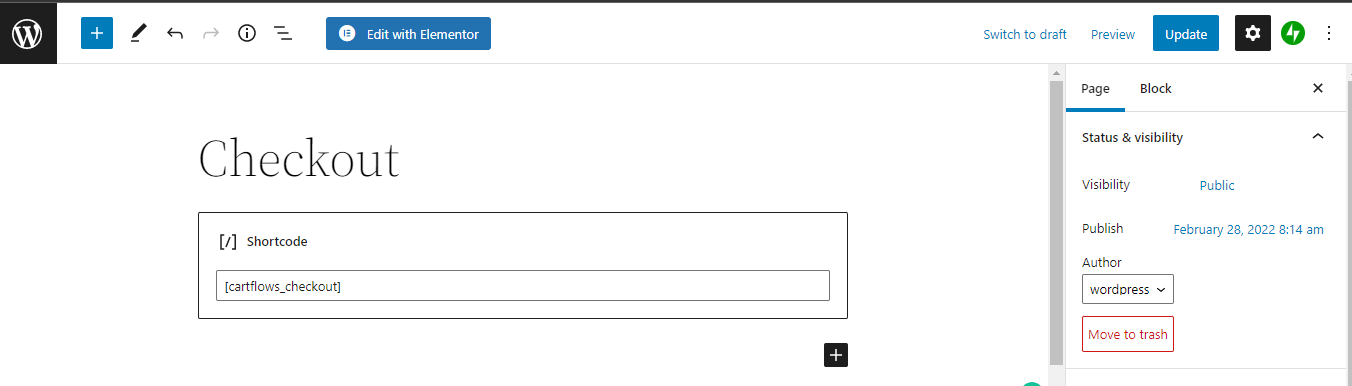
- Hence, your checkout page is designed.
Related: Must have WooCommerce Plugins for You ECommerce Store
Customize the Checkout page with some extensions
WooCommerce Checkout Add-ons
An extension offers paid and free addons for your customization needs. These include:
- Rush fulfillment
- Gift wrapping
- Upsells like stickers or insurance
Additionally, you can add several types of fields to your checkout page. The idea isn’t to create clutter instead of ensuring enough so your customer sticks around to complete the purchase. The fields are:
- Text fields
- Text boxes
- Dropdown or multi-select menus
- Radio buttons or checkboxes
- File uploads
Once you have created your idea page, you can sort and filter orders based on the options set. Such as via delivery date or those marked for immediate dispatch.
WooCommerce One Page Checkout
It’s an extension that can turn any of your product pages into a full-blown checkout page. By the name, it implies it’ll let you in on customization with a single click. The extension eliminates the long and tedious checkout processes by allowing customers to add items to the cart and make payments on the same page. Pretty neat, if we’re honest here?
From a service-based business perspective, you might want to insert checkout fields in your landing page instead.
WooCommerce Social Login
You know those popups that scream, “You shall not pass!”. Lord of the Rings, anyone?
That’s right, those. We feel “Checkout as a guest” is a suitable option but forces the customer. That’s where WooCommerce Social Login swoops in. The site asks you to sign up to complete your purchase.
Log in using your Facebook, Twitter, Google, Amazon, LinkedIn, PayPal, Instagram, Disqus, Yahoo, or VK accounts instead of a new registration.
FOMO Popups
It doesn’t relate to checkout but can help you increase conversions. You can use it to display sale notifications on your site. It’s usually a tactic where the customer fears missing out. Usually, these would say, “Mr. X just purchased the item at this price ($).” And while you may also be inclined like Mr. X to buy the item at the same price. When in truth, there’s no purchase made.
Customize the checkout page with programming (coding)
We will now customize the checkout page via coding by editing the functions.php file inside of themes folder. It is recommended to use a child theme. Follow these steps:
- Add custom fields to the checkout page by adding the following code into your script file. It will help you add custom fields, like radio buttons, checkboxes, etc.
Code for adding check box field:
// checkbox field
add_action( 'woocommerce_after_order_notes', 'quadlayers_subscribe_checkout' );
function quadlayers_subscribe_checkout( $checkout ) {
woocommerce_form_field( 'subscriber', array(
'type' => 'checkbox',
//'required' => true,
'class' => array('custom-field form-row-wide'),
'label' => ' Subscribe to our newsletter.'
), $checkout->get_value( 'subscriber' ) );
}
Code for adding radio buttons field:
// Radio input field
add_action('woocommerce_before_order_notes', 'quadlayers_radio_checkout');
function quadlayers_radio_checkout($checkout3){
woocommerce_form_field( 'feed', array(
'type' => 'radio',
//'required' => true,
'class' => array('custom-field form-row-wide'),
'label' => ' How did you find us?.',
'options' => array(
'Google' => 'Google',
'Friend' => 'Friend',
'Facebook' => 'Facebook',
'Youtube' => 'YoutTube',
'Other' => 'Other'
)
));
}
Likewise, you can add as many fields as you want.
- Now, save the added fields to the databases. Add the following code to the script.
add_action( 'woocommerce_checkout_update_order_meta','quadlayers_save_function' );
function quadlayers_save_function( $order_id ){
if ( ! empty( $_POST['subscriber'] ) ) {
update_post_meta( $order_id, 'subscriber', sanitize_text_field( $_POST['subscriber'] ) );
}
if ( ! empty( $_POST['feed'] ) ) {
update_post_meta( $order_id, 'feed',sanitize_text_field( $_POST['feed'] ) );
}
}
- Make unnecessary fields optional by adding this code snippet.
add_filter( 'woocommerce_billing_fields', 'wc_address_field_optional');
function wc_address_field_optional( $fields ) {
$fields['billing']['billing_address_1']['required'] = false;
return $fields;
}
- Add content to the page.
Adding Image to the checkout page:
add_action('woocommerce_review_order_before_submit','quadlayers_checkout_content');
function quadlayers_checkout_content(){
echo <img src="https://www.heresylab.com/wp-content/uploads/2019/01/paypal-1.png"/>;
}
Adding heading to the checkout page:
add_action(woocommerce_checkout_before_customer_details
,'quadlayers_checkout_header');
function quadlayers_checkout_header(){
echo "
This is a custom Header
";
}
- You can also use shortcode here in functions.php file to add a page.
add_action('woocommerce_after_checkout_form','quadlayers_checkout_shortcode');
function quadlayers_checkout_shortcode(){
echo do_shortcode('[woocommerce_cart]'); }
- Edit the WooCommerce checkout page with custom CSS.
add_action( 'wp_enqueue_scripts', 'quadlayers_enqueue_css' );
function quadlayers_enqueue_css(){
    wp_enqueue_style(  'checkout_style',
        get_stylesheet_directory_uri() . '/checkout-style.css'
    );
}
Frequently Ask Questions
How to edit the WooCommerce checkout page for free?
You can use the checkout field editor; it is a tremendous WooCommerce checkout manager plugin that allows you to add, update, delete checkout fields in just a few clicks. Moreover, you can add core fields such as billing, shipping, additional fields, and more.
How to edit the WooCommerce checkout page using Elementor?
To do this, you must edit your WooCommerce Checkout page using the Elementor Editor.
Is there any WooCommerce checkout page template plugin?
WooCommerce Checkout Manager permits you to customize the checkout process, reducing or including order fields collected. Our plugin can consider your billing data inside the checkout page and recover all data required by your company process.
Conclusion
WooCommerce is the leading eCommerce platform globally because they offer many great themes, plugins, and extensions.
WooCommerce has a vast community, so users directly go to the community and ask their questions whenever they have any queries. Within minutes, they will get the answers according to their queries.
One of the reasons millions of people are using WooCommerce for their online store is because it gives many useful features other than checkout.
This article is wholly based on WooCommerce checkout fields. When it comes to the checkout, you can deal with the fields either using a plugin or code.
I have mentioned both ways to work with WooCommerce checkout fields you can check and choose according to your requirements.


Related Tutorials


WooCommerce vs Magento vs Shopify: Which is your best ecommerce platform in 2024?