- What is SSL?
- Types of SSL Certificate
- Which SSL Certificate is Suitable for Your WordPress Website?
- What to Do Before Installing SSL Certificate on Your Website?
- How to get an SSL Certificate?
- How to Add SSL Certificate to your WordPress Website?
- How to Properly Move WordPress from HTTP to HTTPS?
- How to Renew an SSL Certificate?
- Conclusion
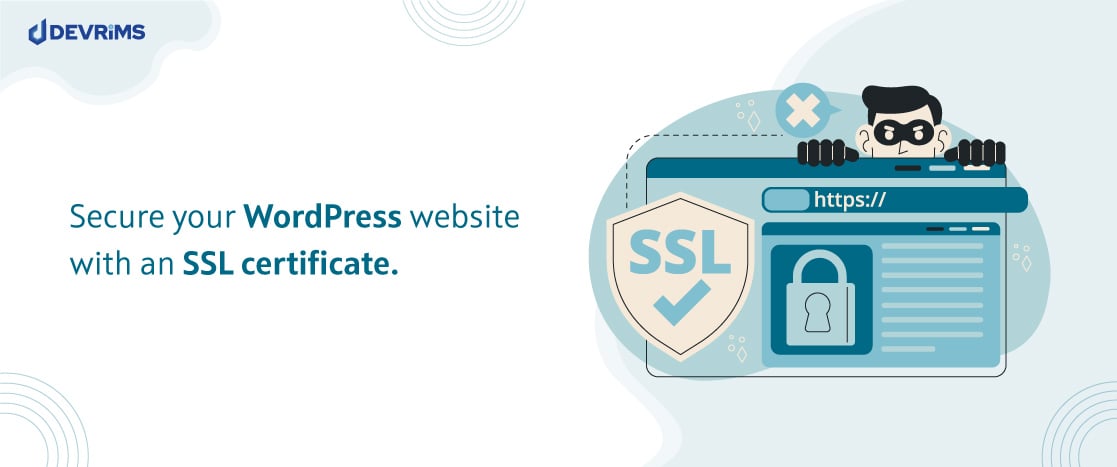
Are you losing the trust of your website users because of security issues? And you want to gain their trust back and make your website trustworthy. Are you looking to move your WordPress website from HTTP to HTTPS but wondering how to do it on your WordPress website? If yes, then you are in the right place. Here is a guide to quickly install an SSL Certificate on your WordPress website in 2024.
You might already know the significance and priority of HTTPS URLs in SERPs. Google announced that the Chrome browser would mark all websites without HTTPS/SSL as insecure. In the previous blog, we discussed SSL and its importance in detail. This article will help you learn how to install an SSL certificate on your website in various ways.
- What is SSL?
- Types of SSL Certificate
- Which SSL Certificate is Suitable for Your WordPress Website?
- What to Do Before Installing SSL Certificate on Your Website?
- How to get an SSL Certificate?
- How to Add SSL Certificate to your WordPress Website?
- How to Properly Move WordPress from HTTP to HTTPS?
- How to Renew an SSL Certificate?
- Conclusion
What is SSL?
SSL is an abbreviation for Secure Sockets Layer. It is a technology that is used to secure data over the internet. When a user tries to communicate with a server, SSL encrypts their information, provides users with security, and helps build clients’ trust. The main goal of installing an SSL certificate on a website is to provide secure and encrypted data transit between the user’s PC and the website server over the Internet.
It’s not just about securing the website; it’s also about ensuring the security of user data through data encryption between the server machine and the user browser. It’s a security protocol that establishes secure connections between the browser and the server. As a result, server-client communication becomes entirely secure. The SSL certificate secures your website, helps you earn client trust, and improves your search engine ranking.
The security system requires each participant’s authentication and encrypts all messages transmitted back and forth, ensuring no outsiders can access the conversation.
Types of SSL Certificate
There are three different SSL certificates to protect your website with easy management.
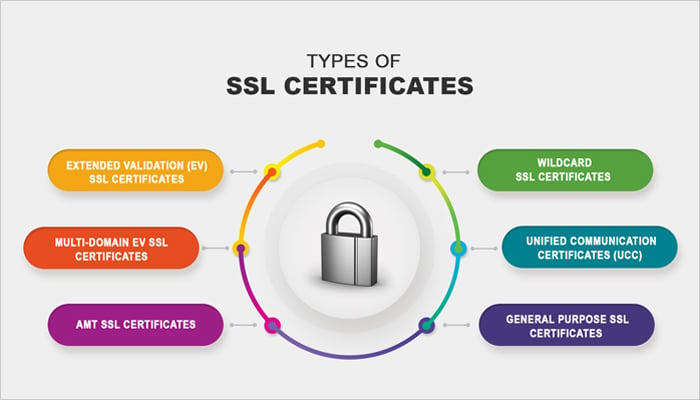
Single Domain SSL Certificates
It is self-explanatory and valid for a fully qualified domain name (FQDN). This certificate contains only one Single Alternative Name (SAN) field and refers to a single domain name like example.com or www.example.com.
Note: Single Domain SSL Certificate supports both www and non-www URLs. Both URLs will be considered as a single domain.
Multi-Domain SSL Certificates
This certificate aims to make a single SSL certificate for multiple domain names. Subject Alternative Name (SAN) and Unified Communication Certificate (UCC) are two terms used to describe Multi-Domain SSL. A Multi-Domain SSL certificate protects multiple domains, which might be top-level domains or subdomains. The Multi-Domain SSL typically includes 250 domain names; however, the exact quantity depends on the certificate authority.
Wildcard SSL Certificate
This certificate protects all subdomain names under a single top-level domain name. It enables users to use a single certificate for a primary domain and its subdomains. For example, a wildcard SSL certificate for *.example.com would secure blog.example.com, store.example.com, www.example.com, and other subdomains.
Which SSL Certificate is Suitable for Your WordPress Website?
Which SSL certificate is suitable for your WordPress website depends on your needs. A single SSL certificate is cost-effective with full security coverage if you have one domain name and no plans to add any subdomains or other domain names.
Multi-Domain SSL is a fantastic choice if you have multiple domain names and want cost-effective security coverage and simple management tools.
Suppose your organization or corporation wants Extended validation using a wildcard SSL certificate. In that case, it is a little more complicated because a wildcard certificate provides complete coverage of unlimited sub-domains under one primary domain name without extended validation. Wildcard SSL is the ideal option if you don’t want extended validation and have a separate subdomain associated with a single primary domain name in use.
What to Do Before Installing SSL Certificate on Your Website?
Securing your website with an SSL certificate ensures that your visitors’ data will remain private. Before installing a new SSL certificate, do these things first:
Confirm if you already have an SSL certificate:
Check with your web host if your plan includes a free or paid SSL certificate.
Back up your website:
Create a complete WordPress site backup before making significant changes, like installing an SSL certificate, to avoid potential issues.
Understand your SSL certificate options:
As we discussed above, there are three types of SSL certificates. Understand which one is a good fit for your website.
Check if you need extra configuration:
Some hosting setups require additional configuration, like updating settings or installing an intermediary certificate. Check documentation to know exactly what your host and domain need.
How to get an SSL Certificate?
There are a few steps you should follow to get an SSL Certificate.
- Before applying for an SSL certificate, you must verify your website’s information.
- You can verify the website’s information using the ICANN Lookup tool.
- Then, Generate Certificate Signing Requests (CSR) via Server or cPanel.
- Submit the CSR to the Certificate Authority (CA) for domain validation.
- Install the SSL on your website.
How to Add SSL Certificate to your WordPress Website?
There are various ways to install SSL on different servers. Here, we will show you how to install SSL via cPanel and Devrims Hosting.
Install SSL Certificate via cPanel
You can install an SSL certificate via cPanel in two different ways.
- Let’s Encrypt SSL Certificate
- Generate CSR
Let’s Encrypt SSL Certificate
Follow these steps to install a free Let’s Encrypt SSL Certificate on your cPanel.
- Go to your cPanel dashboard.
- Then, click the Let’s Encrypt SSL icon in the Security section.
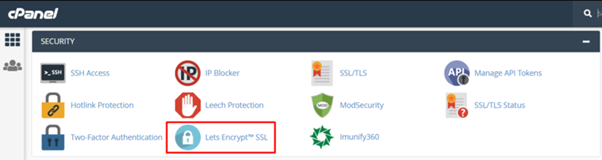
Contact your hosting provider if you cannot find the Let’s Encrypt SSL icon in your cPanel security section.
- Go to the “Issue a new certificate” section and click the “+issue” button for the domain you want to secure.
- Select your domain (www and non-www) and mail server (example.com) options. Then, choose HTTP-01 as the validation method.
- Once you finish all these things, click on the issue button.
It will take a little while for installation.
Certificate Issuance via Generating CSR
To generate CSR, follow these steps.
- Login to your cPanel dashboard and go to the security section.
- Click on the SSL/TSL icon (Upon clicking, you will be redirected to the SSL/TLS Manager page).
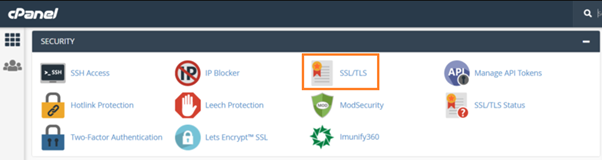
- Click “Generate, view, or delete SSL certificate signing requests” inside Certificate Signing Request.
- Fill in all the fields like certificate type, domain name, etc.
- Once all the data is filled, click the “Generate” button.
The CSR file is generated successfully and will be used for SSL certificate issuance. Certificate Authority (CA) will ask you for some verification factors to confirm the website’s ownership. The public key of the CSR code will be sent to the certificate authority with other required details. After completing the validation process, CA will issue an SSL certificate for you. You will receive an email to complete the installation.
Once the SSL certificate is installed successfully, a padlock on the browser shows a secured sign. If no padlock is showing, you need to verify if the SSL is installed successfully or not. To verify, kindly visit Devrims KB on How to Verify After an SSL is Installed.
How to Add an SSL Certificate to your WordPress Website with Devrims
Devrims provides a free SSL certificate in one click to secure your website and make it trustworthy. Follow this guideline to install an SSL Certificate with Devrims.
How to Properly Move WordPress from HTTP to HTTPS?
Once the certificate is installed in your website hosting server, redirect the domain name from default http to https, like http://example.com/ to https://example.com/. The certificate will not work without the https rule; users will still see the insecure domain warning. A secure HTTPS connection is necessary to protect the data.
Setup HTTPS in WordPress Using a Plugin
It is easy to apply https to your WordPress website domain name. One who does not have enough coding knowledge can redirect the domain name to https without facing difficulty. Many plugins are available to install WordPress SSL, like Really Simple SSL, Cloudflare Flexible SSL, WP Force SSL, etc.
Let’s configure the SSL certificate using one of these plugins. We will do this with the Really Simple SSL plugin:
- You need to install and activate the plugin first.
- Go to the Plugins section on your WordPress dashboard and click the “Add New” button.
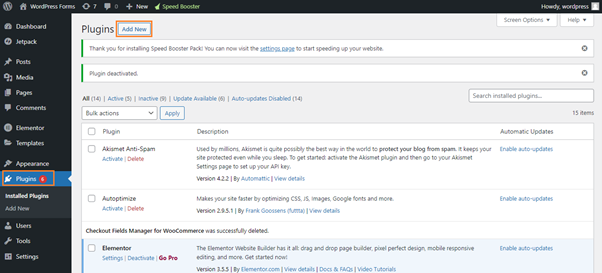
- Then search for the required plugin and click on the install button.
- Once installation is completed, click on activate.
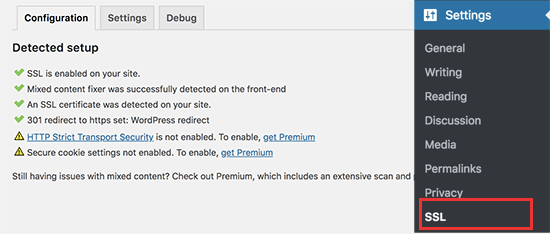
- After activation, go to the SSL option of the settings section on your WordPress dashboard. (Settings >> SSL). It will automatically detect the SSL certificate and set up your website to HTTPS.
This plugin will take care of everything like
- Checking the SSL certificate
- Set WordPress to use HTTPS in the URL
- Taking care of errors
- Redirects HTTP to HTTPS
Note: The plugin uses the output buffering approach to try to fix mixed content issues. Because it replaces material on the site as the page loads, it may have a detrimental performance impact. This effect is only seen on the initial page load, and if you use a caching plugin, it should not be essential.
While the plugin claims that you can preserve SSL while securely deactivating the plugin, this isn’t entirely true. Because deactivating the plugin will result in mixed content errors, you must keep it running at all times.
Setup HTTP to HTTPS in WordPress Manually
You can manually apply the http to https rule on your WordPress website by editing WordPress files. You can use this method for a permanent solution with more optimization.
If you do not have technical skills, you can go for the first method, or if you want an optimized permanent solution, you can hire a WordPress developer. Let’s start.
- Go to the Settings >> General section and update the WordPress website URL address. Replace http with https.
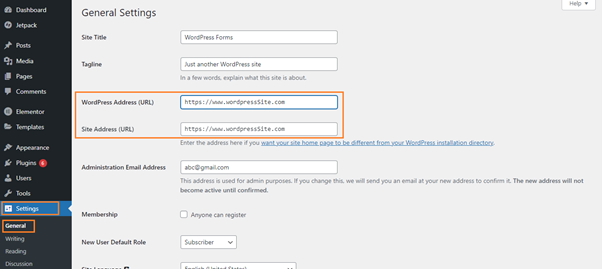
- Remember to click the ‘Save changes‘ button to save your changes.
- WordPress will log you out and ask you to re-login once the adjustments are saved.
- Then, in your .htaccess file, add the following code to set up WordPress redirects from HTTP to HTTPS.
RewriteEngine On
RewriteCond %{HTTP:X-Forwarded-Proto} !https
RewriteRule ^(.*)$ https://%{HTTP_HOST}/$1 [R=301,L]
If you’re using Nginx servers (which most people aren’t), you must add the following code to your nginx.conf file to convert from HTTP to HTTPS and must restart the Nginx after adding the below code:
if ($server_port = 80 ) {
return 301 https://$host$request_uri;
}
Note: Here, I have used mydomain.com as an example. So, you replace mydomain.com with your actual domain.
WordPress will not load the whole website with https. You need to configure SSL in the wp-admin.php file if you want to force your site to be loaded with https.
Add the following code to the wp-admin.php file to do that.
define('FORCE_SSL_ADMIN,' true);
Your website is now ready to use SSL/HTTPS but will show mixed content errors. Stylesheets, images, and other sources are the reason for these errors because they are still loading with HTTP in the URL, which is insecure.
But how will you know if something like that happens? You cannot see the padlock icon in your website address bar. Sometimes, you can see the padlock icon in the browser’s address bar with a notification because some modern browsers block insecure and unsafe resources.
You can use the inspect tool to know which resource or script is causing the error. You will see some warnings in the console with details of mixed content items that show the insecurity errors, as shown in the figure below.
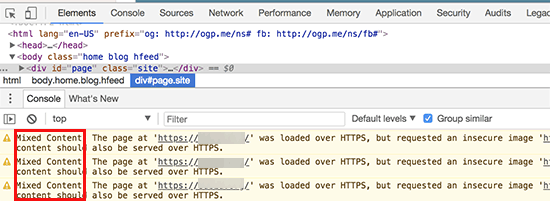
Mixed Content Errors can occur in any part of the WordPress website, such as database, theme, plugins, etc. Most of your website’s data, like images, embeds, files, and other data causing the error of mixed content and incorrect URLs, is stored in your WordPress database.
If you are getting these mixed content errors, follow this complete guide on resolving mixed content issues in WordPress.
How to Renew an SSL Certificate?
Everything is supposed to have an expiry date, so is your WordPress SSL certificate. Let’s see how you can renew an SSL Certificate. Follow the steps given below.
Renew SSL Certificate via cPanel.
- First, sign in to the cPanel dashboard.
- Go to the security section and click SSL/TSL or Let’s Encrypt SSL Certificate.
- You will see Expiring Certificates there. There will be an option “Renew Now” on the expiring certificates page; click on that.
Renew SSL Certificate with Devrims
There is a toggle button for auto-renewal that is auto-enabled by default. It will automatically renew the SSL before it expires. If the toggle button is disabled, you can go to your application and enable it for auto-renew.
Conclusion
Setting an SSL certificate on WordPress sites is not as tough as it sounds. We have mentioned steps that you can follow to add SSL to your WordPress website. I hope this article helped you add SSL and HTTPS to your WordPress website and make your site secure and trustworthy.

Related Tutorials