Are you a developer or a beginner eager to explore WordPress?
Whether you’re building a blog, a business website, or an e-commerce store, starting with WordPress locally is a smart and efficient way to get started. In this guide, we’ll walk you through installing WordPress on localhost using the popular XAMPP server software. By the end of this article, you’ll be confidently working with WordPress on your local host, enabling rapid development and testing without the need for a live web server. Let’s get started!
What is meant by localhost?
The computing phrase “localhost” essentially refers to “this computer,” which is the one you are currently using. It describes a WordPress installation in which the complete website is hosted on the computer you are using to view the complete website is hosted on the computer you are using to see it.
This is not how most people browse. A host server, which is essentially a powerful computer tasked with transferring all of the files to be displayed as websites, sends the data to your computer over the internet when you use a browser to access a website. On the other hand, when you browse a localhost website installation, all of the files required to show the website originate from your computer. However, no one else has access to the webpage, thus it isn’t public.
What is the purpose of localhost? It’s a chance to design and test a draft website without having to pay for WordPress hosting just yet.
The advantages of WordPress installation locally
Installing WordPress locally offers greater privacy and allows you to experiment with different settings. This helps expedite the development and testing of your website.
You won’t need to use an FTP connection to get to a web hosting server because all of the files are stored locally; in fact, you won’t even need an internet connection.
Why Install WordPress on Localhost?
Before we dive in, let’s quickly address why you should consider installing WordPress locally:
- Safe Testing Environment: Experiment with themes, plugins, and code without the risk of breaking your live site.
- Fast Development: Local sites run faster since they don’t rely on internet connectivity.
- Offline Work: Develop your site anytime and anywhere, with or without an internet connection.
- Learning Purposes: If you’re a beginner, this is the perfect playground to enhance your WordPress skills.
How To Setup WordPress On Localhost
To install WordPress on localhost you’ll need a local server environment and XAMPP is one of the most popular and easy-to-use options. XAMPP stands for Cross-Platform (X), Apache (A), MySQL (M), PHP (P) and Perl (P). It’s a free and open-source solution that mimics the server environment on your personal computer.
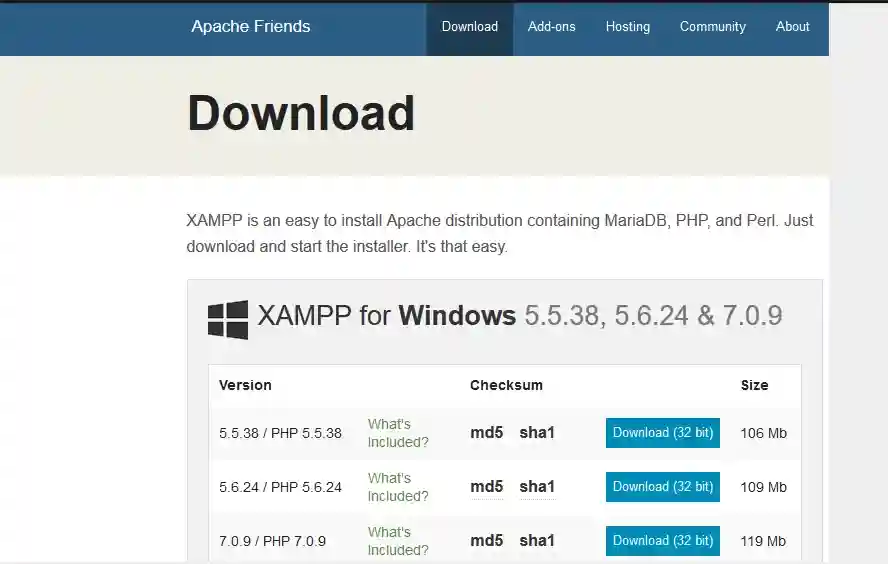
Step 1 : Download And Install XAMPP
- Download the version of XAMPP compatible with your operating system.
- Follow the installation prompts. Keep the default settings for a smooth installation process.
- Launch XAMPP Control Panel in C: drive and start the Apache and MySQL modules.
Step 2: Download and Setting Up WordPress
Next, you’ll need the WordPress files:
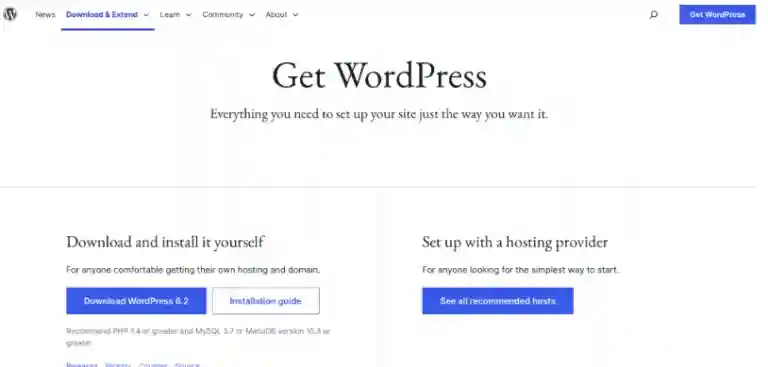
- Visit WordPress.org and download the latest version of WordPress.
- Once downloaded, unzip the WordPress folder.
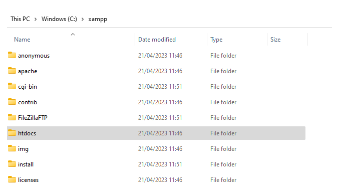
- Transfer that WordPress folder to the XAMPP htdocs folder and rename that folder (e.g. demo)
- The directory looks like [C: drive / Xampp / htdocs / WordPress folder(demo)]
Step 3: Create A Database For WordPress
- Open Xampp Control Panel and start Apache and Mysql
- On Google web browser type http://localhost/phpmyadmin/ and press ENTER
- In the phpMyAdmin dashboard click on the ‘Databases’ tab.
- Create a new database for WordPress (demo) the folder name you created in Xampp /htdocs
- Click ‘Create’.
- Your website database has been created.
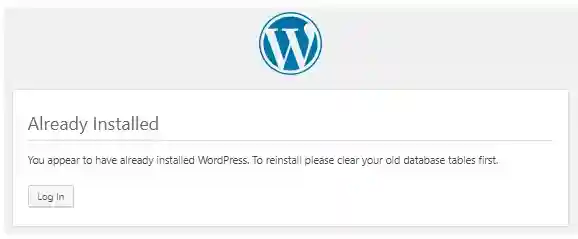
Step 4: Run The Installation of WordPress
- In the Google web browser visit http://localhost/demo/wp-admin
- You should be greeted with the WordPress installation page.
- Choose your language and click ‘Continue’.
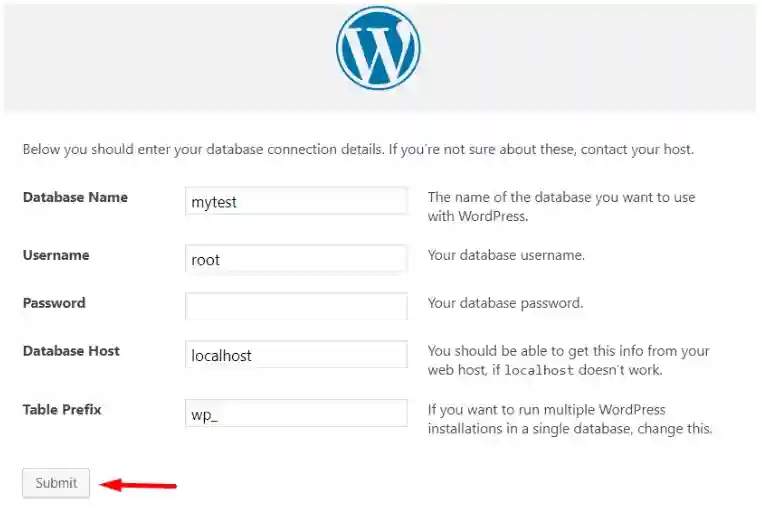
- Fill in the database details:
- Database Name: The name you created in phpMyAdmin (demo).
- User Name: Default is ‘root’.
- Password: Leave this blank for localhost.
- Database Host: Keep the default local host.
- Table Prefix: Leave it as it is or change it if you’re running multiple WordPress installations on a local server.
- Click ‘Submit’ followed by ‘Run the installation’.
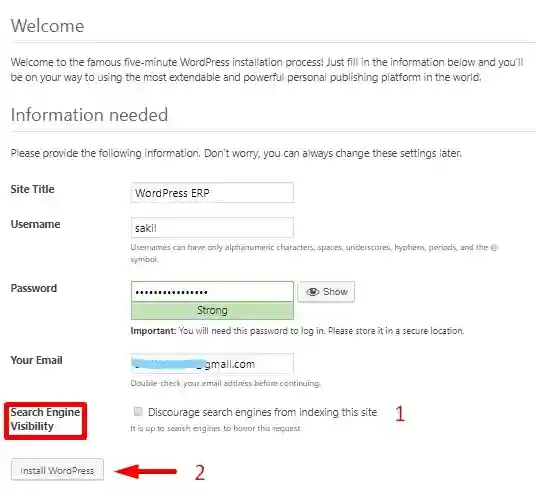
- Enter your chosen site title, username, password, and email for your WordPress site’s admin account.
- Click ‘Install WordPress’.
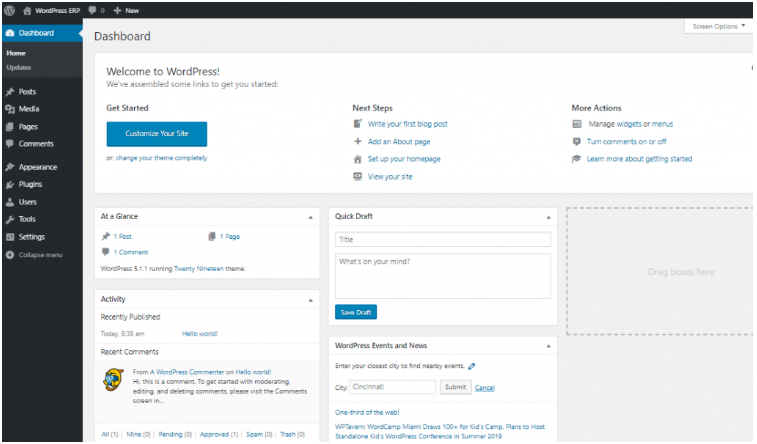
Congratulations! You now have a local WordPress site running on XAMPP
Step 5: Check the Local Site You Built
Your local test site is ready! Go to http://demo/foldername/wp-admin and log in with the credentials you created earlier to access the WordPress dashboard.
Running a WordPress site typically requires a hosting plan and domain name. However, for testing or learning, installing WordPress on your local host is a great solution.
Here’s a quick recap on how to do it:
- Download XAMPP.
- Install XAMPP on your computer.
- Download the latest version of WordPress.
- Create a local database in phpMyAdmin.
- Install WordPress on localhost.
- Check your local test site in the Google web browser.
Enhancing Your Local WordPress Site
Now that your WordPress site is set up locally, it’s time to start experimenting. Install themes and plugins, customize your site, and develop new features all without the fear of breaking a live website. Once you’re comfortable with your changes and ready to go live, you can migrate your local site to a web server. Remember to back up your website regularly, even when working locally, to avoid losing your progress.
A Final Note for Beginners
As a new developer, you might find the learning curve a bit steep at first. However, working with WordPress on localhost is a great way to gain valuable experience. Don’t hesitate to use forums, developer communities, and online resources to help you along the way and continuously improve your skills.
FAQs
Is XAMPP only for PHP?
Apache Friends created XAMPP, a completely open-source, cross-platform internet server solution stack bundle that primarily consists of the MariaDB database, the Apache HTTP Server, and interpreters for PHP and Perl scripts.
Can I install WordPress offline?
WordPress can indeed be installed offline. To accomplish this, you must first install a local server setup on your computer, such as XAMPP, WAMP, or MAMP, and then download the most recent version of WordPress from wordpress.org.
Do I need MySQL for XAMPP?
XAMPP makes local web development and database administration easier by offering an intuitive, pre-configured environment that comes with MySQL, Apache, and PHP.

Related Tutorials