- What is Redis & How Does it Work?
- Benefits of Redis
- Before You Enable Redis Cache Support
- Method 1: Install and Configure Redis on Devrims
- Method 2: Install and Configure Redis using Redis Object Cache Plugin
- Method 3: Install and Configure Redis using W3TC Plugin
- Test Redis Object Cache Response via SSH Terminal
- Frequently Ask Questions
- Fully Managed Magento Hosting
- Fully Managed Magento Hosting
- Final Words
In today’s fast-growing digital world, website speed plays an important role in attracting and retaining visitors. Slow-loading websites not only frustrate users but also have a negative impact on search engine rankings. If you’re running a WordPress website, leveraging the Redis cache is one effective way to enhance its performance.
Redis is an open-source caching solution that significantly boosts your WordPress site’s speed and efficiency. By storing frequently accessed data in memory, Redis minimizes the need to query the database repeatedly, resulting in faster response times and improved overall performance.
This tutorial will guide you through the process of installing and configuring Redis cache to accelerate your WordPress website. Whether you’re an experienced developer or a WordPress enthusiast, this step-by-step tutorial will provide you with the necessary knowledge about the power of Redis and optimize your website’s performance.
- What is Redis & How Does it Work?
- Benefits of Redis
- Before You Enable Redis Cache Support
- Method 1: Install and Configure Redis on Devrims
- Method 2: Install and Configure Redis using Redis Object Cache Plugin
- Method 3: Install and Configure Redis using W3TC Plugin
- Test Redis Object Cache Response via SSH Terminal
- Frequently Ask Questions
- Fully Managed Magento Hosting
- Fully Managed Magento Hosting
- Final Words
What is Redis & How Does it Work?
Redis stands for Remote Dictionary Server, an open-source, in-memory data structure store. It is a high-performance caching system that can significantly improve the speed and efficiency of data retrieval for applications and websites. Redis is often used as a caching layer to reduce database load and response times.
At its core, Redis operates as a key-value store, where data is stored in memory and can be accessed easily. This in-memory nature makes Redis exceptionally fast, as it avoids the disk I/O operations that are typically slower. By keeping frequently accessed data in memory, Redis minimizes the need to fetch information from other sources, such as databases or APIs.
Redis supports various data structures, including strings, lists, sets, sorted sets, hashes, and more. This versatility allows developers to store and manipulate data in different formats, making Redis suitable for a wide range of use cases.
When a request is made to retrieve data, Redis checks if the requested information is already stored in memory. If it is, Redis quickly returns the data, bypassing the need for time-consuming database queries. If the data is not present in memory, Redis can be configured to fetch it from the database and store it for future requests, effectively creating a cache.
Furthermore, Redis offers advanced features such as data expiration, which allows you to set an expiration time for cached data. This ensures that the cache remains fresh and relevant, as expired data is automatically removed.
Additionally, Redis provides support for replication and clustering, allowing you to create high-availability setups and distribute data across multiple Redis instances. This enables scalability and fault tolerance for applications that require robust caching solutions.
Overall, Redis is a robust in-memory data store that operates as a cache, storing frequently accessed data to accelerate application and website performance. Its fast response times, versatile data structures, and advanced features make it a popular choice for optimizing data retrieval and improving overall system efficiency.
Benefits of Redis
Redis offers various benefits that make it a preferred choice for caching and improving the performance of applications and websites. Here are some key advantages of using Redis:
- High Performance: Redis is designed to deliver exceptional performance. Redis minimizes the need for disk I/O operations by storing data in memory, resulting in faster data retrieval and response times. Its in-memory nature enables Redis to handle high read and write loads efficiently, making it ideal for caching frequently accessed data.
- Low Latency: With its ability to retrieve data from memory quickly, Redis offers low latency, ensuring that applications and websites respond promptly to user requests. By reducing the time required to fetch data, Redis helps improve user experience by delivering near-instantaneous results.
- Versatile Data Structures: Redis supports a wide range of data structures, including strings, lists, sets, sorted sets, hashes, and more. This flexibility allows developers to store and manipulate data in a format that best suits their application’s requirements. The rich set of data structures provided by Redis enables efficient data modeling and simplifies complex operations.
- Caching Capabilities: Redis is commonly used as a caching layer to reduce the load on databases and external APIs. Redis acts as a fast and efficient cache by storing frequently accessed data in memory. This significantly improves response times and reduces the strain on backend systems, enhancing overall application performance.
- Pub/Sub Messaging: Redis includes a publish/subscribe (pub/sub) messaging system, allowing for real-time communication between components of an application. This feature is valuable for building event-driven architectures and implementing features such as real-time notifications, chat systems, and distributed messaging.
- Persistence: Redis provides options for data persistence, allowing you to store data on a disk and recover it in case of system failures or restarts. Redis offers reliability and resilience for critical data by combining in-memory speed with data durability.
- Scalability and Replication: Redis supports replication and clustering, enabling horizontal scaling and fault tolerance. With replication, you can create multiple Redis instances, distributing the workload and providing high availability. Clustering allows you to scale Redis across multiple nodes, accommodating larger datasets and handling increased traffic.
- Extensive Ecosystem: Redis has a thriving ecosystem with a wide range of client libraries and integrations available for various programming languages and frameworks. This makes incorporating Redis into your existing application stack easy and leverages its capabilities without extensive retooling.
With these benefits, Redis empowers developers to build high-performance applications that deliver exceptional user experiences, handle high loads, and scale effectively. Its versatility and rich feature set make it a valuable tool for optimizing data access and improving overall system efficiency.
Before You Enable Redis Cache Support
Before enabling Redis cache support for your WordPress website, you should complete a few essential tasks to ensure a smooth integration. Taking these steps before beginning the process will help you avoid potential issues and maximize the benefits of Redis cache. Here are the things to do before enabling Redis cache support:
- Verify Redis Compatibility
- Backup Your WordPress Website
- Update WordPress and Plugins
- Understand Redis Cache Settings
- Evaluate Existing Caching Solutions
- Test Redis Integration in Staging Environment
- Monitor Resource Usage
- Plan for Cache Invalidation
Method 1: Install and Configure Redis on Devrims
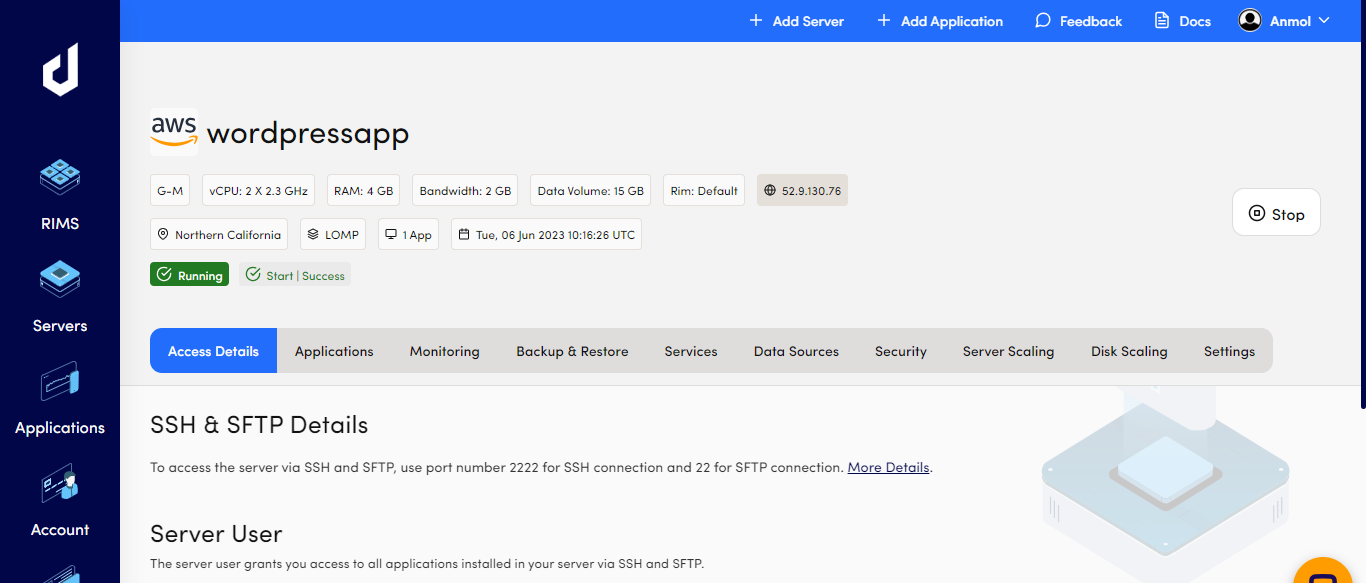
To install and configure Redis on Devrims, go to the devrims user dashboard and navigate to your server.
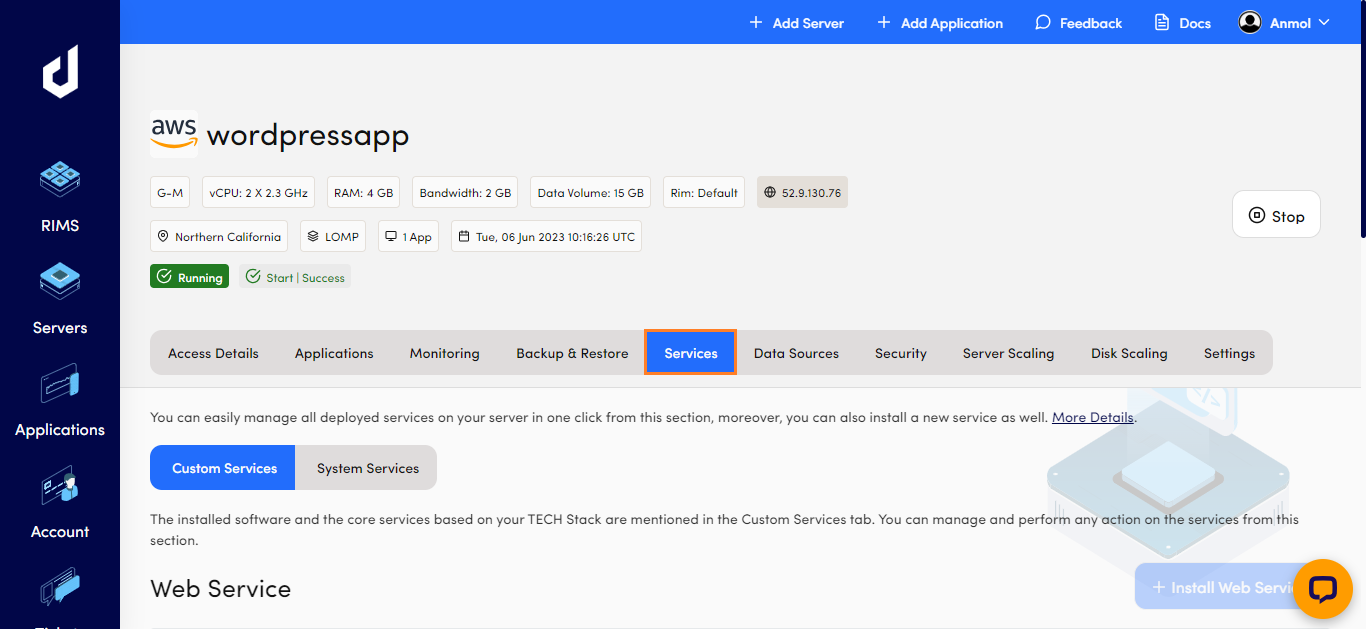
Now, click on the “Services” tab.
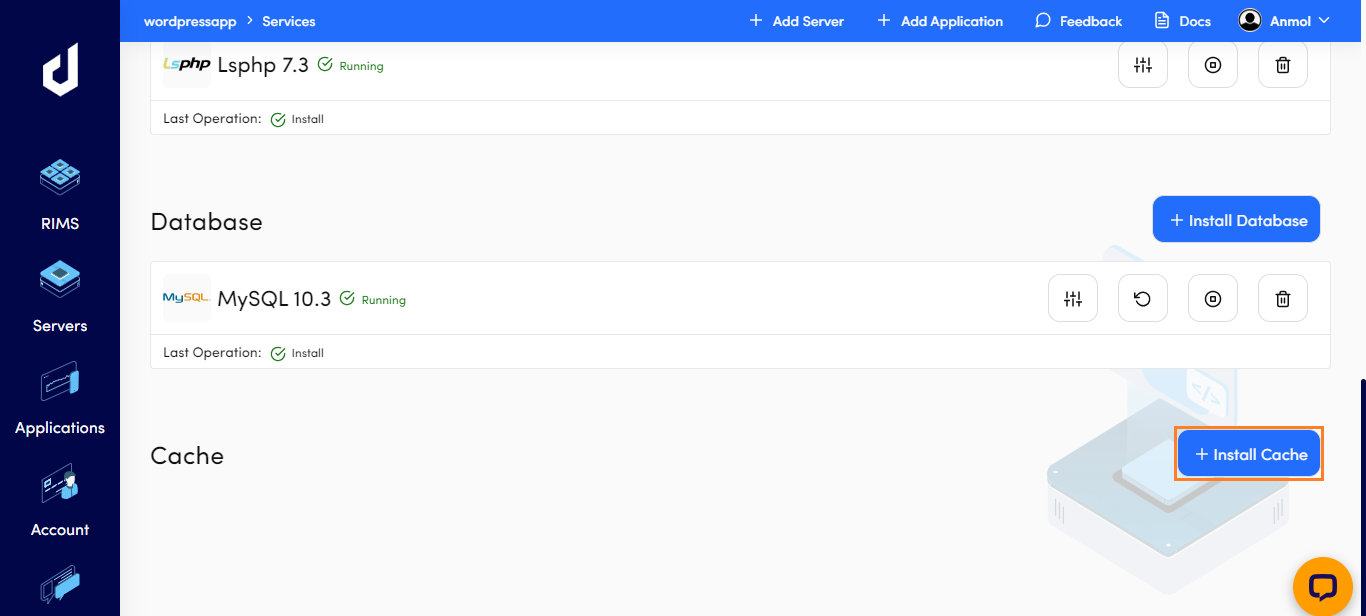
Scroll down and stop at the Cache section. Then, click on the “+ Install Cache” button.
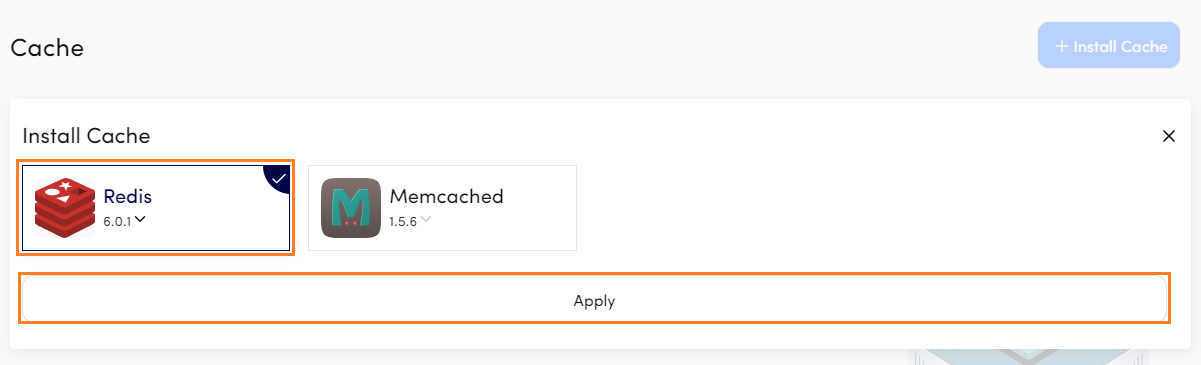
Select the latest Redis version available and then click on the “Apply” button.
It will take a while to install Redis on your application.

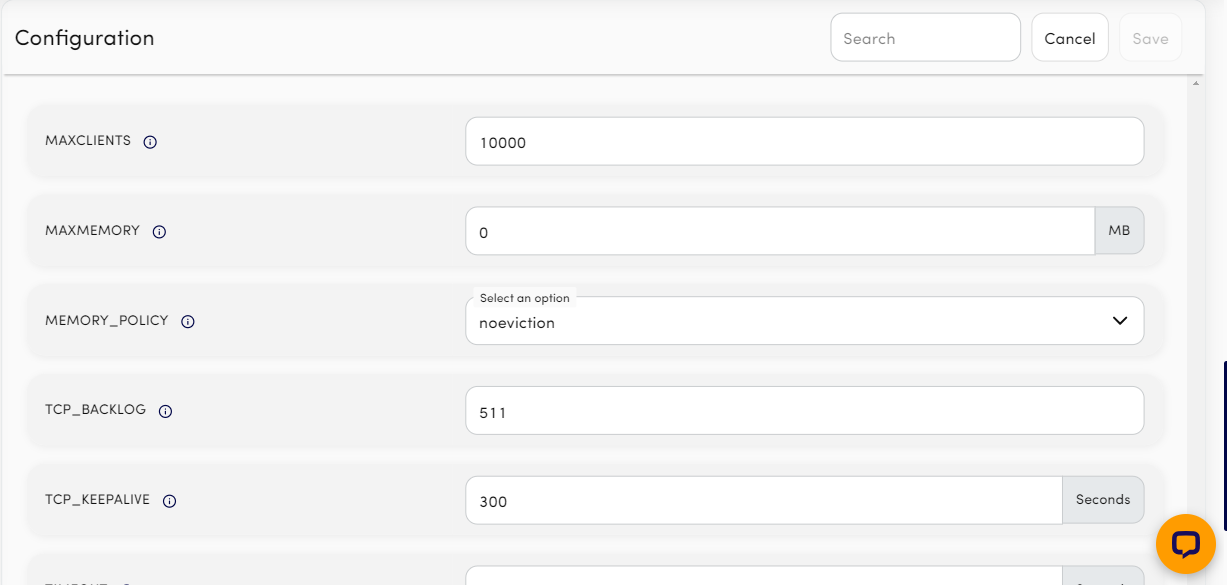
Once installation is complete, it will show “running” status. Now, click on the configuration icon button to configure the Redis.

You will see the options there to edit, configure the Redis as you want and click on the “Save” button at the top right side after editing the values.
Here we are done with installing and configuring the Redis on Devrims.
Method 2: Install and Configure Redis using Redis Object Cache Plugin
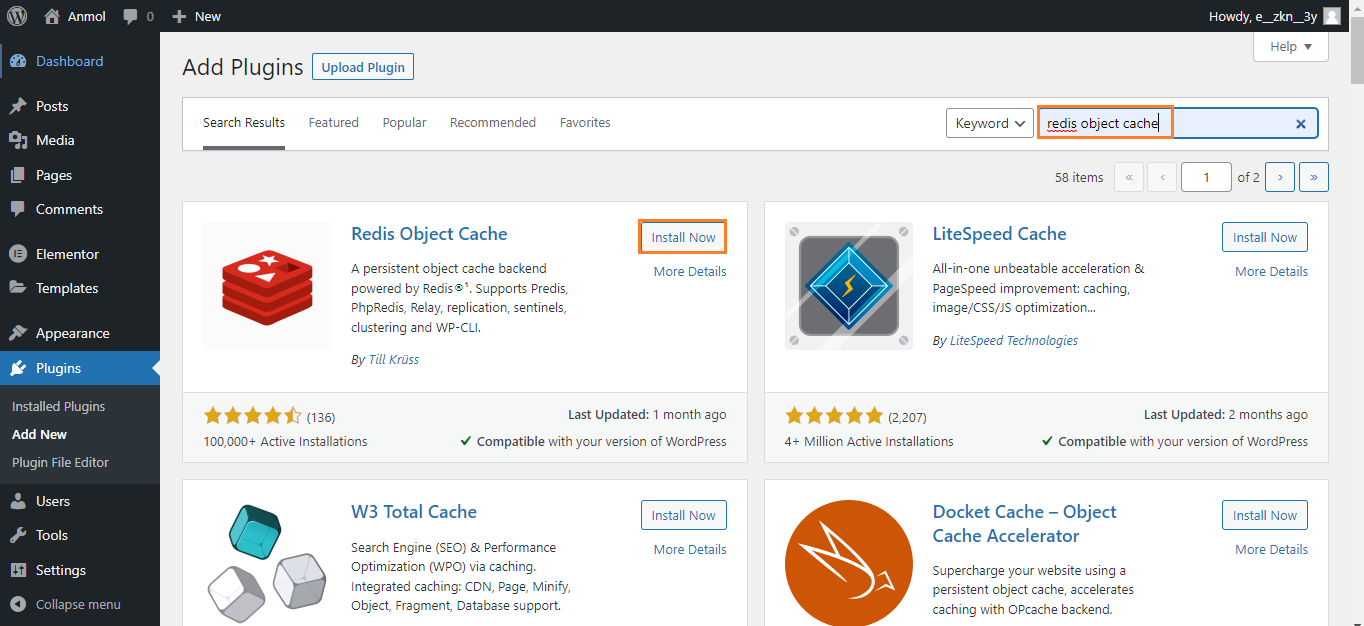
To install and configure Redis Object Cache Plugin, you first need to log in to the WordPress admin dashboard and navigate Plugins > Add New on the navigational bar left side.

Next, you need to search for the Redis Object Cache plugin. Click on the “Install Now” button.
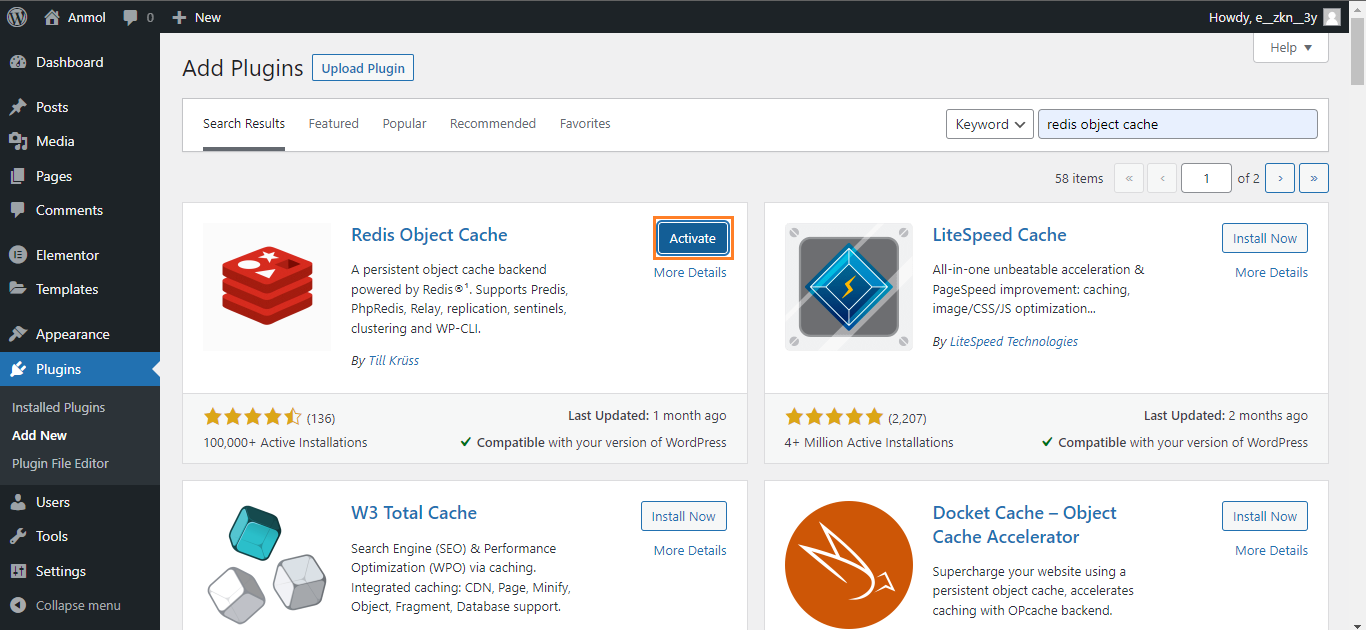
Once the installation is complete, click the “Activate” button to activate the plugin.
It will automatically take you to the Redis configuration setting after activation, where you need to enable the object cache. Simply click on the “Enable Object Cache” button.

Once the Object cache is enabled successfully, it will show you the status “Connected” and other connection details.
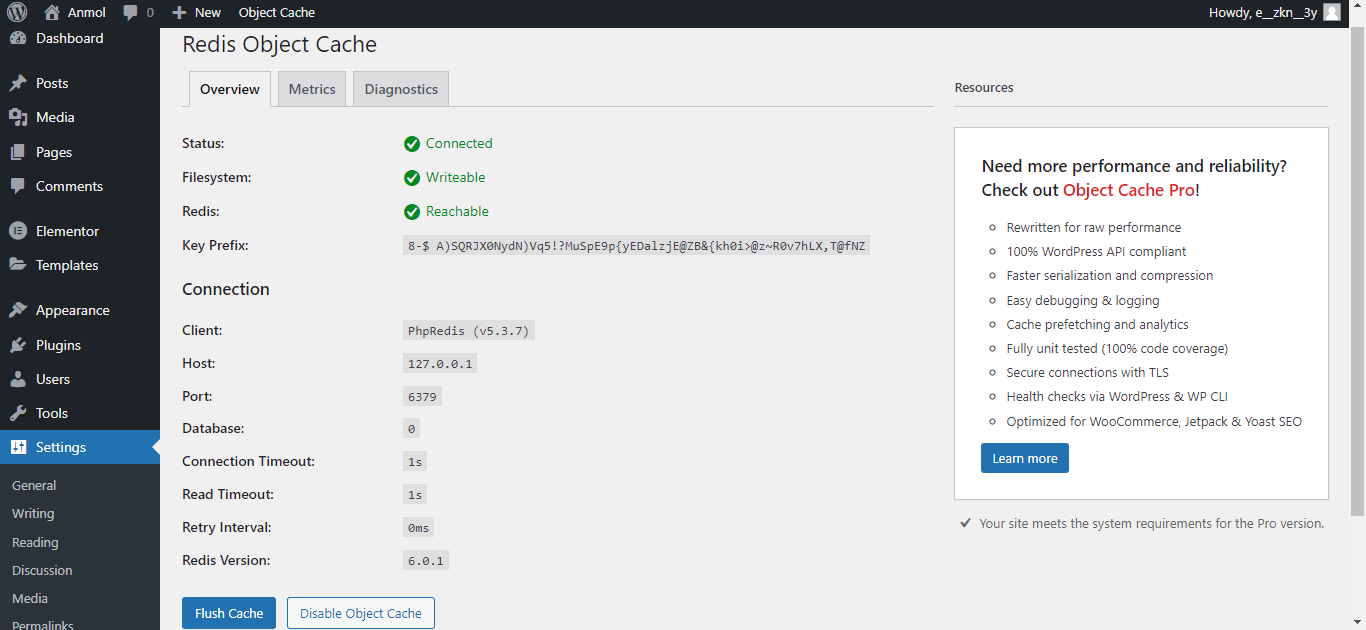
We can also see a “Flush Cache” button at the end of the page. The Flush Cache option is just for the object cache and is a good practice to flush the cache to clean out unnecessary files from your site.
We usually don’t need to flush the object cache. Still, it is sometimes the only saving grace when backend operations don’t work correctly, like the need for activating or deactivating a plugin activation.
Usually, flushing the object cache is not necessary. Still, there are situations when it is the only solution available when backend processes go wrong or not working correctly.
You can visit other tabs as well and see the metrics and diagnostics.
Method 3: Install and Configure Redis using W3TC Plugin
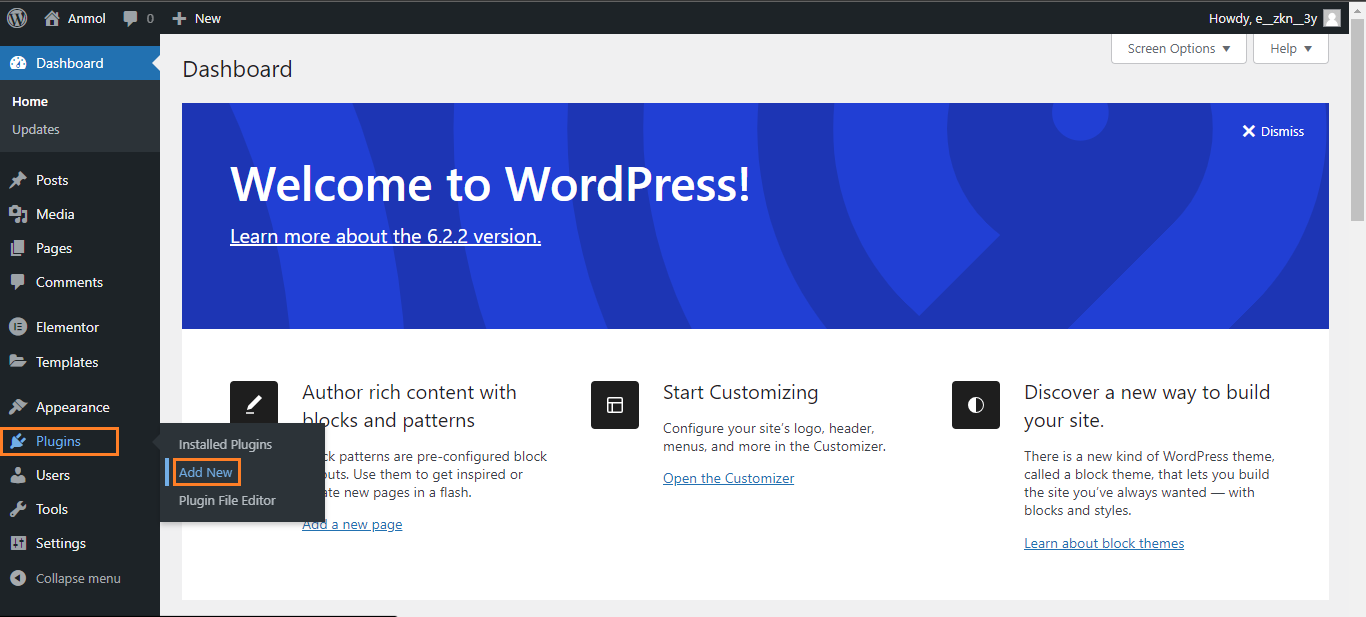
To install and configure W3TC Plugin, you first need to log in to the WordPress admin dashboard and navigate Plugins > Add New on the navigational bar left side.
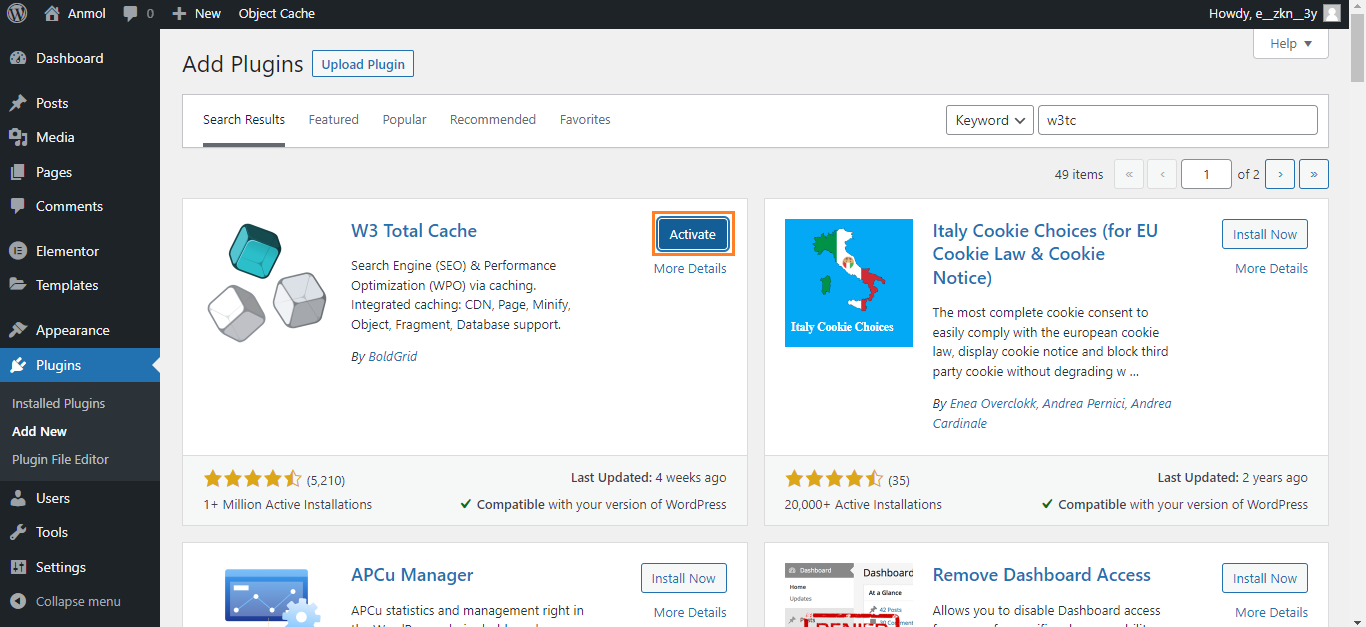
Next, you need to search for the W3TC plugin. Click on the “Install Now” button.

Once the installation is complete, click the “Activate” button to activate the plugin.
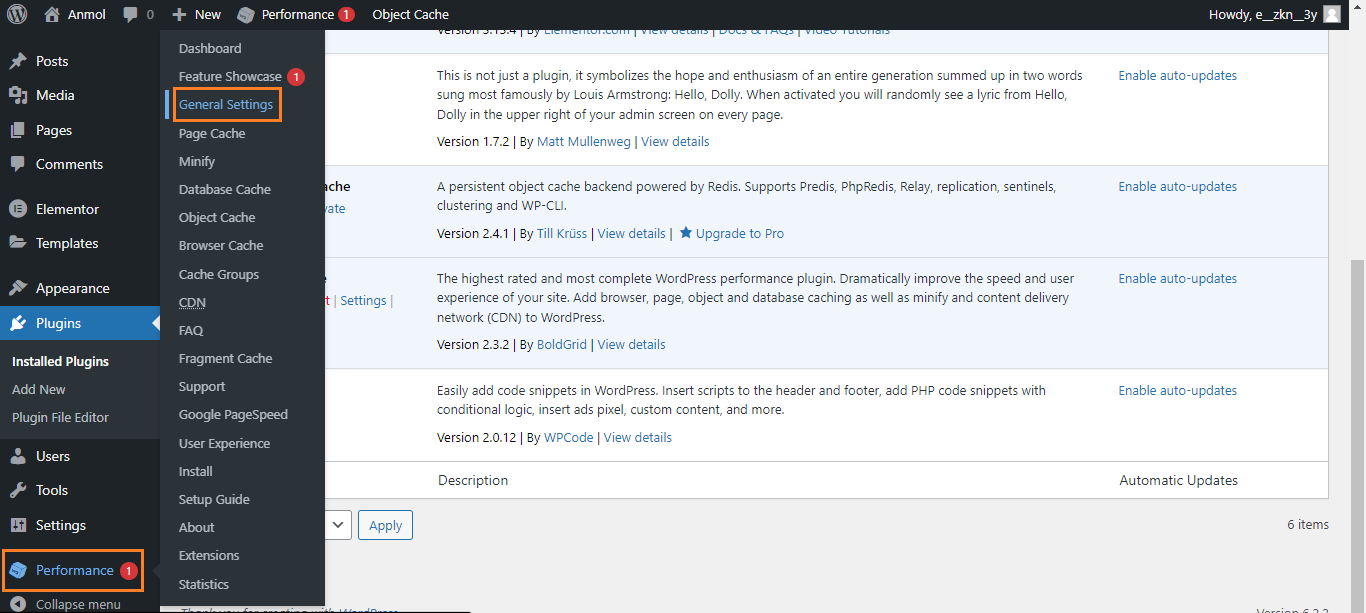
Once the activation is completed, navigate to the “General Settings” option inside the “Performance” tab.
Now, you need to scroll down and stop at the “Object Cache” section.
Enable the “Object Cache” option and select redis as the “Object Cache Method,” and click on the “Save Settings & Purge Caches” button.
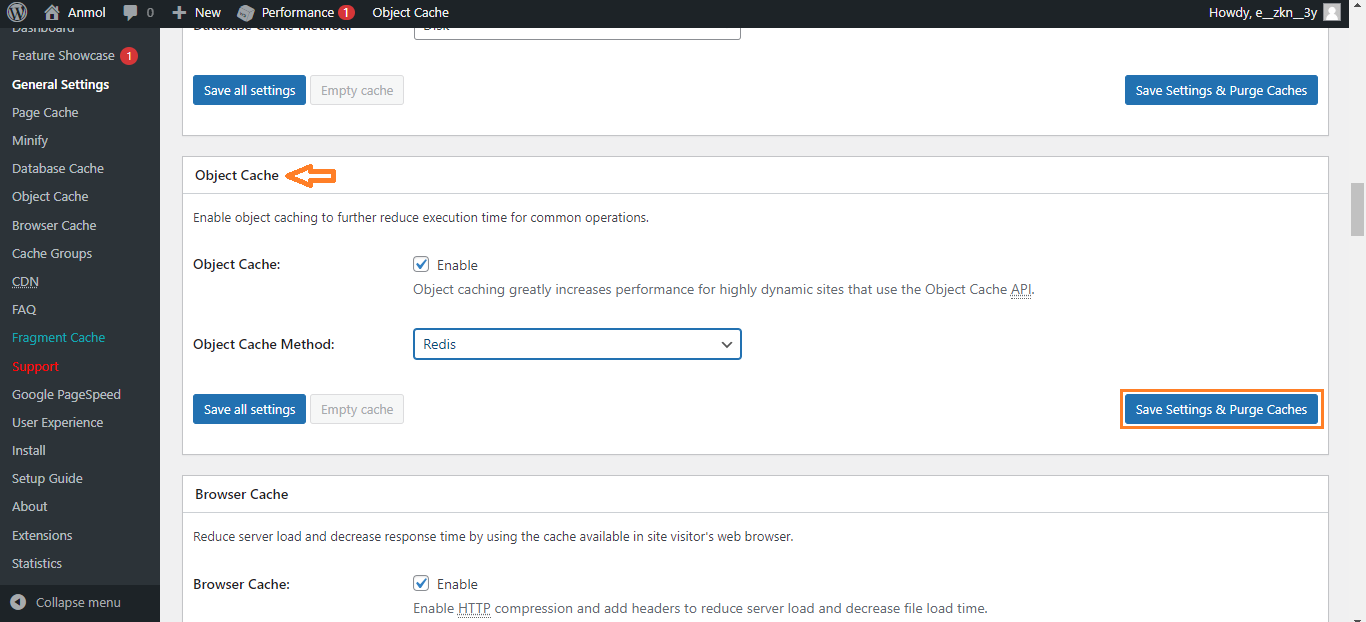
Here you go! We have successfully enabled the object cache using the W3TC plugin.
Now, it’s time to test the Redis Object Cache response via SSH terminal. So, what are we waiting for? Let’s do it.
Test Redis Object Cache Response via SSH Terminal
Next, you should test if everything is working fine. This is done by running a simple command on your SSH terminal. For that, you need to add/install SSH to your application.
To add SSH to your application, go to your server dashboard. In our case, we are using the Devrims platform, so log in to the user account and navigate to the server.
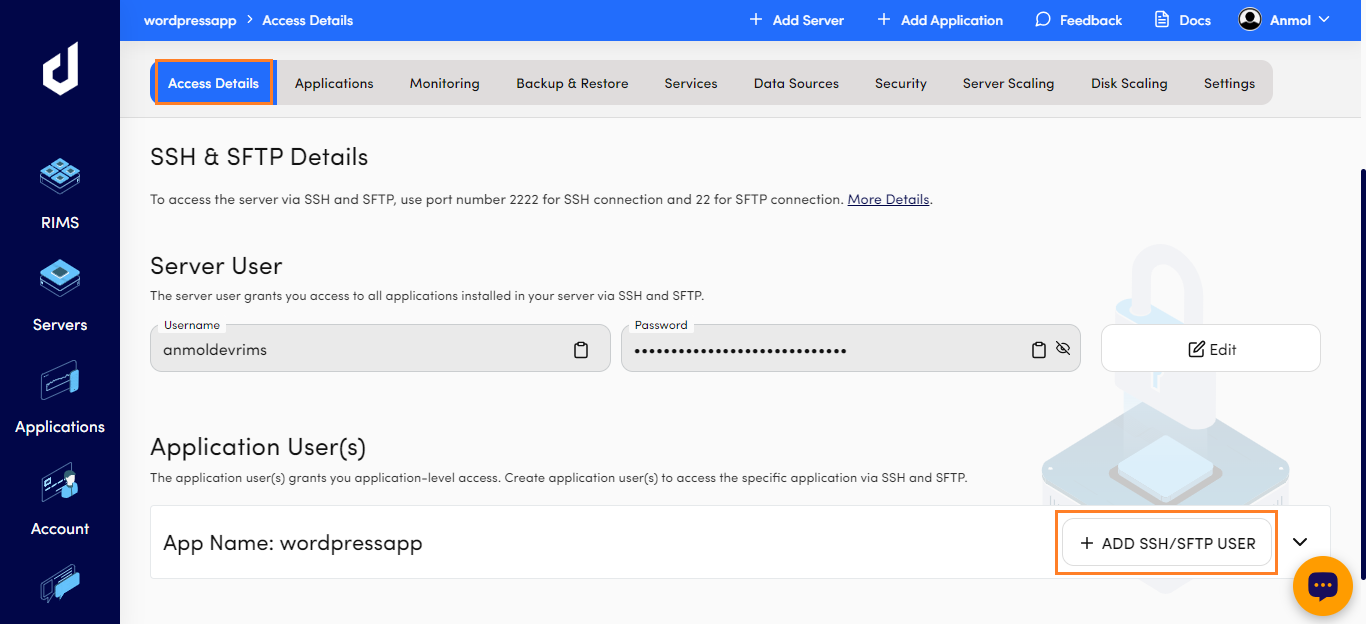
Inside the “Access Details” tab, you will find an option to add SSH/SFTP user. Click on the “+ Add SSH/SFTP User” button to create SSH user access.
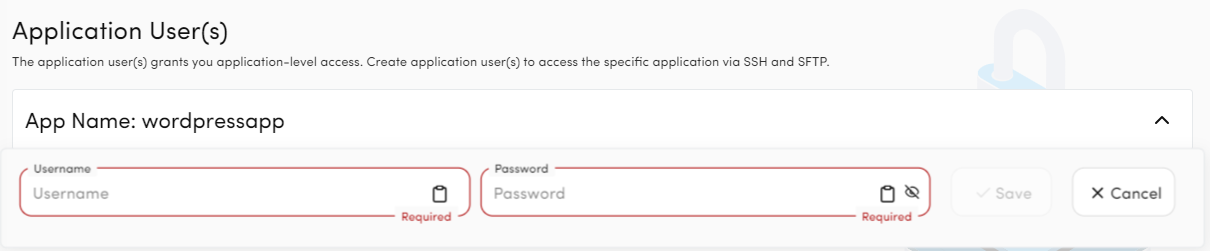
Enter a username and password, then click the “Save” button.
It will take a while to process. After completing the process, you can see that you have successfully added it. Now, you can easily access to SSH terminal using these credentials.

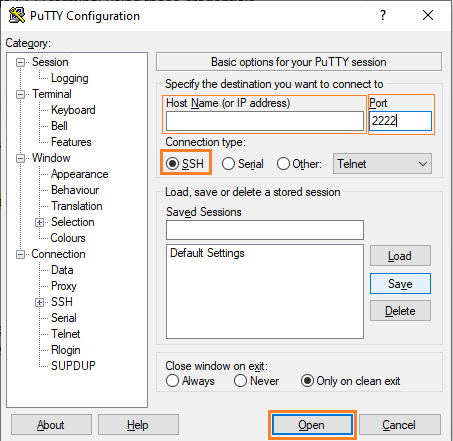
Once you are done with adding SSH to your application, open the SSH terminal. To do that, open PUTTY software and enter the details like server IP port, select SSH connection type and click the “Open” button.
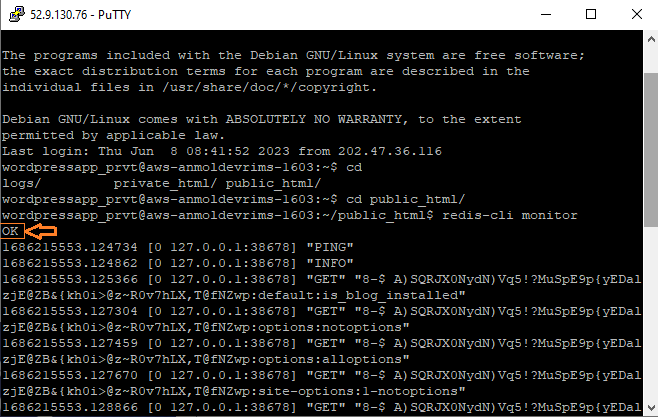
It will take you to the SSH terminal or command line. Enter your SSH login access and navigate to the public.html file. After that, run this command: redis-cli monitor.
It will show an “OK” message if everything is configured correctly.
Here you go! Congratulations! We successfully installed and configured the Redis Object Cache on our WordPress website.
Frequently Ask Questions
Fully Managed Magento Hosting
Now avail Six Days Free Trial Account without any feature restriction and payment details to experience a true Managed Cloud Hosting Platform.
SIGNUP FREE TRIAL
Fully Managed Magento Hosting
Sign up now for 6 Days Free Trial Account without any payment details and install the Magento application on a dedicated cloud server in a few clicks.
SIGNUP FREE TRIAL
How do I enable object caching in WordPress?
The most popular WordPress plugin is Redis Object Cache, with over 30,000 installs. It is easy to install and set up. Once the plugin is activated, navigate to Settings > Redis and click “Enable Object Cache.”
What does purge cache do in WordPress?
To purge WordPress pages or posts from the cache in the W3 Total WordPress Cache plugin, you just need to simply means delete the cached WordPress posts or pages, so the next time when anyone visits this page, your WordPress site can’t find it in the cache, it will access its database to fetch the original content.
What happens if Redis runs out of memory?
If this limit is spanned, Redis will begin to reply with a blunder to write commands (but will proceed to accept read-only commands), or you can config it to evict keys when the max memory limit is spanned in the case where you are using Redis for caching.
Should I purge the cache in WordPress?
It is essential to have caching enabled for your site and also regularly clear the cache manually. Using popular WordPress Cache Plugins like WP WP Rocket, W3 Total Cache, Super Cache, and WP Fastest Cache, you can optimize your website performance and get the most out of your site!
Why is the WordPress backend so slow?
The most common remedies for a slow WordPress admin are removing high CPU plugins, using a better cache plugin, configuring it with optimal settings, and upgrading to cloud hosting. If using W3 Total Cache, try disabling the object cache.
How does one install Redis on a shared hosting server?
You can not install Redis on shared hosting. Those are pre-configured systems. We would recommend choosing cloud hosting like Devrims, where you can easily install Redis cache.
Final Words
This tutorial provides a comprehensive guide on configuring Redis Object Cache support for your WordPress sites hosted at Devrims. Implementing Redis Object Cache aims to enhance the performance of your website’s backend operations significantly. By utilizing persistent caching for queries, transients, and fundamental data structures, Redis reduces the reliance on WordPress (WP) and the database (DB), ultimately resulting in faster website speeds.
Enabling Redis Object Cache ensures that frequently accessed data is stored in memory, eliminating the need for repetitive queries to the WP and DB. This caching mechanism optimizes data retrieval, improving response times and reducing the load on backend resources. Consequently, your website functions more efficiently, delivering a seamless user experience.
By following the steps outlined in this tutorial, you will be able to seamlessly integrate Redis Object Cache into your WordPress site hosted at Devrims. The instructions will help you configure the necessary settings, allowing Redis to handle caching effectively.
If you have any questions or would like to contribute to the discussion, please feel free to leave a comment below. Our team is here to assist you and ensure that you successfully implement Redis Object Cache, optimizing the performance of your WordPress site and enhancing overall user satisfaction.
And, if you want to explore some more plugins, read this guide on the best cache plugins for WordPress.


Related Tutorials