- WooCommerce Checkout Page Overview
- The default WooCommerce Checkout Page and its settings
- Why do you need to change or redesign your WooCommerce Checkout Page?
- How to Reduce Checkout Page Abandonment?
- Change/Redesign your WooCommerce Checkout Page with various methods
- Edit/Customize the WooCommerce Checkout Fields
- How do you allow guests to log on to the WooCommerce checkout page?
- Create a One-Page WooCommerce Checkout
- How to add a payment gateway to your WooCommerce checkout page?
- How do you enable free shipping during the WooCommerce Checkout Process?
- Enable direct link products to the WooCommerce Checkout Page
- How to Test the Checkout Process?
- How do we allow add-ons at checkout in WooCommerce?
- The Best WooCommerce Checkout Plugins and Extensions
- Conclusion
It is essential for any online store owner to create and provide a seamless checkout experience for their customers. Optimizing the WooCommerce checkout page is crucial to reducing cart abandonment, boosting conversions, and increasing revenue.
Whether you are launching your online store or looking to improve your existing checkout page, this comprehensive guide will provide everything you need. We will cover how to customize the layout and design using themes, plugins, and code.
You will learn to add multiple payment gateways, allow add-ons, and more. With the right strategy, you can create a smooth checkout process that delights customers and leads to more sales. Let’s dive in!
- WooCommerce Checkout Page Overview
- The default WooCommerce Checkout Page and its settings
- Why do you need to change or redesign your WooCommerce Checkout Page?
- How to Reduce Checkout Page Abandonment?
- Change/Redesign your WooCommerce Checkout Page with various methods
- Edit/Customize the WooCommerce Checkout Fields
- How do you allow guests to log on to the WooCommerce checkout page?
- Create a One-Page WooCommerce Checkout
- How to add a payment gateway to your WooCommerce checkout page?
- How do you enable free shipping during the WooCommerce Checkout Process?
- Enable direct link products to the WooCommerce Checkout Page
- How to Test the Checkout Process?
- How do we allow add-ons at checkout in WooCommerce?
- The Best WooCommerce Checkout Plugins and Extensions
- Conclusion
WooCommerce Checkout Page Overview
A WooCommerce Checkout Page is where customers complete their purchasing process on an online store. It includes fields for customers to ask for basics and mandatory information. Name, contact information, shipping address, billing address, and payment details are those fields.
The layout of the WooCommerce checkout page consists of two columns: one is the checkout fields on the left, and the second is the order summary on the right. The default styling matches the rest of the WooCommerce front end using greys, whites, and blues.
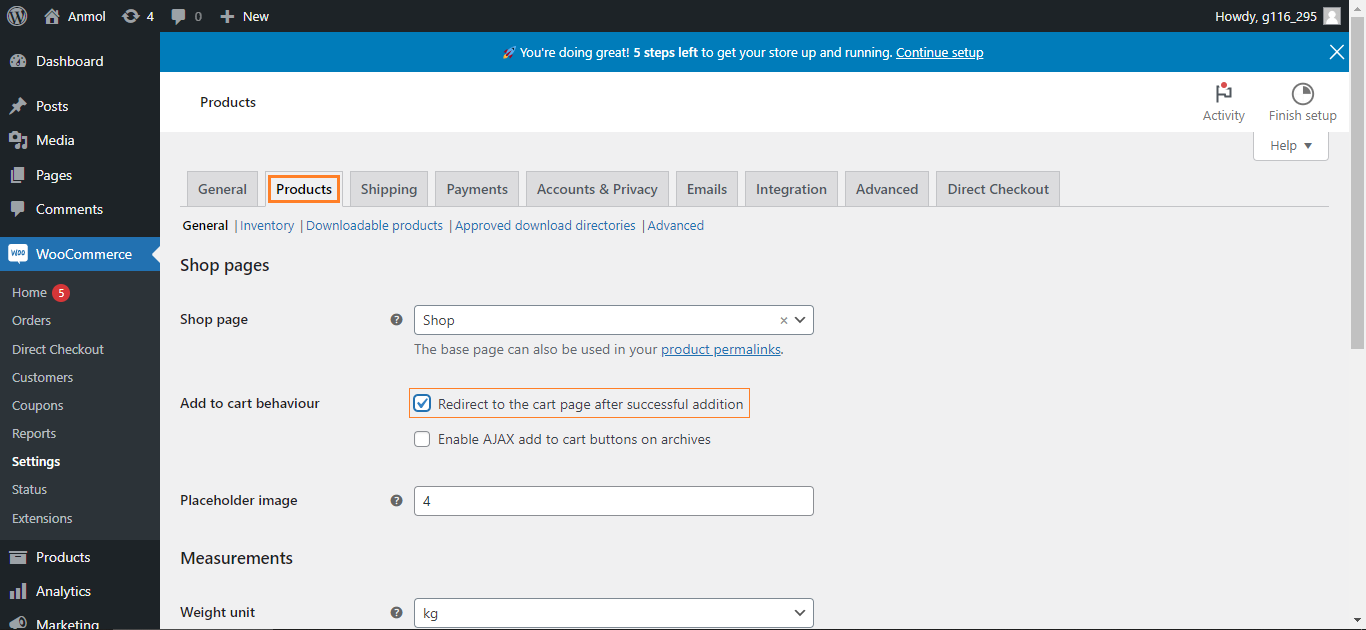
The default WooCommerce Checkout Page and its settings
The default WooCommerce Checkout Page and its settings include many checkout options that help you configure elements like:
- Checkout Process: You can choose between a multi-step or single-page checkout flow.
- Checkout Pages to set checkout and order received pages.
- Registration Options include a Guest account and a registered/created account.
- Billing/Shipping Details include specifying mandatory and optional fields.
- Payment Methods include selecting and managing payment gateways.
- Display Options including show/hide order notes, coupon field, etc.
- And More.
Using a combination of settings, codes, CSS, and plugins, you can customize everything from styling to fields to payment methods for complete control over the checkout process experience.
Why do you need to change or redesign your WooCommerce Checkout Page?
The checkout page is the final step in the customer journey, so optimizing your WooCommerce Checkout page to convert customers into buyers is essential. You can miss out on the opportunities with the default WooCommerce checkout page to boost conversion through designs, layout, trust factors, and more.
Studies show that up to 85% of customers abandon their shopping carts without spending a small amount of money, which means a poorly designed checkout page can cost you losing sales. You can overcome this by customizing your checkout page, reducing cart abandonment, and increasing revenue.
How to Reduce Checkout Page Abandonment?
To reduce checkout page abandonment, you should streamline the entire checkout process. You can do it by:
- Minimize the number of fields customers must fill out, asking only for necessary information like name, email, and billing details. Optional account creation adds unnecessary steps, so allow guest checkouts or keep registration simple with social login.
- Optimize the page design and layout for clarity and simplicity. Break the checkout into logical sections with clear calls to action. Make sure checkout buttons stand out. Also, emphasize trust badges, security seals, and customer reviews.
- Provide multiple payment options like PayPal, Credit Cards, Cash on delivery, etc., so it could match the customer’s preferences. You can also offer discounts or free shipping to motivate customers to complete the purchase process.
- Avoid or reduce friction points and surprises like unexpected fees at checkout.
- Provide live support in case customers need assistance.
You can lower abandonment rates and earn more revenue with a smoother, effortless checkout experience.
Change/Redesign your WooCommerce Checkout Page with various methods
Depending on your requirements, skills, and budget, there are various ways to change/redesign your WooCommerce checkout page. Those ways include:
- WooCommerce Built-in Settings: You can make minor changes with WooCommerce’s built-in settings and features. For instance, enabling free shipping or linking products to the checkout.
- Shortcodes: Add elements like coupons using shortcodes.
- Pre-installed plugins: These plugins, like Checkout Field Editor, let you add, remove, or edit fields without coding.
- Themes, Page Builders, or Templates: If you want to redesign the page, use an optimized theme or template for checkout. Going for a premium theme will give you more extensive styling options to make your page attractive. Alternatively, page builders like Elementor allow drag-and-drop customization for easy restyling.
- Manual Coding: Experienced users with coding knowledge can directly edit template files like checkout.php to change markup, CSS, and JS. While using this technique, the user will have complete control over it. If you do not have coding experience, you can hire a developer to perform advanced tasks.
- And More.
Edit/Customize the WooCommerce Checkout Fields
Optimizing your WooCommerce checkout fields is essential to create a smooth purchasing process. There are many ways to edit and customize the default fields; a few of them are:
- Use a plugin like WooCommerce Checkout Field Editor. It will provide a visual editor to add, remove, reorder, and customize fields without coding.
- Manually edit the form-checkout.php template file in your theme. It will allow you to change the HTML structure and CSS.
- Customize the fields by hiding labels, changing layouts, adjusting styling, and using CSS.
- If you want to make significant changes requiring technical knowledge, you can hire a developer to help you build a customized checkout form from scratch. It costs more, but you will have complete control.
Ideally, start with a drag-and-drop editor plugin for easy changes. Then, use hooks, code edits, and CSS for more control as needed.
How do you allow guests to log on to the WooCommerce checkout page?
It is essential to enable guest checkout on your WooCommerce store to provide a hurdle-free purchasing experience to your customers. Forcing customers to create an account at checkout time will create unnecessary distractions that can increase abandonment rates.
If you activate the guest checkout, you can go through the process quickly using their contact and payment details without creating an account. This results in higher conversion rates as customers face fewer hurdles to complete their purchases.
Enabling guest checkout is easy to implement in WooCommerce. Follow these steps to do it:
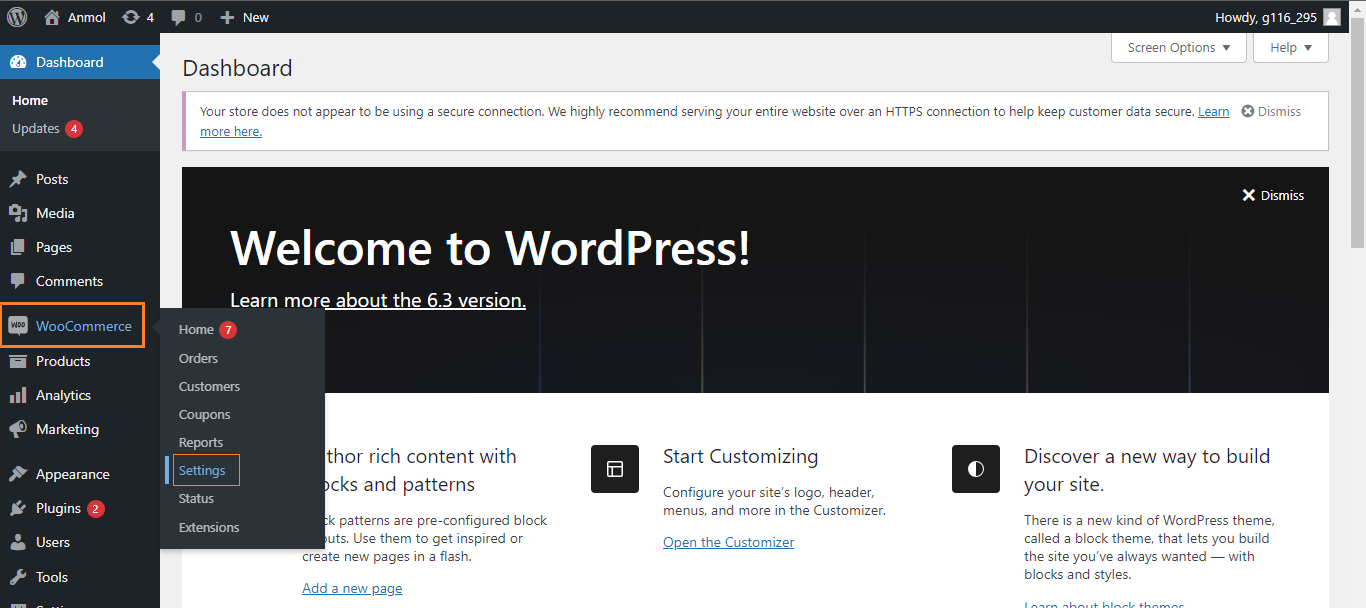
- Go to the WordPress admin dashboard and navigate to the WooCommerce settings section.
- Go to the “Accounts & Privacy” tab and check the box “Allow customers to place orders without an account.”
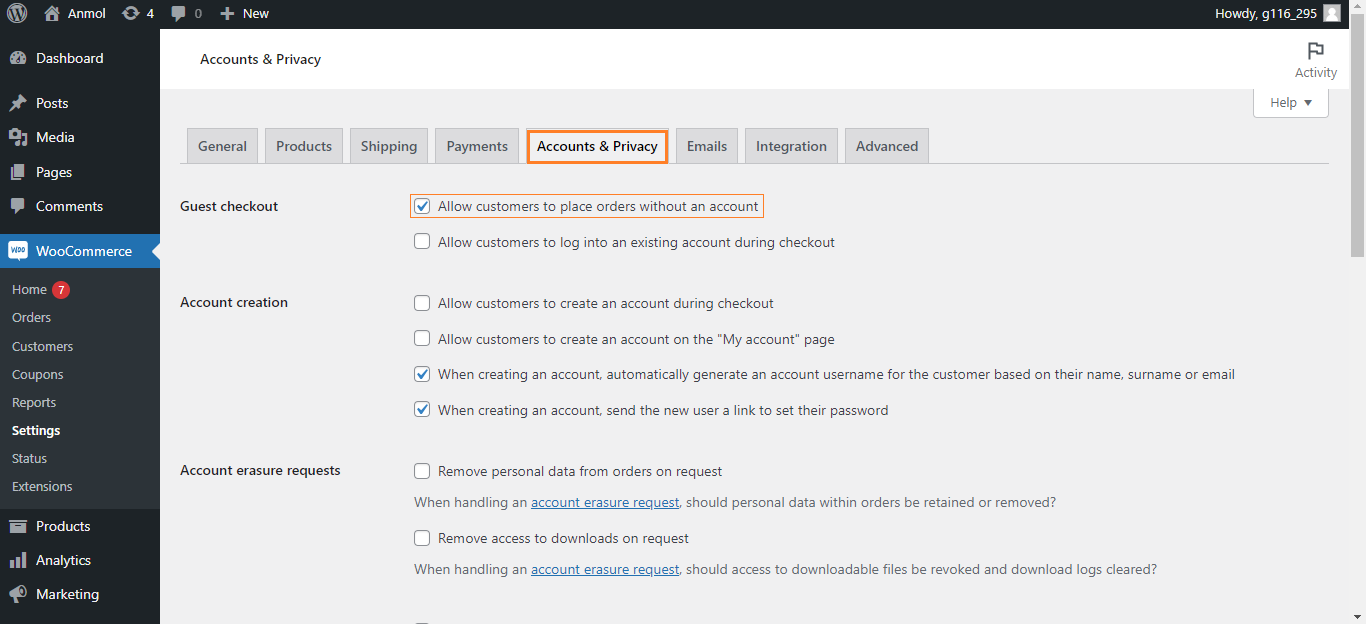
And that’s it! Customers will have the option to check out as a guest or register an account with one click. Ensure you have guest checkout marked as an option on your checkout page.
Providing guest checkout delivers a smoother, faster purchasing process. Your customers will appreciate the convenience. And you will get an increase in conversion rates and revenue.
Create a One-Page WooCommerce Checkout
A one-page checkout page combines product selection, cart, and checkout on a single page to make the purchasing process more straightforward. It removes extra steps and distractions during the buying journey, leading to higher conversion rates and lower abandonment. There are many ways to create a one-page WooCommerce Checkout; a few of them include:
- Use a dedicated one-page checkout theme or template that combines everything by default. It will set up fast but allow less customization.
- Install and activate a plugin like WooCommerce One Page Checkout. It will help you turn any product page into a one-page checkout and enable control of individual products.
- Manually build a one-pager on the same page using cart and checkout shortcodes like [woocommerce_cart] and [woocommerce_checkout]. You will have to work hard in this technique but will have complete control over things.
- Use a page builder plugin like Elementor to add cart and checkout widgets on one page and customize the design.
These are a few methods to create a one-page checkout for your online store.
How to add a payment gateway to your WooCommerce checkout page?
Adding multiple payment gateways to your WooCommerce checkout page makes it easy and convenient for customers to pay with different accounts. Follow these steps to add a new payment gateway to your WooCommerce checkout page:
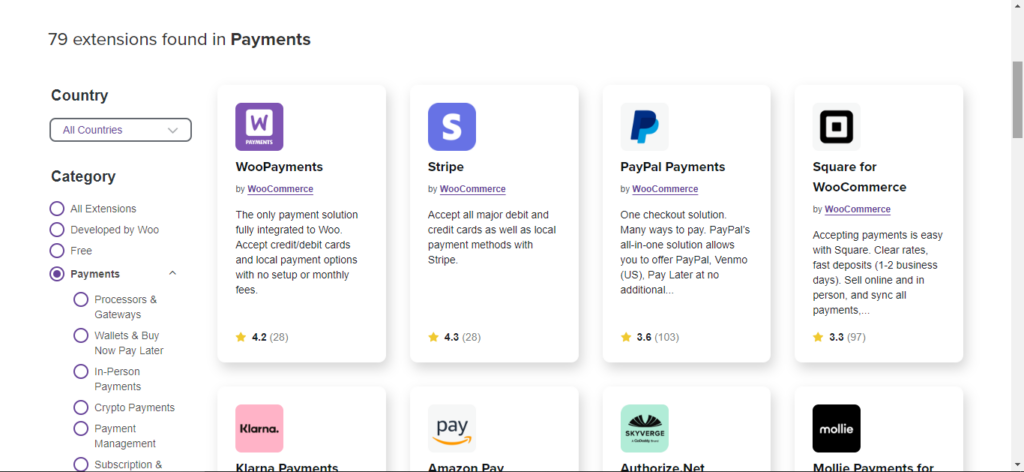
- First, you must install a plugin for the gateway you want to add to your WooCommerce checkout page. All the plugins are available in the WooCommerce extensions section; you must install them.
- To install a payment gateway plugin, navigate to the WooCommerce Extensions section on the WordPress admin dashboard.
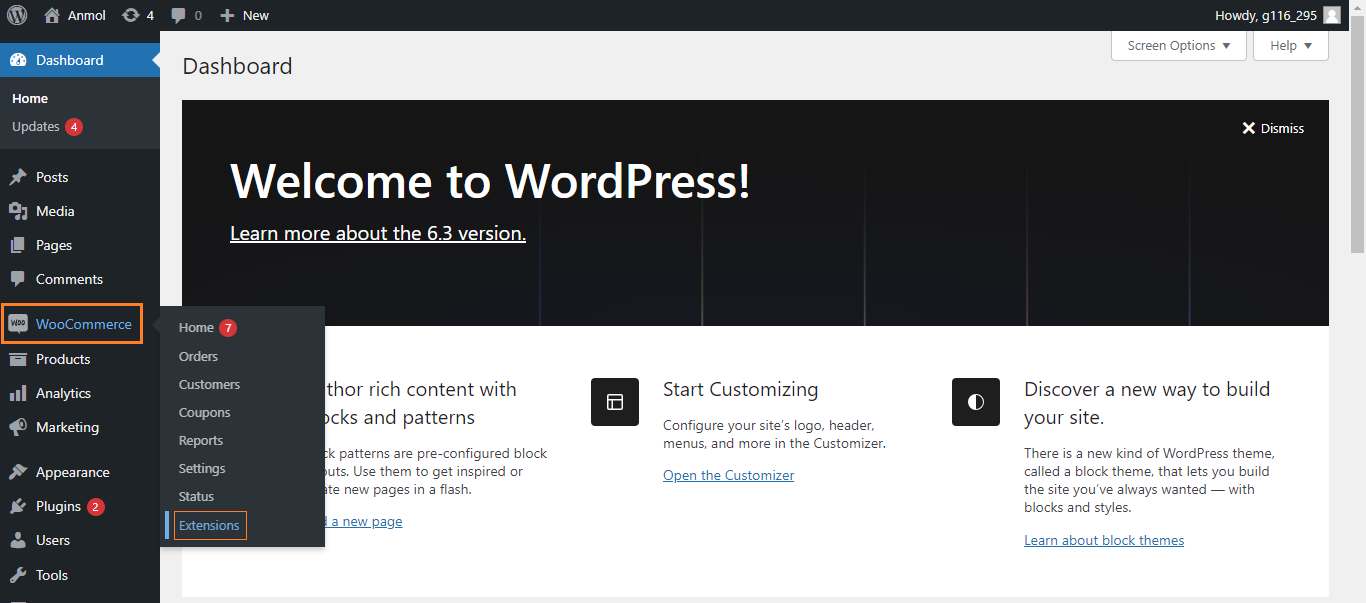
- Search for the plugin or extension you want to install.
- Install and activate the plugin you want and navigate to the WooCommerce settings page.
- Enter your API keys and merchant account details and configure gateway-specific parameters.
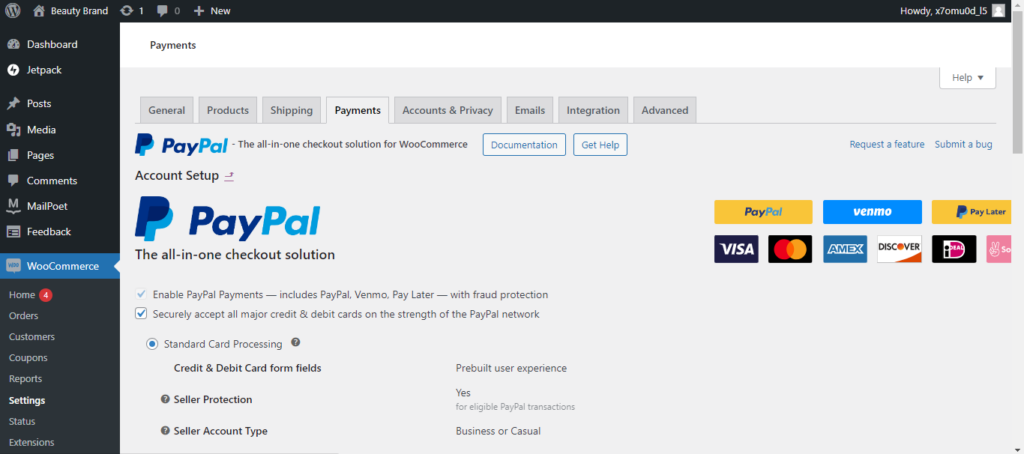
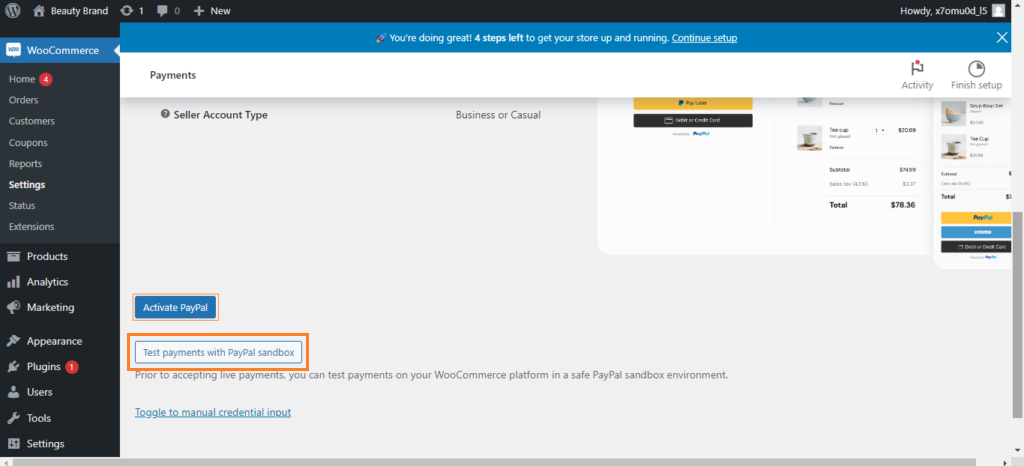
- Enable the payment method and test transactions in sandbox mode before going live. Check for any error messages or bugs and fix them.
- Finally, customize the checkout page to display the payment icons you accept. Make sure customers know you accept their preferred payment method.
How do you enable free shipping during the WooCommerce Checkout Process?
Free shipping is an excellent way to motivate customers to spend more during checkout. You can automatically enable free shipping with WooCommerce when the order total exceeds a specified amount. To enable the free shipping option in WooCommerce, follow these steps:
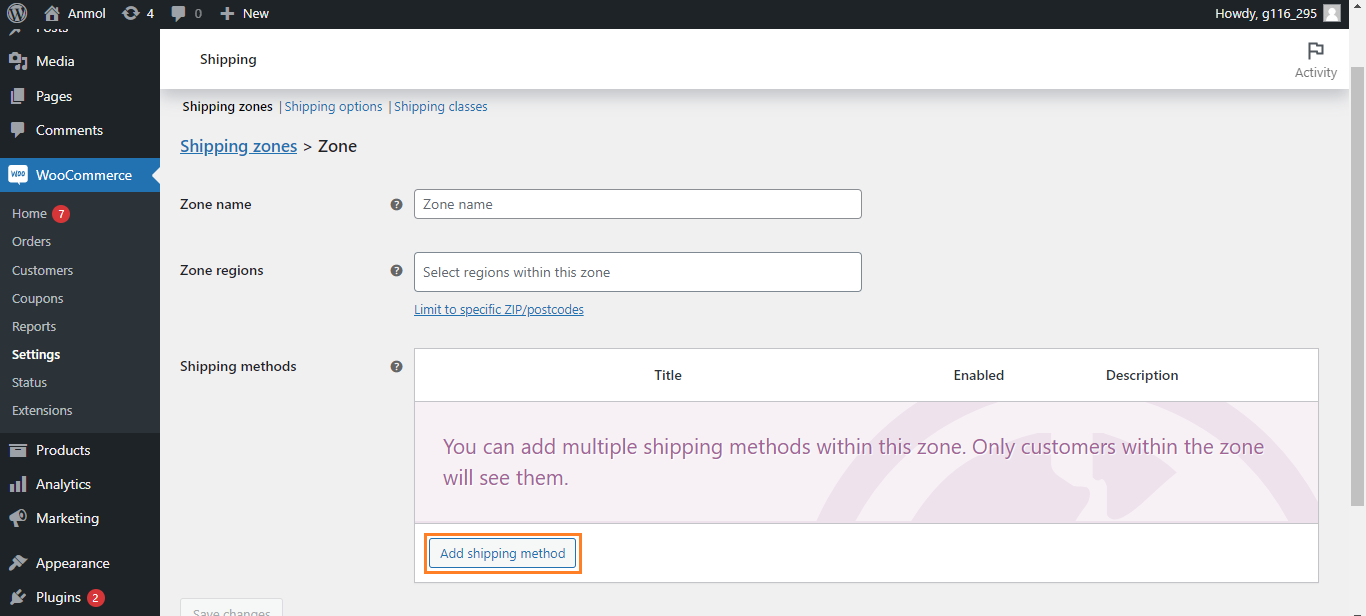
- On your WordPress admin dashboard, navigate to the WooCommerce settings section and go to the “Shipping” tab. You will see a button “Add shipping zone“; click on that.
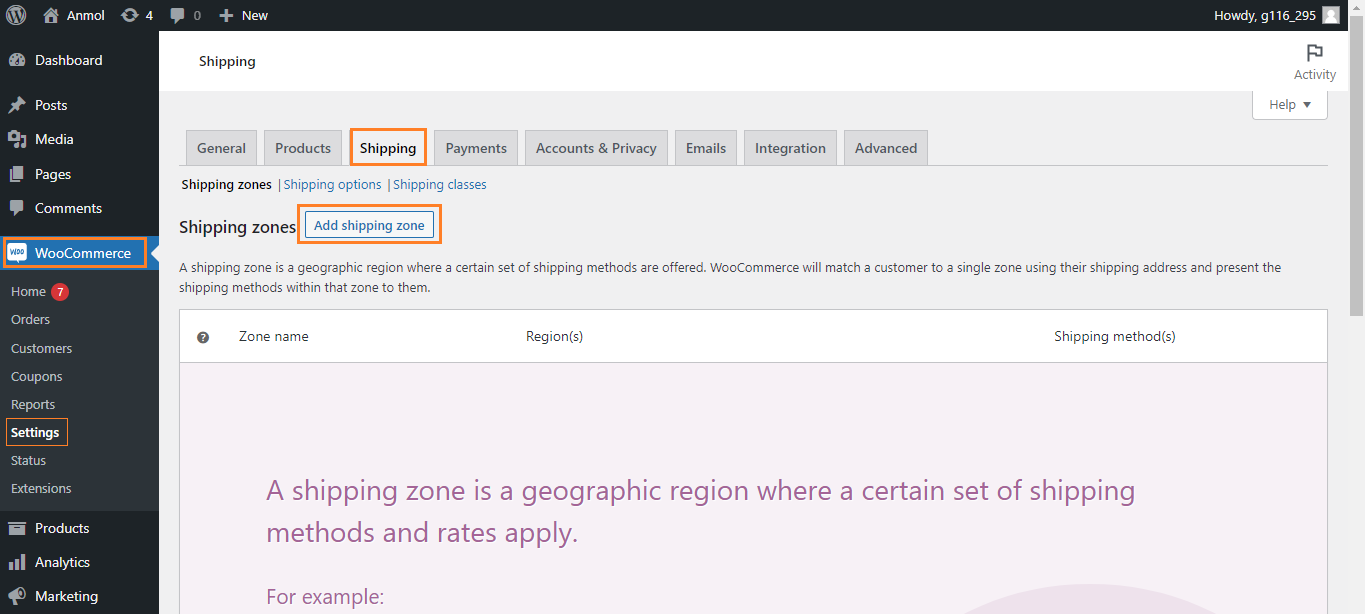
- Now, enter a Zone name and add the regions you want to apply the changes on. Then, click on the “Add shipping method” button to add shipping methods.
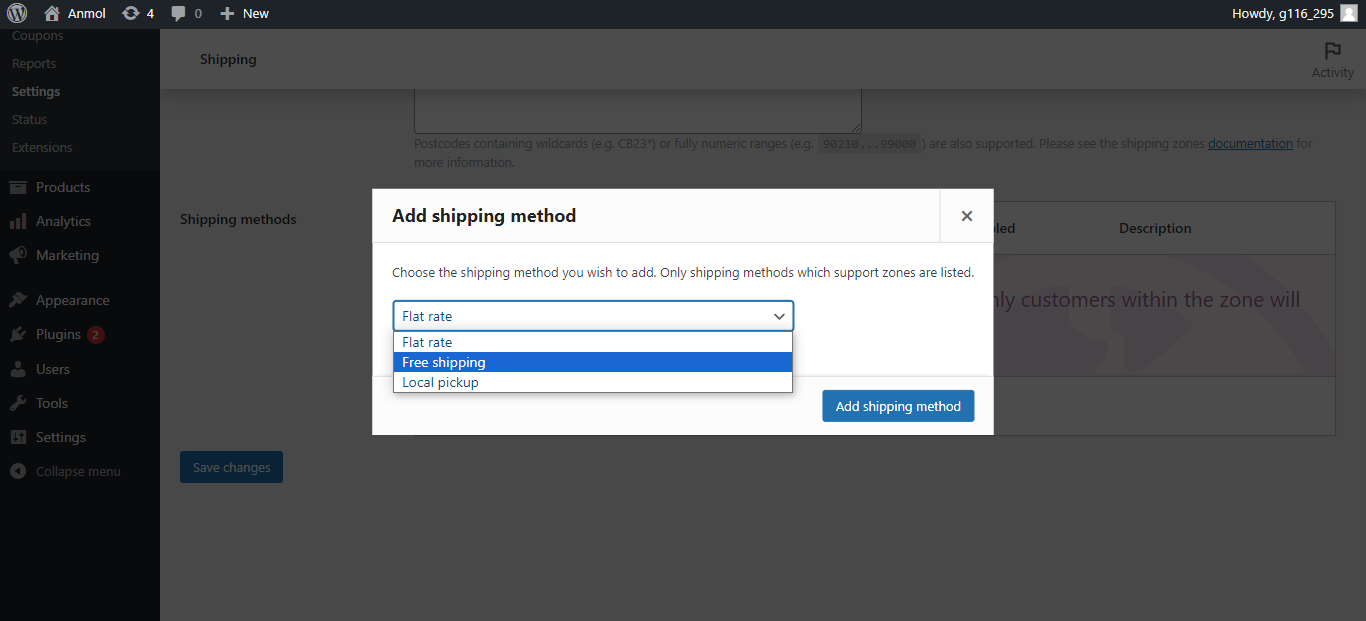
- Select the “Free shipping” option from the drop-down menu and click the “Add shipping method” button.
- Here you go! You have successfully added a free shipping method. Now, hover on the free shipping method and click the edit option.
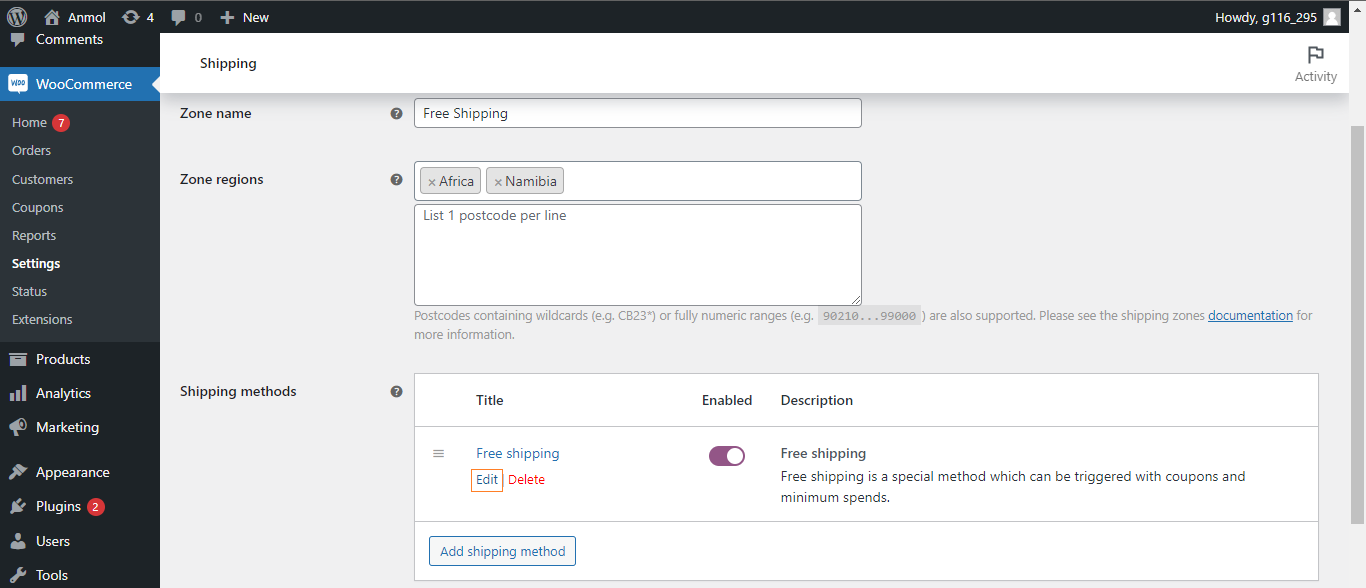
- Add a condition on which you will provide free shipping. For example, you want to offer free shipping only to customers who order for a minimum of 100. So, select the “A minimum order amount” option from the “Free shipping requires” drop-down menu.
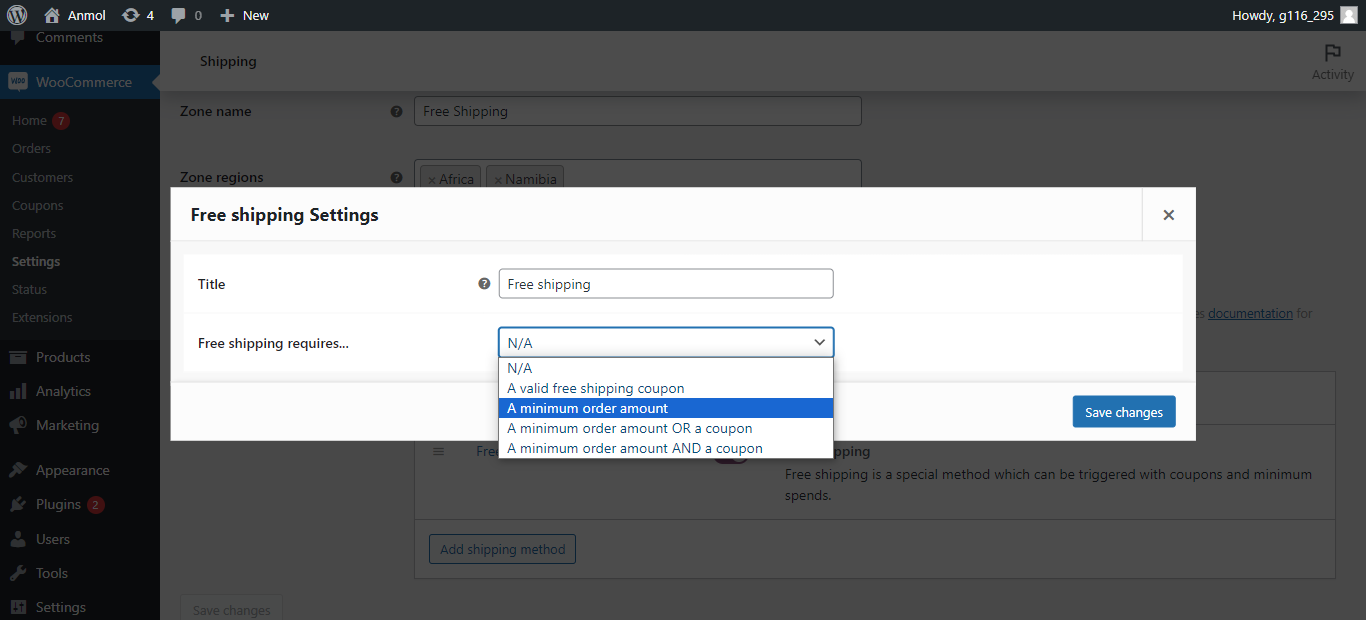
- Enter the minimum amount number inside the “Minimum order amount” field. Then, check the “Coupons Discounts” box if you want to offer free shipping before applying coupons. After that, click on the “Save Changes” button.
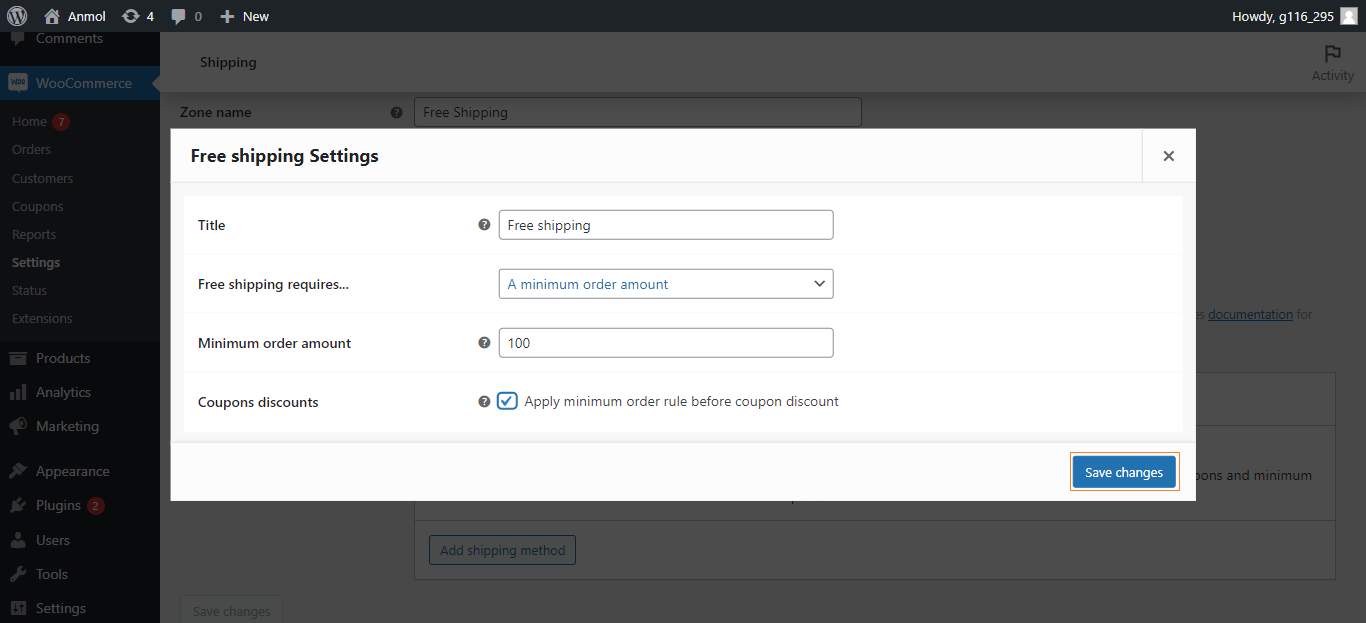
- Do not forget to click the “Save changes” button at the end.
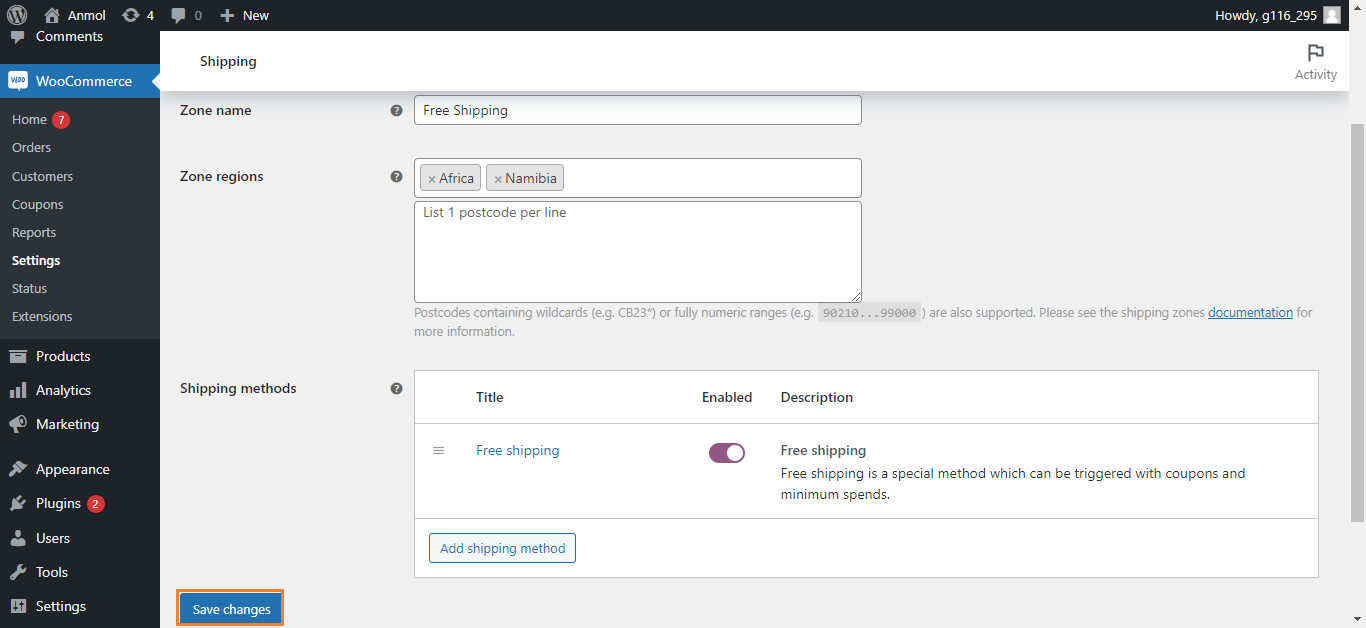
Finally, you are done with enabling the free shipping method to your WooCommerce checkout page.
Enable direct link products to the WooCommerce Checkout Page
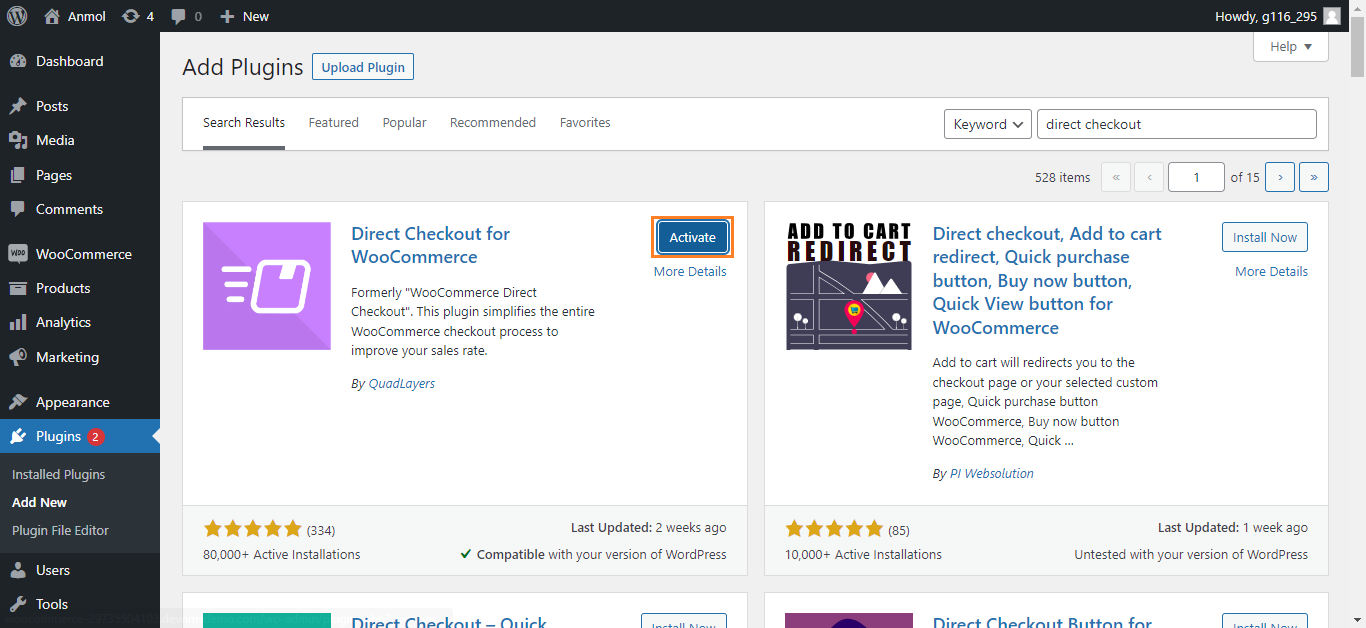
Allowing customers to link product pages to the checkout page directly will quicken the purchasing process. Ultimately, it will reduce the distractions and abandonment rate and boost conversions. If you enable direct link products to the WooCommerce checkout page, it will skip the cart page and take the customer directly to the checkout page. Follow these steps to do that:
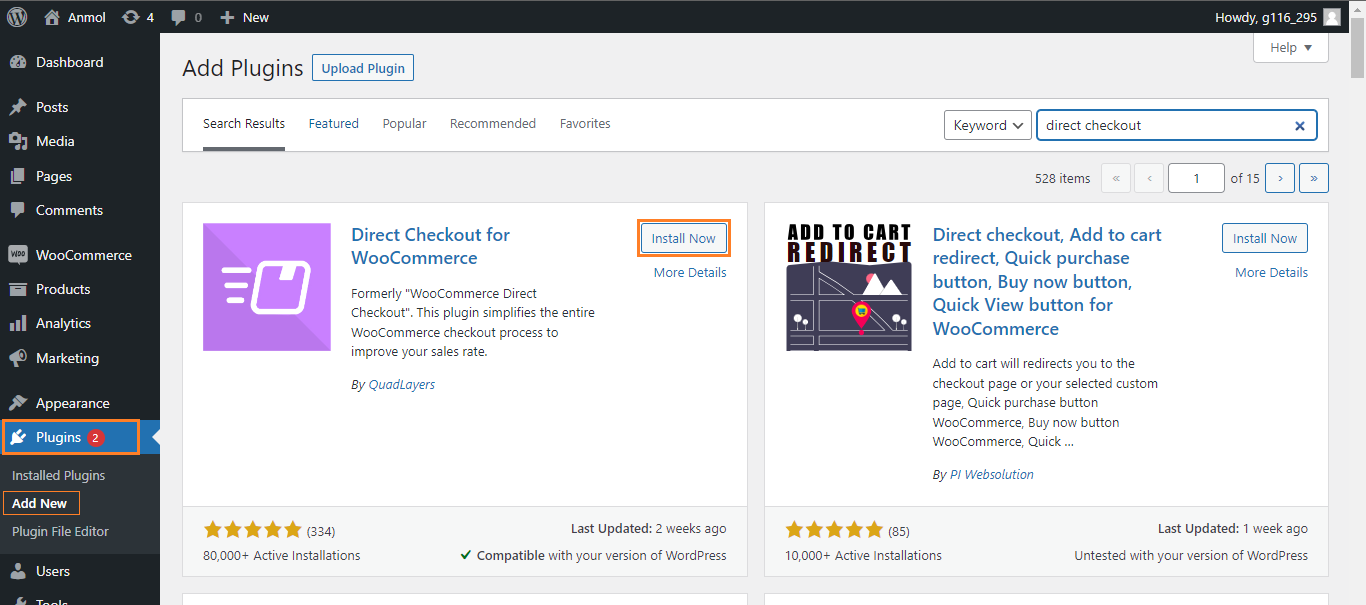
- First, install a plugin like Direct Checkout for WooCommerce, enabling one-click buying from product pages. Navigate to the “Add new” from the Plugins section on the WordPress admin dashboard and search for the required plugin. Then, install it by clicking on the “Install Now” button.
- Click on the “Activate” button.
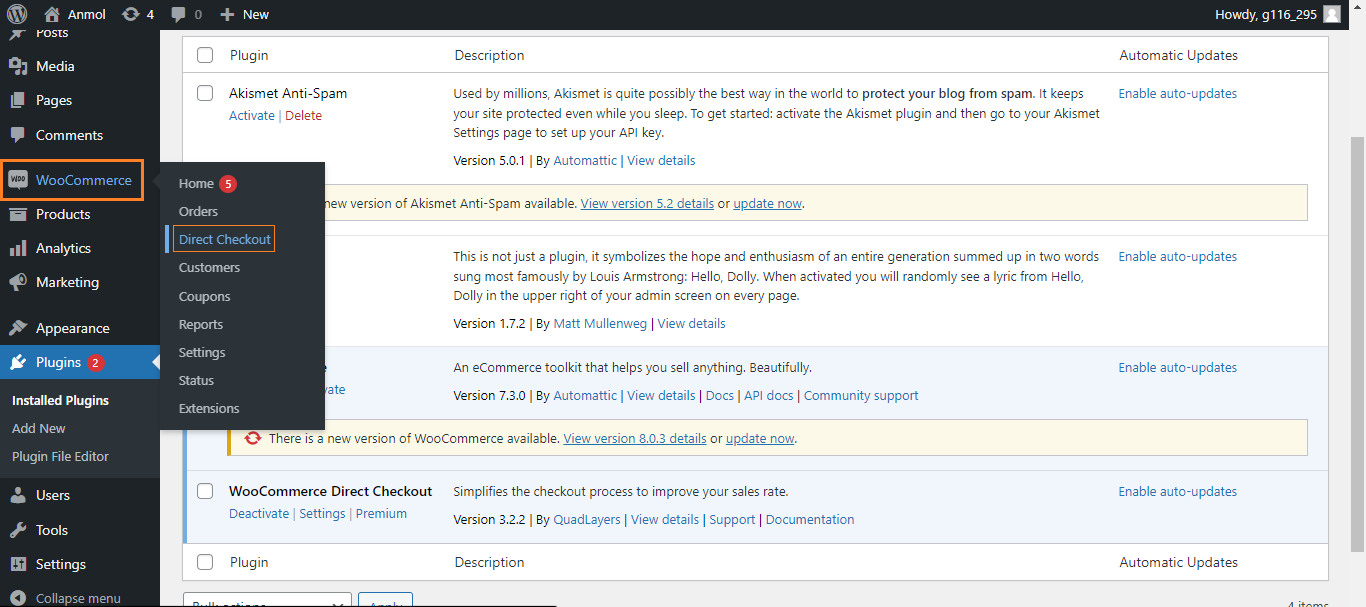
- Now, navigate to the WooCommerce Direct Checkout section on the WordPress admin dashboard.
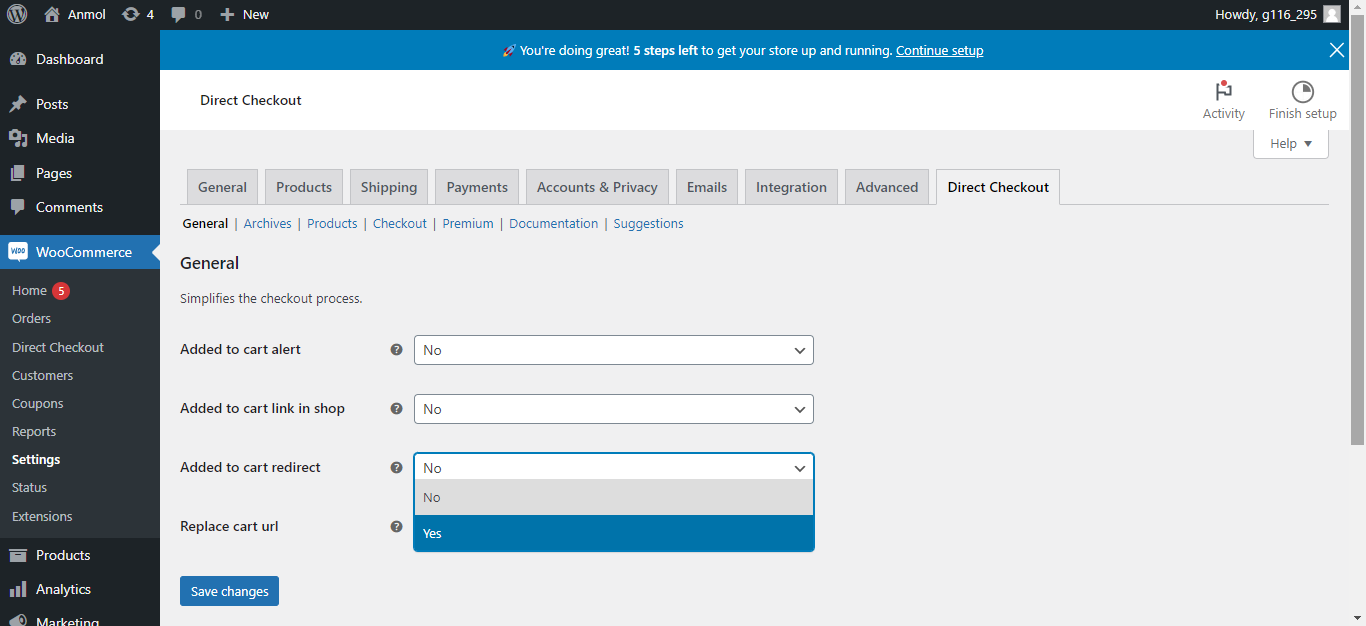
- Inside the “General” tab of the WooCommerce Direct Checkout section, select the “Yes” option from the “Added to cart redirect” drop-down menu.
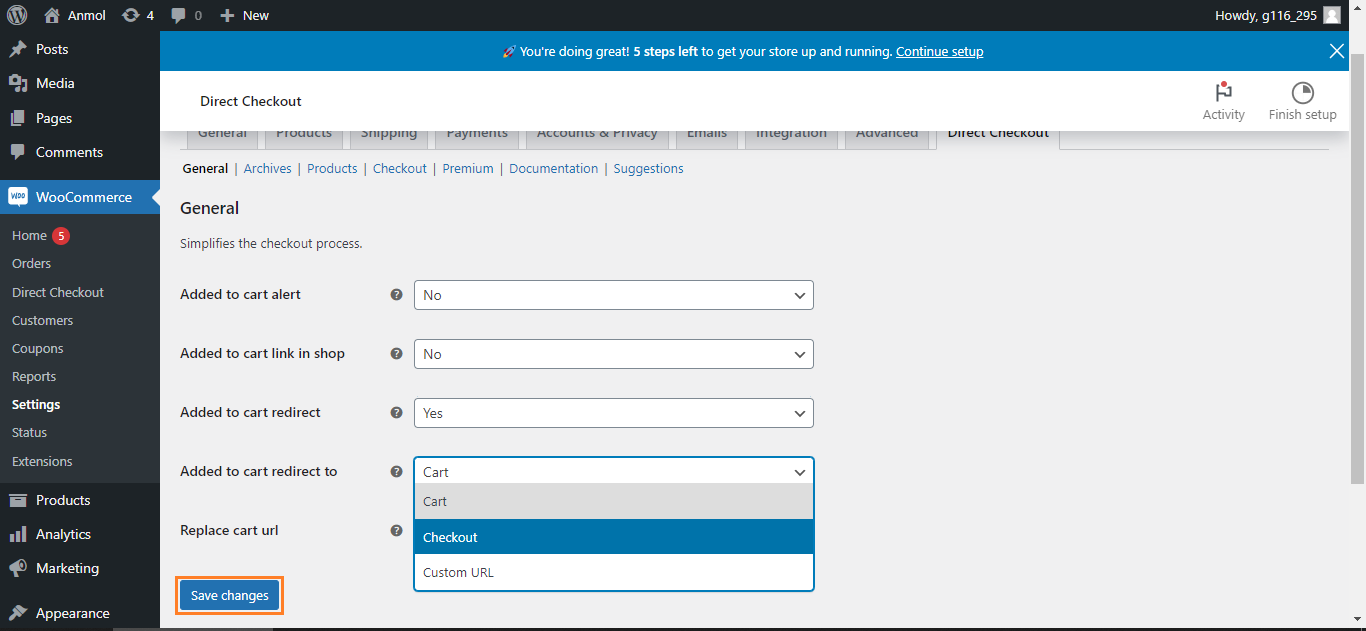
- Then, select the “Checkout” option from the “Added to cart redirect to” drop-down menu and click on the “Save Changes” button.
- Click the “Products” tab and check the “Add to cart behavior” box.
- After that, scroll down and save the changes. That’s it. You have enabled the direct link products to the WooCommerce checkout page option.
How to Test the Checkout Process?
Testing your checkout process is very important to identify any issues your customers are facing, leading to abandoned carts. Once you know the errors, you can fix them to grow your business.
Here are some tips for you to test your WooCommerce checkout:
- Enable test mode in WooCommerce Payments to detect fake credit card transactions.
- Place test orders to check for speed, bugs, confusing fields, and error messages.
- Ask friends or co-workers to test the checkout and give feedback from an actual customer perspective.
- Check on mobile devices to ensure responsiveness and mobile-friendly design.
- Test for both logged-in and logged-out users. Use incognito browser sessions to confirm guest checkout works appropriately.
- After completing checkout, verify confirmation emails, order tracking info, and thank you page contents.
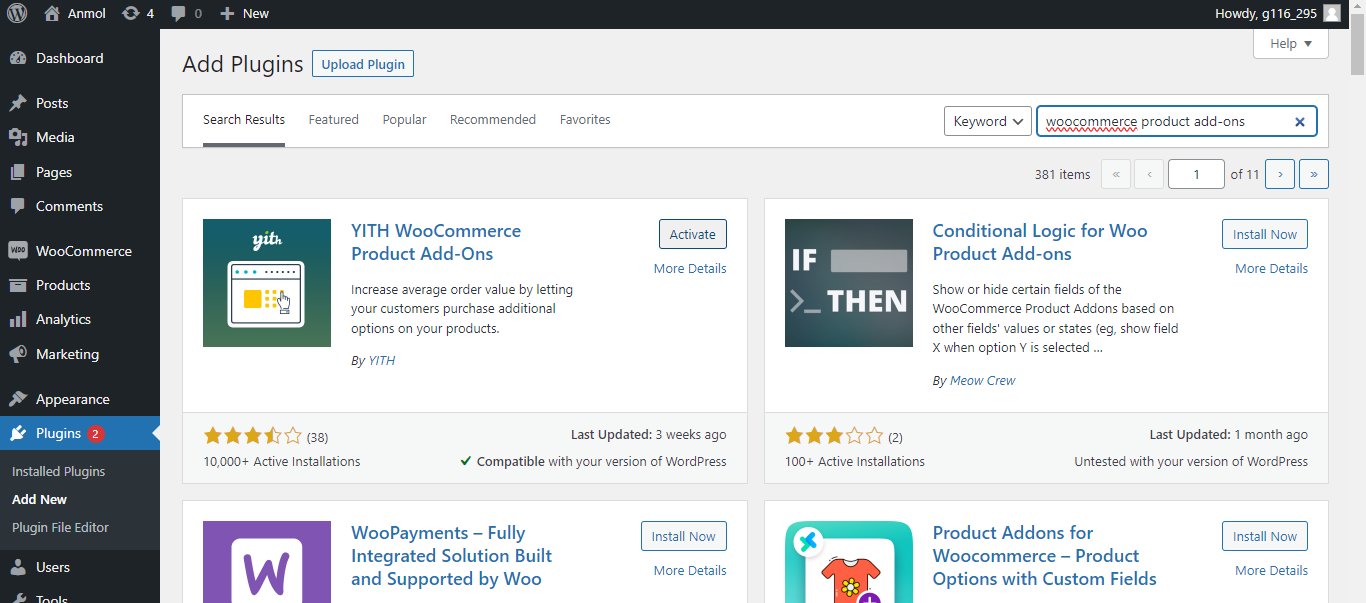
How do we allow add-ons at checkout in WooCommerce?
Offering product add-ons at checkout is a great way to boost revenue. Customers can upgrade their purchase with extras like gift wrapping, personalization, warranties, and more. Here’s how to enable this in WooCommerce:
- First, install and activate a checkout add-on plugin like WooCommerce Product Add-Ons. It will allow you to create and manage add-ons without coding.
- Navigate to the “Add New” in the Plugins section on the WordPress admin dashboard and search for the required plugin. Then, install and activate the plugin as we did for WooCommerce Direct Checkout.
- Once you finish it, you will find a “Product Add-ons & Extra Options” section on the left navigational bar. Go to that section available on the WordPress admin dashboard.
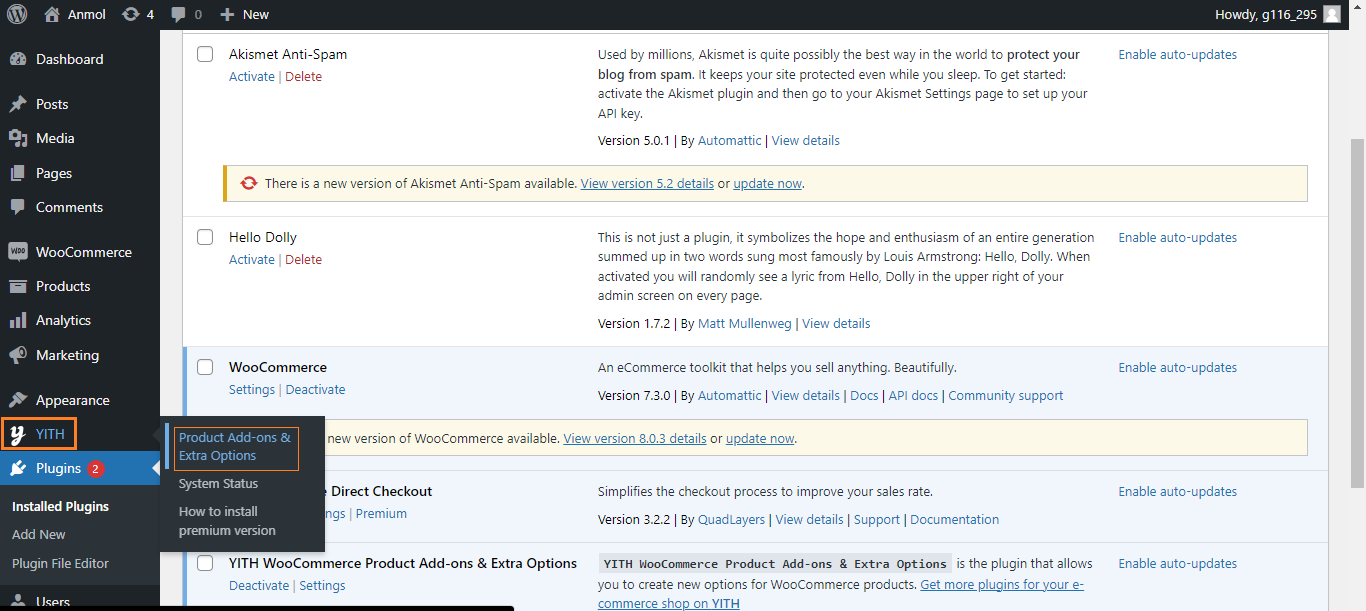
- Now, explore the options your plugin is providing and create your first add-on, such as “Gift Wrapping for $1“. Set the price, description, image, etc. In the end, display it on your checkout page.
The Best WooCommerce Checkout Plugins and Extensions
WooCommerce has a vast library of plugins and extensions for customizing the checkout page. These are some of the best options mentioned:
- WooCommerce Checkout Manager or WooCommerce Checkout Field Editor: Add, Remove, and Edit or create custom fields without coding.
- WooCommerce Cart Notices Add-On: Display actionable messages or notifications during checkout.
- WooCommerce Amazon Pay, WooCommerce Stripe Payment Gateway, and WooCommerce PayPal Payments: Platform integration for customers to pay using their respective accounts. Providing multiple payment methods leads to a higher conversion rate as the user gets options to pay as they want.
- WooCommerce Subscription Downloads: Offer digital subscriptions to customers that they can purchase at checkout. (Great option for membership sites)
- WooCommerce Checkout Add-Ons: This premium plugin lets you add free and paid add-ons on the checkout page.
There are many more checkout customization plugins and extensions available. Analyze your needs and customer demographics to select your store’s best plugins and extensions.
Conclusion
An optimized checkout process is essential for converting users into paying customers. Now, you better understand how to customize your default WooCommerce checkout page to reduce cart abandonment and increase revenue.
We have covered many things, including field customization, adding a payment gateway, allowing guests to log in, free shipping methods, and more. You can also learn different techniques to modify the checkout page using themes, plugins, code edits, and page builders. You can make the checkout experience smoother by applying these tips.
Note: Remember to back up your site before and after changes.
Boost conversions, delight customers with the proper checkout technique, and take your online store to the next level.


Related Tutorials


WooCommerce vs Magento vs Shopify: Which is your best ecommerce platform in 2024?