As Magento grows as a top eCommerce platform, store owners always look for ways to improve their online presence and engage customers more effectively. One great way to do this is by adding a blog to your store, which helps with customer interaction and improves search rankings and traffic. When it comes to blogging, WordPress is the go-to platform, known for its flexibility and ease of use.
So, how can you bring together the power of Magento and WordPress? The good news is that Magento WordPress integration is easier than you might think. You can seamlessly integrate a WordPress blog with your Magento store using a simple extension. This integration lets you take advantage of both platforms—Magento’s strong eCommerce features and WordPress’s excellent blogging tools.
In this guide, we’ll show you how to integrate WordPress with Magento so you can boost your store’s content and attract more visitors with minimal effort. Let’s get started!
Getting Started with Magento WordPress Integration
You’ll need a Magento module to add a WordPress blog to your Magento store. One popular and free option is FishPig, which works with both Magento Community and Enterprise editions. This integration allows for smooth navigation between the two platforms and keeps users within your Magento store, improving their experience.
Before you begin, ensure you have FTP access to your hosting server and are comfortable managing files. It’s also essential to follow the steps carefully for a smooth integration.
First, you’ll need to install WordPress. While many hosting providers offer a 1-click installation, we recommend installing it manually. This gives you more control over the setup and helps you understand the process for this tutorial.
Once WordPress is installed, we’ll set up the blog, install the FishPig module, and adjust the blog’s settings to match your Magento store.
Let’s get started with the Magento-WordPress integration!
Download and Install WordPress
The first step is to download and install WordPress. While you can use the one-click installation option through Devrims, we recommend you install WordPress manually for more control.
Here’s how to install WordPress manually:
- Visit the WordPress website and download the latest version. You’ll receive a zip file containing all the necessary files for the application.
- Extract the zip file to the root of your Magento store. This will create a “WordPress” folder containing all the site files.
- Rename the folder to either “wordpress” or “wp” (whichever you prefer).
Next, let’s configure WordPress.
- Open a web browser, type your Magento store URL, and add the folder name at the end. For example, if your folder is named “wp,” enter:
example.com/wp - Press Enter, and you should see the WordPress installation page if everything was done correctly.
Now, follow the instructions on the installation page. You can create a new database or use your existing Magento database for the database settings. This is safe because WordPress uses a separate table prefix by default (wp_). This ensures that Magento data won’t mix with WordPress data. You can also change the table prefix if you prefer.
If you don’t know where to find your database, check the $MagentoRoot/app/etc/local.xml file. It contains the database details.
Once the installation is finished, your WordPress blog will be set up on your Magento site. However, the integration isn’t complete yet. The next step is to install the Magento WordPress integration extension, FishPig.
Install the Integration Module
The FishPig module is a free extension that links WordPress with Magento. It connects both platforms and can be installed like any other Magento module using the Magento Connect Manager.
Before you begin, make sure to disable the Magento Compiler and Magento Cache to avoid any errors. After the installation is finished, you can re-enable the cache and compiler.
Configure the Magento WordPress Integration Module
To adjust the extension settings, log in to the Magento Admin panel and navigate to WordPress settings. Here, you will need to configure two sections: Database and Integration.
Database Settings
In the first section, if you used an existing database when installing WordPress, select “Yes.” Then, enter the table prefix you chose, for example, “wp_.”

If you created a new database for WordPress, select “No” and enter the correct database name and prefix. Once you’re done, click the “Save Config” button.
Integration Settings
In the “Integrate Theme” section, select “Yes” if you want the WordPress blog to use the same theme as your Magento store. If you choose “No,” the themes will not be linked.
Next, in the “Home URL” section, enter the name you want for your blog. This will be added to your Magento store’s base URL. For example, if you enter “blog,” the link will be: “example.com/blog.”
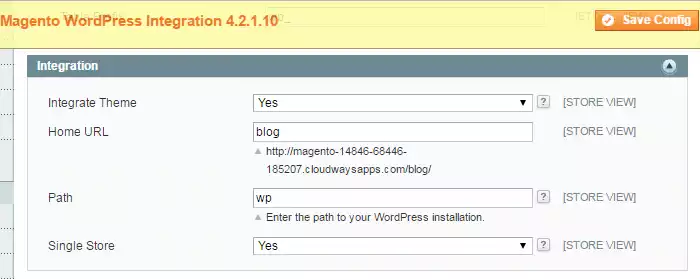
Lastly, in the “Path” field, specify the installation path. If you named your folder “wp,” just enter that. Then, click the “Save Config” button.
Configure WordPress for Magento Integration
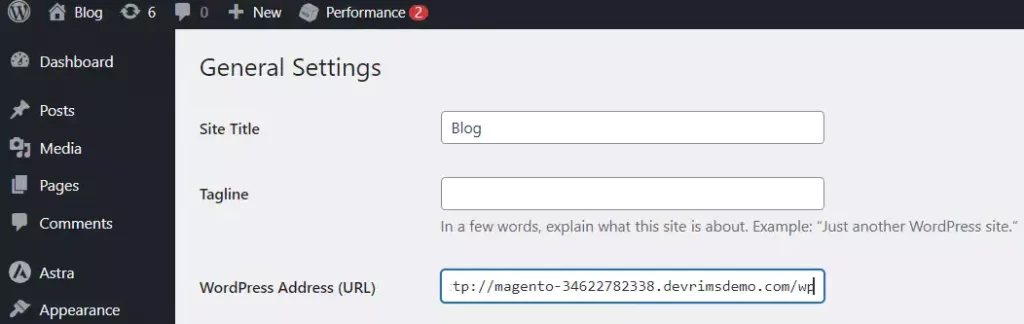
To complete the integration, we need to adjust some settings in the WordPress configuration. Like Magento, WordPress stores its settings, including URLs, in the database. These URLs can be found in the “wp_options” table. To edit them, log in to your WordPress Admin and go to Settings > General from the left navigation menu.
In the General Settings, you’ll see two fields for URLs: WordPress Address (URL): This is where WordPress is installed. It should not be changed. For example, if your Magento base URL is http://www.example.com/, the WordPress Address (URL) should be http://www.example.com/wp.
Site Address (URL): This is the URL where the frontend of your WordPress blog will be available. Usually, this URL matches the WordPress Address (URL). However, since we are integrating WordPress with Magento, the Site Address will be your Magento base URL plus the Home URL you set earlier in the Magento WordPress integration module. For example, if your Magento base URL is http://www.example.com/ and you set the Home URL as “blog” in the module, the Site Address will be http://www.example.com/blog.

Once you’ve checked and updated these URLs, click the “Save Changes” button at the bottom of the page.
Congratulations! Your WordPress blog is now integrated with your Magento store. To confirm it’s working, visit the URL you set up in the Magento WordPress integration module, such as http://www.example.com/blog.
Frequently Asked Questions
Here are answers to some frequently asked questions.
Is Magento better than WordPress?
Magento is better for large eCommerce stores with complex needs, while WordPress is more effortless for content-based sites and small online stores.
Why should you do WordPress Magento Integration?
WordPress Magento Integration has many benefits. It boosts traffic by using eCommerce SEO tools and engaging blog posts about products and promotions, which drive visitors to Magento product pages and increase conversions.
The integration creates a smooth “Blog to Cart” experience, turning blog readers into buyers by linking WordPress content directly to Magento products. Combining both platforms also improves the user experience with more customization options and easier order processing through a single login system.
What is Magento integration?
Magento integration connects the platform to other systems like payment gateways, shipping services, and CRMs, making store operations more efficient.
Does Magento work with WordPress?
Yes, Magento can integrate with WordPress using plugins, enabling smooth navigation and a consistent theme across both platforms.
How to migrate Magento to WordPress?
Use a migration plugin like Cart2Cart or LitExtension to move products, orders, and customer data from Magento to WordPress/WooCommerce.
Conclusion
Integrating WordPress with Magento improves your online store by combining Magento’s eCommerce features with WordPress’s blogging tools. This integration helps boost SEO, drive traffic, and increase conversions by linking blog content directly to product pages. The FishPig extension makes the setup easy and seamless, providing a better user experience with smooth navigation and content. Your Magento store and WordPress blog are now connected, giving you a strong, content-driven solution for your business.
Related Topics:

Related Tutorials