WordPress is the world’s most popular content management system (CMS), powering millions of websites. However, its widespread use also makes it a prime target for hackers seeking to exploit vulnerabilities. Despite its strong security features, no WordPress site is completely immune to malware attacks.
Malware can cause significant damage to your site, from unauthorized redirects and corrupted files to compromised user data. The consequences of a malware infection can include lost traffic, damaged credibility, and even the complete shutdown of your site.
In this article, we’ll guide you through effective methods for removing malware from your WordPress site. Whether you prefer manual removal, automated tools, or need to hire professional help, we’ll cover all the options. So that, you can choose the best solution for your situation and ensure your site stays secure against future threats.
What to Do Before Removing Malware on WordPress
Before removing malware from WordPress, restrict access by modifying the .htaccess file to block all IPs except your own, ensuring only authorized administrators can manage the cleanup. Then, back up your WordPress files and database to safeguard your site and facilitate recovery if needed.
Restrict WordPress Access
When you suspect that your WordPress site has been compromised, it’s crucial to restrict access immediately. This action helps prevent the malware from spreading to visitors’ devices or redirecting them to harmful websites. Limiting access ensures that only authorized administrators can address the issue, making it easier to manage and track changes during the recovery process.
To restrict access to your WordPress site, you can modify the .htaccess file to block all IP addresses except your own. Here’s how you can do it:
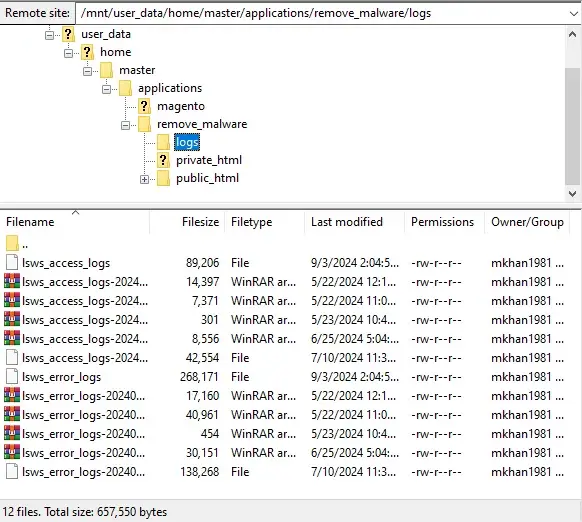
- Log in to your hosting server via SFTP service using FileZilla or any other software.
- Navigate to the application where you can manage your website files.
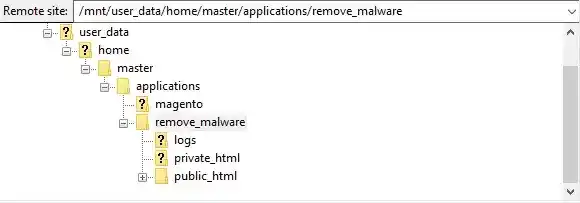
- Locate the .htaccess file in your WordPress installation’s public_html or root directory.
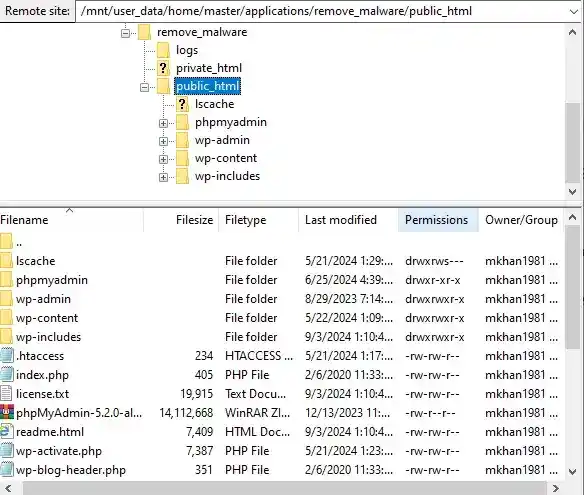
- If the .htaccess file is not visible, ensure that hidden files are enabled in your file manager settings.
- Open the .htaccess file for editing.
- Add a rule to block all IP addresses except your own:
order allow,deny

deny from all

allow from [your_IP_address]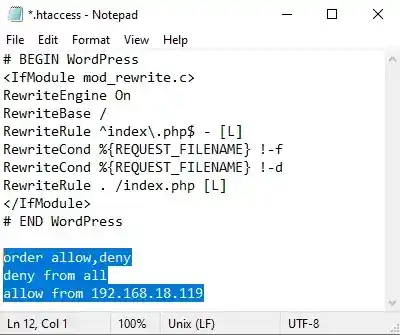
- Replace [your_IP_address] with your IP address to ensure that only your computer can access the site.
- Save the modified .htaccess file to apply the changes.
- Ensure your computer has a static IP address to avoid needing to update the .htaccess file if your IP address changes.
Restricting access to your WordPress site is a crucial first step in managing a potential malware infection. It helps secure the environment, allowing you to focus on cleaning and restoring your site without risking further damage.
Back-Up WordPress Files
Before removing malware from your WordPress site, it’s essential to create a full backup of your website files and database. A backup provides safety, allowing you to restore your site if anything goes wrong during the cleanup process. Additionally, having a backup makes it easier to identify when and where the malware was introduced by comparing the infected files to a clean version.
Here’s how you can back up your WordPress files:
- Log in to your hosting account and navigate to the server.
- Look for the backup or file management section, where you can create a site backup.
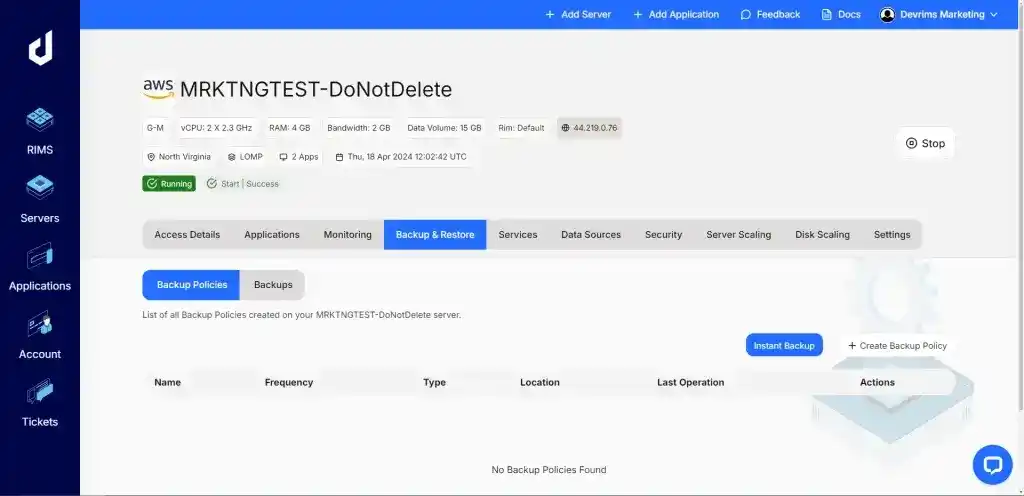
- Click on the “Instant Backup” button and choose the option to back up your entire website, including both files and the database.
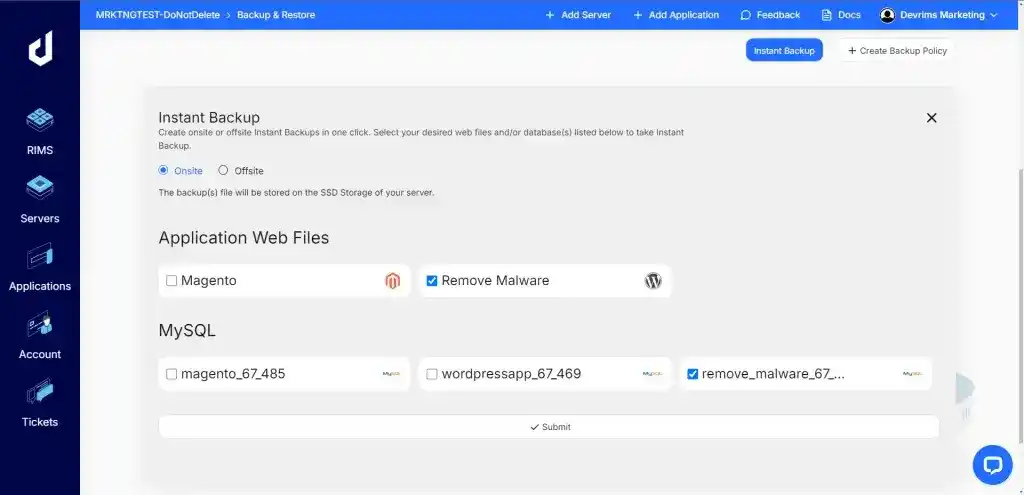
- Select a recent date or create a new backup if necessary.
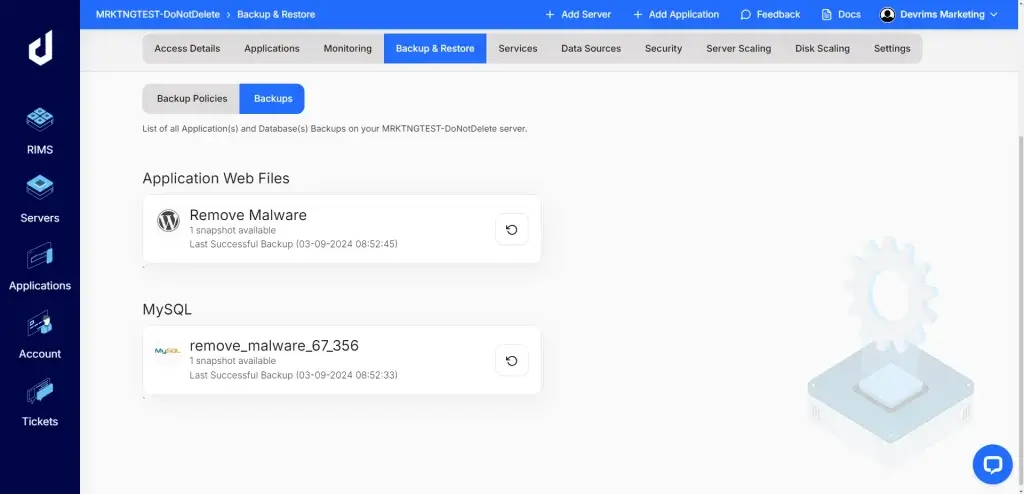
- Once the backup is complete, download the files to your local computer. This ensures you have a copy of your site stored safely offline.
- Don’t forget to back up your database separately if it’s not included in the file backup.
- After downloading, verify that the backup includes all necessary files and the database. Check the file sizes and contents to ensure everything is backed up correctly.
- If your hosting provider offers automatic backups, ensure this feature is enabled. Regular backups ensure you always have an up-to-date copy of your site in case of future issues.
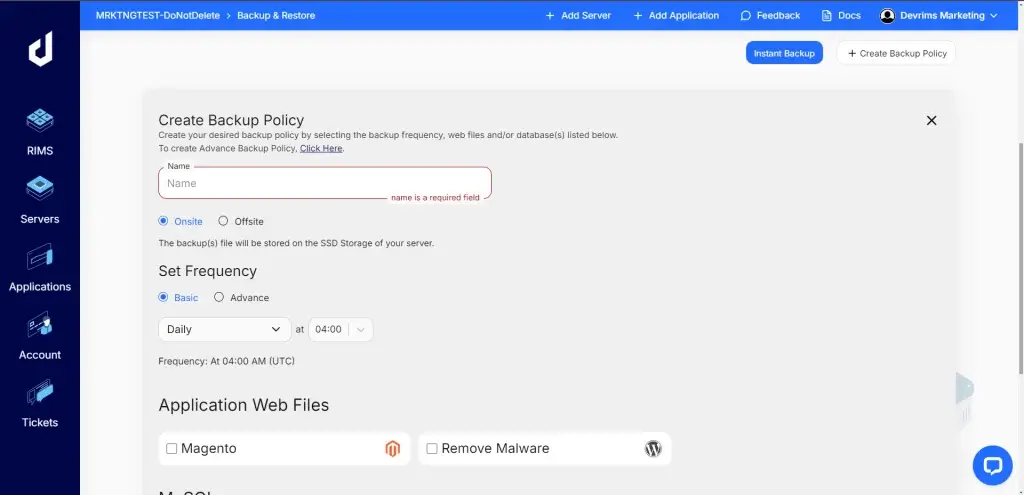
If your hosting provider does not offer a built-in backup option, consider using a WordPress backup plugin. Plugins like UpdraftPlus or BackWPup can automate the backup process and store your files in cloud storage services like Google Drive or Dropbox.
Backing up your WordPress files is critical to securing your site during a malware attack. Knowing that you can recover your site if needed provides peace of mind and helps you track down and remove the malware more effectively.
Check Recent Changes
Identifying recent changes on your website is a crucial step in locating and removing malware. You can pinpoint which files may have been compromised by tracking modifications and focus on cleaning those specific areas.
Here’s how you can check recent changes on your WordPress site:
- Most hosting providers offer an activity log or access logs that track changes made to your website. This log can provide insights into suspicious activity, such as unauthorized file modifications or adding new files.
- If your hosting provider offers this feature, navigate to the appropriate section of your control panel to review recent changes.
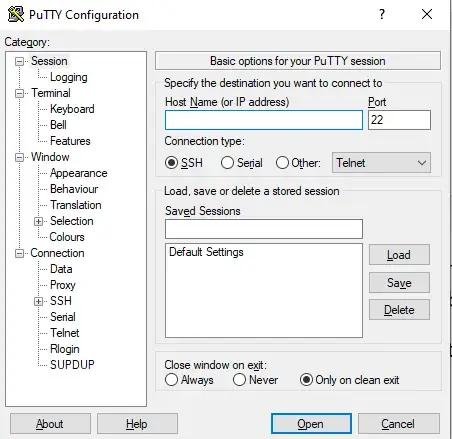
- You can connect to your WordPress server via SSH (Secure Shell) for a more detailed examination. This allows you to search for files that have been modified within a specific timeframe.
- Use a terminal or SSH client like PuTTY to connect to your server.
- Run the following command to list recently modified files:
find . -type f -name '*.php' -mtime -3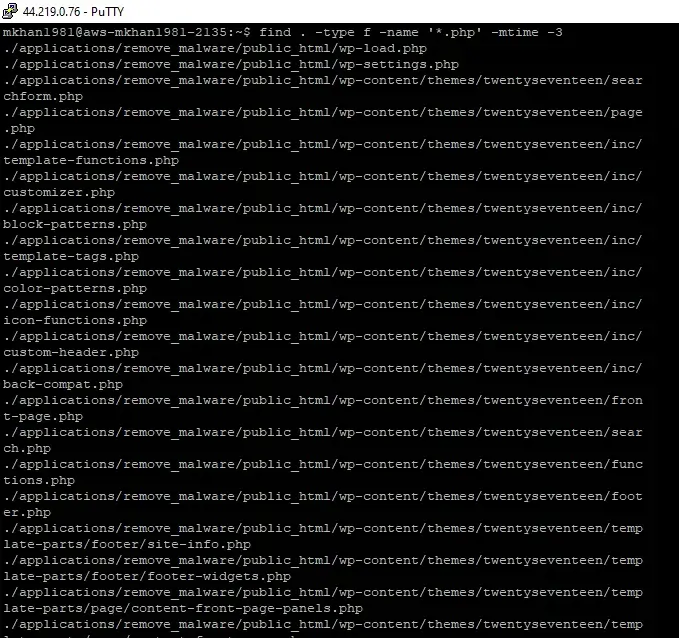
- Replace *.php with the file extension you want to search for (e.g., .js, .html). The -mtime -3 option specifies that you want to find files modified within the last three days. Adjust the number based on how far back you want to search.
- Review the list of modified files to identify any that seem out of place or suspicious. Pay special attention to core WordPress files, theme files, and plugins, as these are common targets for malware.
- If you find any unfamiliar files or suspicious modifications, note them for further investigation.
- If you have a recent backup or a clean version of your website files, compare the modified files against the clean versions. This can help you identify malicious code or unauthorized changes.
Checking recent changes allows you to focus on the areas of your site most likely to be compromised by malware. By narrowing down the list of potential threats, you can more effectively remove malicious code and restore your site’s security.
Update All Passwords and Access Keys
When your WordPress site is compromised, one of the first steps is to update all passwords and access keys. Cybercriminals often deploy malware to capture login credentials, which they can use to gain unauthorized access to your site. Changing your passwords immediately can slow down the attack and prevent further damage.
Here’s how to update your passwords and access keys:
- Update WordPress Admin Passwords:
- Log in to your WordPress dashboard and navigate to the “Users” section.
- Change the password for all administrator accounts. Ensure that each password is strong, unique, and challenging to guess.

- Change Database Credentials:
- Update the database password in your hosting platform.
- After changing it, update the wp-config.php file in your WordPress installation to reflect the new database credentials.
- This step is crucial to prevent unauthorized access to your database, which stores all your site’s data.
- Reset Hosting and FTP Passwords:
- Change the passwords for your hosting account and FTP client. Use strong, unique passwords to minimize the risk of these accounts being compromised.
- Ensure your hosting account and FTP client are updated with the new credentials.
- Use a Password Generator:
- To create secure passwords, use a password generator tool like 1Password Strong Password Generator or LastPass. These tools can generate complex passwords much harder for attackers to crack.
- Store Credentials Securely:
- Use a password manager such as KeyPass or 1Password to store your new credentials. These tools offer an encrypted vault, ensuring your login information is safe and easily accessible only to you.
- Update WordPress Salts:
- WordPress salts are security keys that help encrypt your login credentials. Changing them enhances the security of your site, especially after a breach.
- You can reset the salts by accessing your server via SSH and running the following command:
wp config shuffle-salts && wp user reset-password $(wp user list --role=administrator --field=ID)- This command will shuffle the salts and reset the passwords for all administrator accounts.
Updating all passwords and access keys is critical in securing your WordPress site after a malware attack. It helps lock out unauthorized users and strengthens your site’s overall security, reducing the likelihood of future breaches.
Remove Symlinks
Symlinks, or symbolic links, are shortcuts that point to files or directories, simplifying file management by providing multiple access points. However, cyber attackers can exploit these shortcuts to gain unauthorized access to critical files or even the root directory of your WordPress site.
To protect your site from further damage, removing any existing symlinks during the malware removal process is crucial. Here’s how to do it:
- Connect to your WordPress server using a terminal or an SSH client like PuTTY. SSH access allows you to run commands directly on your server, making it easier to manage files and directories.
- Run the following command to find and unlink all symlinks in your WordPress installation:
find . -type l -exec unlink {} \;- This command searches for all symbolic links (-type l) within the current directory and its subdirectories, then unlinks them, effectively removing the symlinks from your site.
- After running the command, check the directories where symlinks were previously present to ensure they’ve been successfully removed. This step helps confirm that potential security vulnerabilities have been addressed.
- Once you’ve completed all malware removal steps and secured your site, it’s essential to recreate any necessary symlinks. Some WordPress configurations or plugins may rely on symlinks for proper functionality.
- Ensure only to recreate legitimate symlinks required for your site to function correctly.
Removing symlinks is essential to the WordPress malware cleanup process, as it eliminates potential backdoors that attackers could exploit. By taking this step, you help ensure that your site remains secure and that unauthorized access points are effectively closed off.
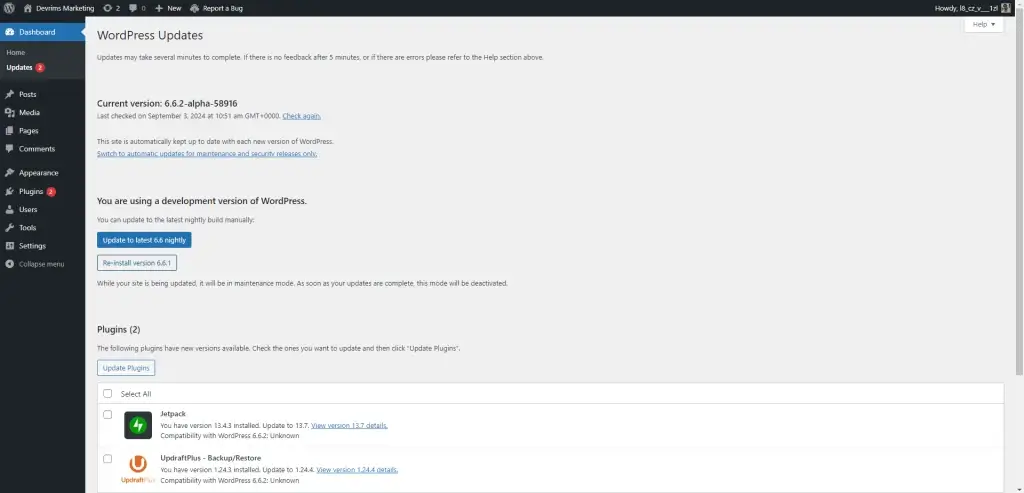
Update WordPress
Keeping your WordPress installation up to date is one of the most effective ways to protect your site from malware and security vulnerabilities. Outdated versions of WordPress, plugins, and themes are common targets for cybercriminals, as they may contain security flaws that have been patched in newer versions.
Here’s how to update WordPress and its components to secure your site:
- Log in to your WordPress dashboard and navigate to the “Updates” section under the “Dashboard” menu.

- If an update is available for WordPress, you’ll see a notification. Click “Update Now” to install the latest version.
- Updating WordPress core files ensures that the latest security patches and improvements protect your site.
Outdated plugins and themes can introduce security vulnerabilities. Go to the “Plugins” and “Themes” sections of your WordPress dashboard and update any that have new versions available.
If you notice any plugins or themes, their developers no longer maintain, consider replacing them with more secure alternatives.
- Regularly updating plugins and themes helps prevent attackers from exploiting known vulnerabilities.
WordPress relies on PHP as its scripting language. An outdated PHP version can expose your site to attacks like SQL injection and cross-site scripting (XSS).
- Check with your hosting provider or access your control panel to update PHP to the latest supported version. Many hosts offer easy PHP version management within their control panels.
- Updating PHP ensures better security and performance for your WordPress site.
Enable automatic updates for WordPress core, plugins, and themes to keep your WordPress site automatically updated with the latest security patches.
- Many hosting providers offer an option to turn on automatic updates in their control panels. This feature might already be enabled by default using managed WordPress hosting.
- Automatic updates help ensure your site remains secure even if you forget to check for updates manually.
Some hosting providers offer built-in vulnerability detection tools that scan your WordPress installation for outdated or compromised components. Use these tools regularly to monitor your site’s security status.
Updating WordPress and its components significantly reduces the attack surface that cybercriminals can exploit. Regular updates are crucial for maintaining your website’s security and integrity, helping protect it from potential threats.
Reset File and Folder Permissions
Proper file and folder permissions are crucial for the security of your WordPress site. Incorrect permissions can expose sensitive data to unauthorized users, making it easier for attackers to infect your site or access critical information. Resetting file and folder permissions ensures that only authorized users can access the necessary files and directories, helping secure your site against further compromise.
Here’s how to reset file and folder permissions:
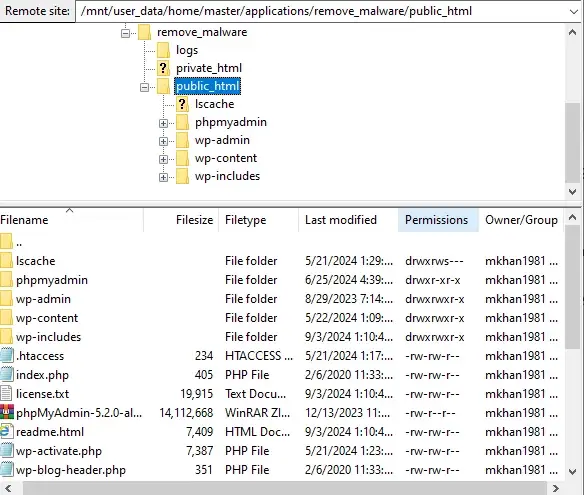
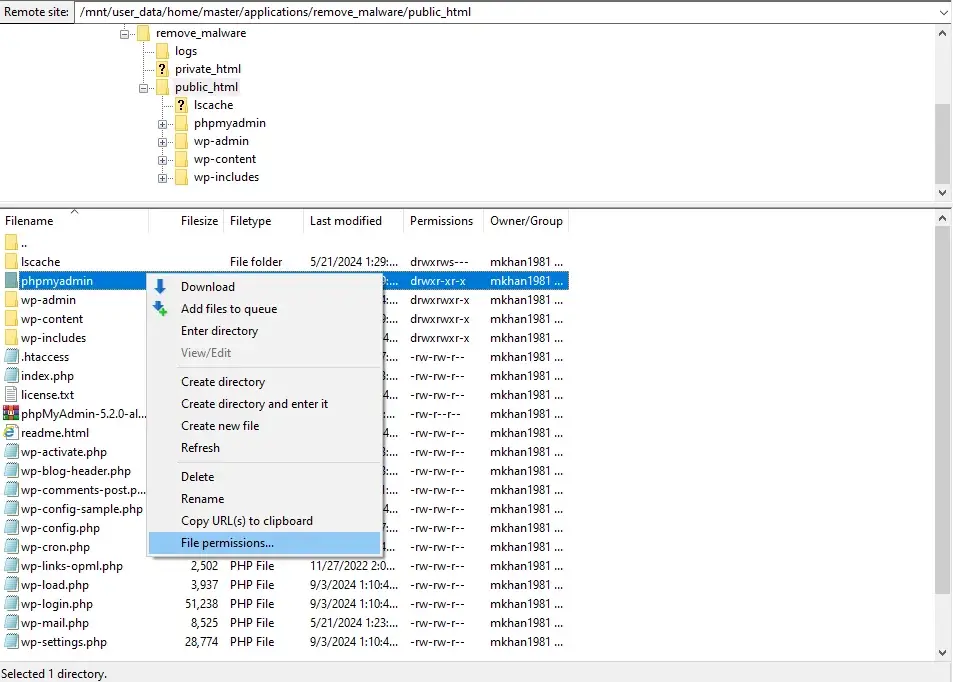
- Connect to your WordPress site using an FTP client like FileZilla.
- Navigate to your WordPress root directory and review the permissions for files and folders.
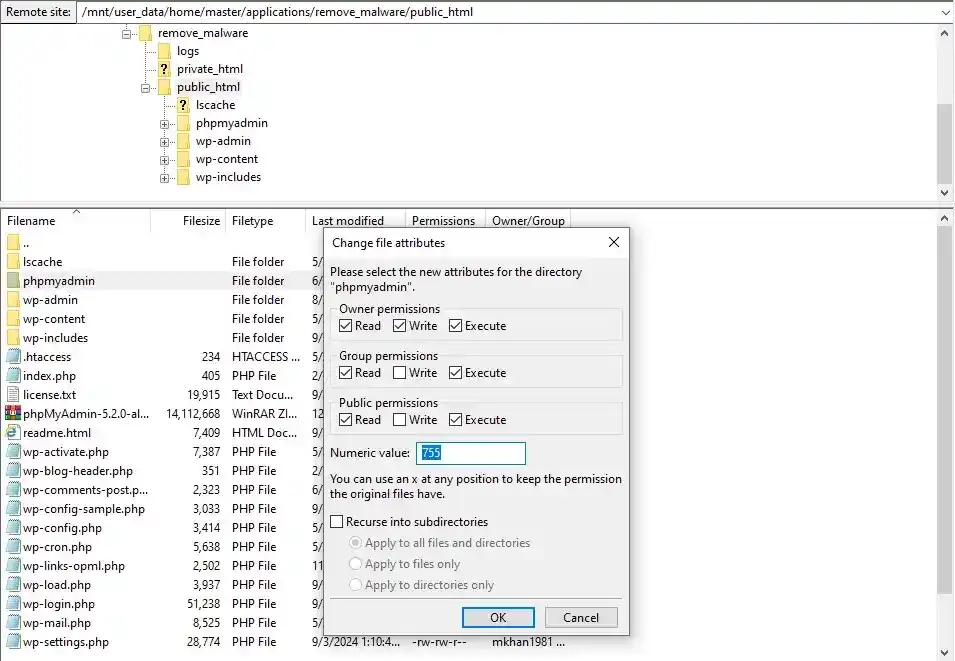
- Set the file permissions to 644 and folder permissions to 755. This configuration provides the appropriate level of access:
- Files (644): The owner can read and write, while the group and others can only read.
- Folders (755): The owner can read, write, and execute, while the group and others can only read and execute.
- You can usually set these permissions by right-clicking on files or folders in your FTP client and selecting “File Permissions” or a similar option.
- After resetting permissions, double-check your site to ensure everything functions correctly. Pay attention to any errors or issues arising from incorrect permissions.
- If you encounter problems, review the permissions settings to ensure they match the recommended values.
Resetting file and folder permissions is critical to securing your WordPress site. It prevents unauthorized access and modification of your site’s files, reducing the risk of further infections or data breaches.
Scan Your Computer for Malware
When dealing with a WordPress malware infection, checking your computer for malware is crucial. If your computer is compromised, malware could have spread from your WordPress site or be used to reintroduce malicious code to your website, hampering your cleanup efforts.
Here’s how to ensure your computer is clean and prevent further spread of malware:
- Use reputable antivirus software to perform a comprehensive scan of your computer. This will help detect and remove any malware that may have infected your system. Popular antivirus programs include Bitdefender, Norton, and Malwarebytes. Ensure your antivirus software is up-to-date with the latest virus definitions to catch new threats.
- Look for any unusual behavior on your computer, such as unexpected pop-ups, slow performance, or unfamiliar programs. These can be indicators of a malware infection. Monitor your system’s activity and network traffic to identify suspicious processes or connections.
- Ensure that your antivirus software is fully updated to the latest version. Updates often include new malware definitions and improved detection capabilities. If available, enable automatic updates to keep your protection current.
- Follow the antivirus software’s instructions to quarantine or remove any detected malware. If prompted, restart your computer to complete the removal process.
- Clear your browser’s cache, cookies, and history. This helps remove any remnants of malware that might be stored in your browser or its settings. Consider resetting your browser settings to their default state to eliminate potential browser-based malware.
- After cleaning your computer, update your passwords for all accounts, including those used to access your WordPress site. Use strong, unique passwords to enhance security.
- After ensuring your computer is malware-free, revisit your WordPress site and verify that the malware removal process is complete. Perform additional scans if needed to confirm that no remnants of the infection remain.
Scanning your computer for malware is a critical step in the cleanup process. By ensuring that your system is not compromised, you help prevent the malware from reappearing on your WordPress site and reduce the risk of future infections.
How to Remove Malware Manually from WordPress Site
To manually remove malware from a WordPress site, reinstall the WordPress core files to replace potentially compromised files with clean ones. Then, compare your infected installation with a clean version to identify and remove malicious code, clear any PHP files from the uploads folder, and inspect your SQL database and website content for hidden backdoors or suspicious scripts.
Reinstall WordPress Core Files
Reinstalling the WordPress core files is crucial in removing malware from your site. This process replaces the core WordPress files with fresh copies, helping to eliminate any malicious code that might be embedded in these files. Here’s how to reinstall WordPress core files, depending on your access and tools:
Reinstall via the WordPress Admin Dashboard:
- Log in to your WordPress dashboard.
- Navigate to the sidebar and click on “Updates.”
- Click the “Reinstall Now” button under the WordPress version section. This will automatically download and reinstall the latest version of WordPress core files without affecting your content or settings.
Reinstall Using WP-CLI:
- If you prefer using the command line, you can reinstall WordPress core files using WP-CLI.
- Connect to your server via SSH.
- Navigate to your WordPress root directory using the cd command.

- Rename the existing wp-admin and wp-includes directories to ensure fresh downloads:
mv wp-admin wp-admin-old

mv wp-includes wp-includes-old
- Run the following command to download a fresh copy of WordPress core files. Replace 6.6 with the version you want:
wp core download --version=6.6 --skip-content –force
- This command downloads the specified WordPress version and replaces the core files while keeping your existing wp-content folder and database intact.
Reinstalling WordPress core files helps remove any potential malware hidden in the WordPress system files and ensures your site runs on a clean and updated version of WordPress.
Compare Infected vs Clean WordPress Installation
Comparing your infected WordPress installation with a clean one helps you identify any malicious changes to your files. This process involves checking for differences between the two sets of files to pinpoint which ones have been compromised.
Here’s how to effectively compare your infected and clean WordPress installations:
Prepare Clean and Infected File Sets:
- Clean Installation: Download a fresh copy of WordPress from the official WordPress website.
- Infected Installation: Ensure you have a backup of your infected WordPress files.
Use File Comparison Tools:
- FTP Client Method: Open the clean and infected file sets using an FTP client that supports split window features, such as FileZilla. This method allows you to compare files manually, but it can be time-consuming, especially for more significant sites.
- Command-Line Method:
- Upload the clean and infected WordPress files to separate directories on your server. For instance, name them wordpress-clean and wordpress-infected.
- Connect to your server via SSH and navigate to both folders’ parent directory.
- Use the diff command to compare the files and identify differences:
diff -r wordpress-clean/ wordpress-infected/ -x wp-contentThe -r option allows for a recursive comparison, and the -x wp-content option excludes the wp-content directory to focus on core WordPress files.
Verify File Integrity with Checksums:
- Core Files Checksum:
- Run the following WP-CLI command to check the integrity of your WordPress core files. This command compares your current core files with the official WordPress checksums:
wp core verify-checksums- This process helps you detect any unauthorized modifications in your WordPress core files.
- Carefully review the differences highlighted by the comparison tools. Look for any unfamiliar or suspicious code, especially in files that should not have changed. Focus on core files and configuration files that might be altered by malware.
- Once you identify the infected files, replace them with their clean counterparts. Do not overwrite the wp-content directory to avoid losing your themes and plugins.
- After replacing the infected files, run the checksum and file comparison commands again to ensure that all malicious code has been removed and no new issues have been introduced.
Comparing infected vs. clean WordPress installations is an effective way to pinpoint and remove malicious code from your site. By carefully following these steps, you can restore your WordPress installation to a secure and functional state.
Clear Out PHP Files from Uploads
Malware often hides within PHP files in the wp-content/uploads directory, exploiting the file upload functionality to gain unauthorized access to your WordPress site. Removing these PHP files helps eliminate potential entry points for attackers and reduces the risk of further infection.
Here’s how to clear out PHP files from the Uploads folder:
Via FTP:
- Connect to your website using an FTP client such as FileZilla.
- Navigate to the public_html/wp-content/uploads directory.
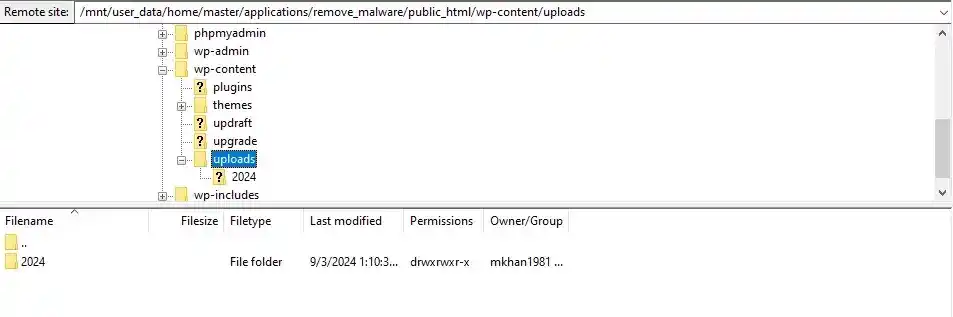
- Within the uploads directory, look for files with a .php extension. Attackers often use these to execute malicious code.
- If you find any file like that, select these files and delete them.
Via SSH:
- Connect to your server via SSH.
- Navigate to the uploads directory:
cd public_html/wp-content/uploads/
- List PHP files to verify their presence before deletion:
find . -name "*.php"- If you find any, remove all PHP files:
rm *.phpCaution: The rm *.php command deletes all PHP files in the uploads directory. Ensure that no essential files are present before executing this command.
- Additional Precautions:
- Inspect Other File Types: If you suspect that other file types, such as .js or .html, might be compromised, perform similar checks and cleanup operations.
- Review File Permissions: Ensure that file permissions in the uploads directory are set correctly to prevent unauthorized file uploads.
By clearing PHP files from the uploads folder, you can close one of the common entry points for malware, thus enhancing your WordPress site’s security and mitigating the risk of further attacks.
Look for Hidden Backdoors within Your Files
Cybercriminals often create hidden backdoors by injecting malicious code into your WordPress files, including core files, themes, and plugins. These backdoors enable attackers to regain access or control even after initial cleanup efforts. Identifying and removing these hidden threats is crucial to securing your website.
Here’s how to locate hidden backdoors in your WordPress files:
- Check critical files such as wp-config.php and wp-load.php, which are frequently targeted.
- Examine theme functions.php and plugin files, as these can have malicious code.
- Malicious code often uses specific PHP functions to create backdoors. Look for functions like base64_decode, exec, system, eval, and shell_exec, which attackers commonly use.
- Use the following command to find PHP files containing these functions:
find . -type f -name '*.php' | xargs egrep -i "(base64_decode|exec|system|eval|shell_exec)"- Review the results for any unexpected or unfamiliar code indicating a backdoor.
- Attackers sometimes embed malicious code within image files or use iframes to load external malicious scripts. To search for PHP code embedded in image files, run:
find wp-content/uploads -type f -iname '*.jpg' | xargs grep -i php- To check for hidden iframes in PHP files, use:
find . -type f -name '*.php' | xargs grep -i '<iframe'Be cautious with any results, as they might indicate malicious content hidden within seemingly innocuous files.
- Use a clean WordPress installation as a reference to compare the code in your existing files. This helps you identify any deviations or added scripts that could be backdoors.
- Carefully remove any identified backdoor code from your files. Ensure you do not inadvertently delete legitimate code necessary for your site’s functionality. After removal, test your site thoroughly to confirm that it functions correctly and that no new issues have been introduced.
- Continue monitoring your site for any signs of re-infection. Implement regular scans and updates to maintain security.
By diligently searching for and eliminating hidden backdoors, you can safeguard your WordPress site from persistent threats and ensure a more secure environment for your users.
Inspect the SQL Database File
Malware can also reside within your WordPress database, where attackers might inject harmful scripts into posts, pages, or other content. To ensure complete cleanup, inspecting and sanitizing your SQL database for malicious entries is essential. Here’s how to perform this crucial step:
- Connect to your server via SSH.
- Run the following command to search for suspicious entries in your SQL database:
wp db search "<script"This command will display entries containing the <script> tag, often used in malicious code. Review these entries carefully.
- To find other common script elements that might indicate malware, use:
wp db search '(<script|eval\(|atob|fromCharCode)' --regexThis command searches for JavaScript functions like eval(), atob(), and fromCharCode(), which attackers frequently exploit.
For manual inspection, if you have a backup of your SQL database, open it using a code editor that supports search functionality, such as Sublime Text or Visual Studio Code. Search for suspicious scripts and code snippets, focusing on the presence of <script> tags or any unexpected JavaScript functions.
Examine the content of posts, pages, and custom fields for injected malicious scripts, paying close attention to any code that doesn’t belong or seems out of place. Additionally, remember serialized data, as attackers sometimes use serialized PHP objects to conceal their code.
Once you identify malicious entries, you can manually remove them using WP-CLI or your database management tool like phpMyAdmin. However, exercise caution when deleting database entries to avoid removing legitimate content. If you are working directly with the database backup, carefully edit or delete the identified malicious scripts and then restore the cleaned database file to your WordPress installation.
After cleaning the database, testing and verifying that your website is functioning correctly is essential. Ensure that no data or content has been inadvertently removed or altered during the cleanup process. Continue to monitor your database for any signs of re-infection and implement regular backups and security scans to maintain its integrity.
Inspecting and sanitizing your SQL database is critical in removing malware from your WordPress site. By following these procedures, you can help ensure that your database remains free of malicious code and that your website operates securely.
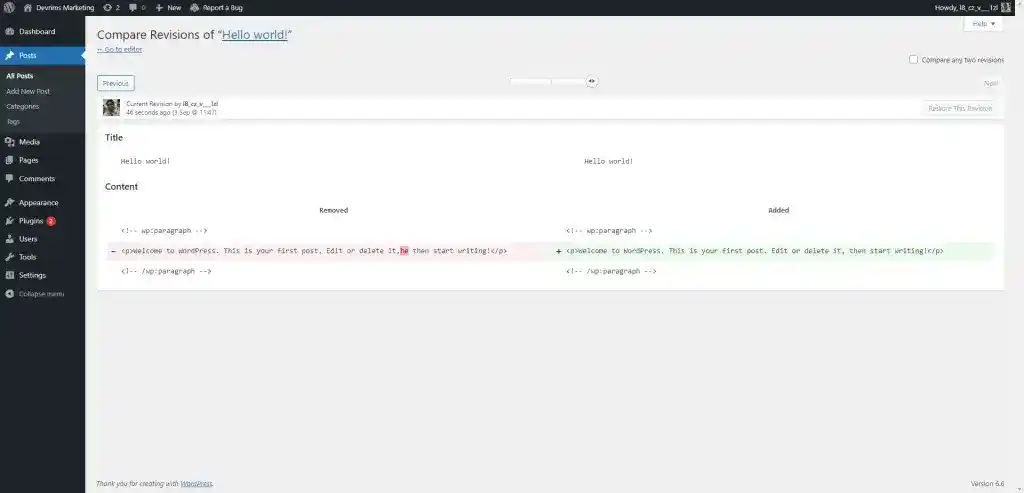
Review the Code for Each Page and Post
Malicious actors can inject harmful code into your WordPress pages, posts, and comments, exploiting input fields to introduce vulnerabilities. Carefully reviewing the code for each piece of content is crucial in identifying and removing these threats. Here’s how to thoroughly check and clean your content:
- Log in to your WordPress dashboard.
- Navigate to the page or post you want to review and click “Edit.”
- In the editor screen, open the “Settings” sidebar.
- Click the three-dot icon (or “Document” tab) and select “Revisions” to view the history of changes.
- Examine recent revisions for any unauthorized or suspicious modifications.
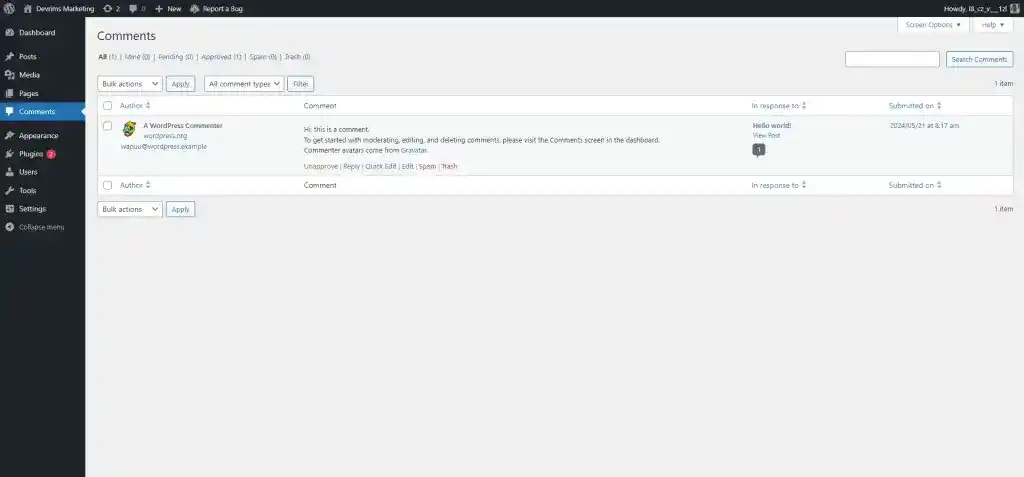
Examine Comments:
- In your WordPress dashboard, go to “Comments.“
- Review the comment history for any suspicious entries or content.
- To remove unwanted comments, hover over the comment and click “Trash.”
By thoroughly reviewing each page and post, you can identify and eliminate hidden malware, ensuring the integrity and security of your WordPress site. This step is essential in maintaining a clean and functional website.
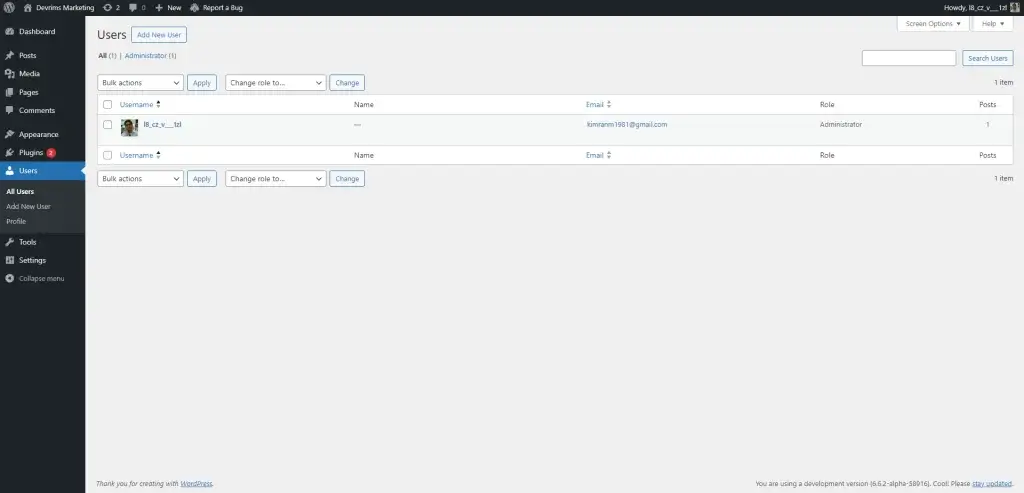
Review the User List and Privileges
After cleaning your WordPress installation, you must audit your user list and their privileges. Unauthorized or malicious user accounts can pose significant security risks, potentially allowing attackers to access or alter critical parts of your website. Follow these steps to ensure that only legitimate and authorized users have access to your WordPress site:
- Log in to your WordPress dashboard.
- Navigate to the sidebar and select “Users” then “All Users.”
- Review the list of users for any unfamiliar or suspicious accounts.
- Look for accounts with roles you did not authorize, particularly those with admin privileges.
- To delete an unwanted user, check the box next to their name.
- From the “Bulk actions” dropdown menu, select “Delete” and click “Apply.”
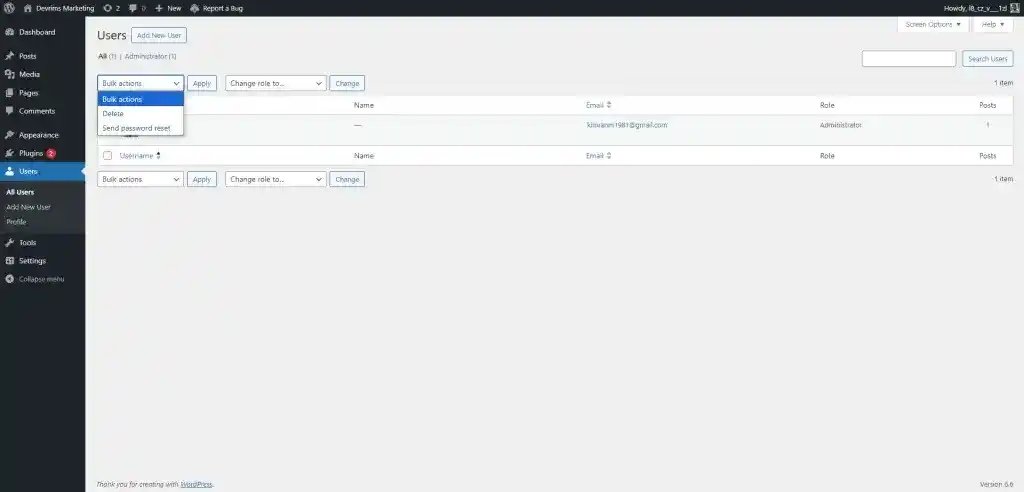
- Confirm the deletion if prompted.
Via SSH:
- Connect to your server via SSH.
- Use WP-CLI to list all users sorted by their registration date. Run the following command:
wp user list --field=ID,user_login,user_registered --orderby=user_registered --order=ASC --format=table- Review the output to identify any unusual or recently created accounts that need attention.
- Implement periodic reviews of your user list to ensure that no unauthorized accounts are added and all users have appropriate access levels. Set up alerts or monitoring to track changes to user accounts.
- Encourage users to use strong, unique passwords and enable two-factor authentication (2FA) where possible. Regularly update and enforce security policies related to user access.
By carefully reviewing the user list and adjusting privileges, you can help prevent unauthorized access and ensure that only trusted individuals control your WordPress site. This step is essential in maintaining a secure and well-managed website environment.
Remove Your Website from URL Blocklists
Once you’ve cleaned your WordPress site of malware, you must ensure that your website is no longer flagged or blocklisted by search engines and security services. A blocklist can harm your site’s reputation and SEO performance. Follow these steps to request removal from URL blocklists and restore your site’s standing:
- Log in to your Google Search Console account. Select the property (website) you want to address.
- Go to the “Security & Manual Actions” section in the sidebar.
- Click on the “Security Issues” tab.
- Review any reported issues to confirm that you have addressed them.
- Click on “I have fixed these issues” and then select “Request a review.”
- In the text box, provide details about the actions you took to resolve the issue, then submit your request.
- The review process may take several days. During this time, Google will re-crawl your site to verify that the malware has been removed and that it is clean. You can monitor the status of your request through the Google Search Console.
Removing your website from URL blocklists is crucial in restoring your site’s credibility and ensuring that it continues to perform well in search engine results. Act quickly to minimize any negative impact on your site’s SEO and reputation.
How to Remove WordPress Malware Automatically
A convenient way to remove malware from WordPress is by using security plugins. These plugins can scan your site for malware, provide reports, and often allow you to clean or quarantine infected files directly from the WordPress admin dashboard. Here’s how to use them effectively:
- Log in to your WordPress admin panel.
- Go to Plugins > Add New.
- Search for plugins like Wordfence Security, Sucuri Security, or MalCare Security.
- Click Install Now and then Activate.
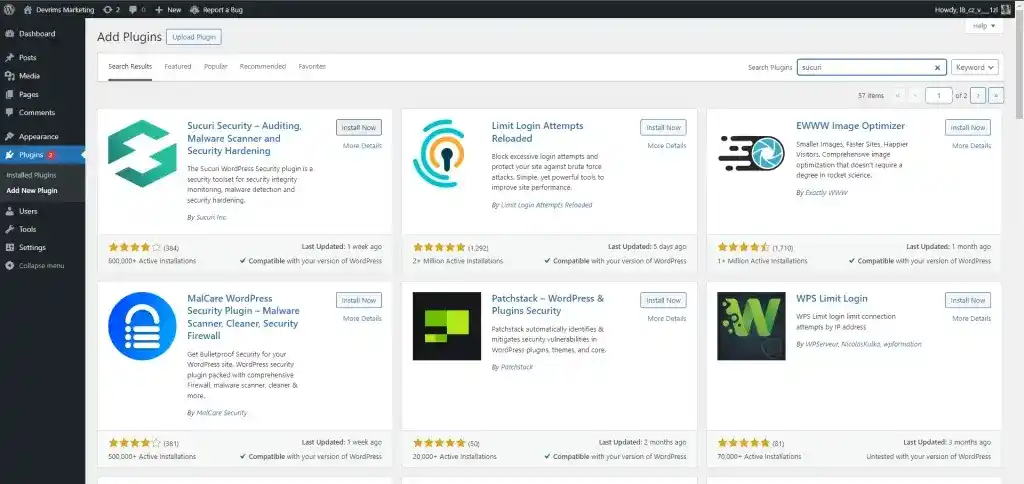
- Find the security plugin in your dashboard menu.
- Click on Scan or a similar option within the plugin.
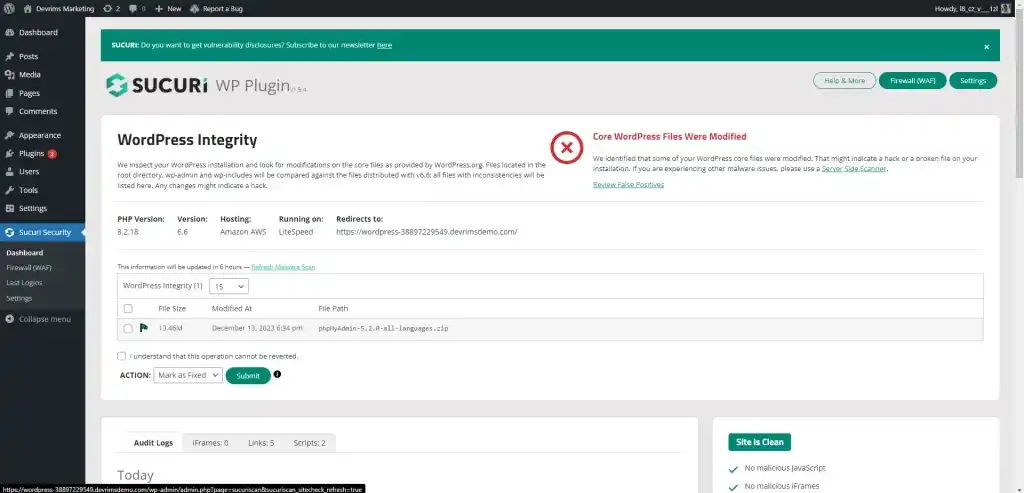
- The plugin will scan your site and provide a report on any detected malware. Follow the plugin’s instructions to clean or quarantine the malicious files.
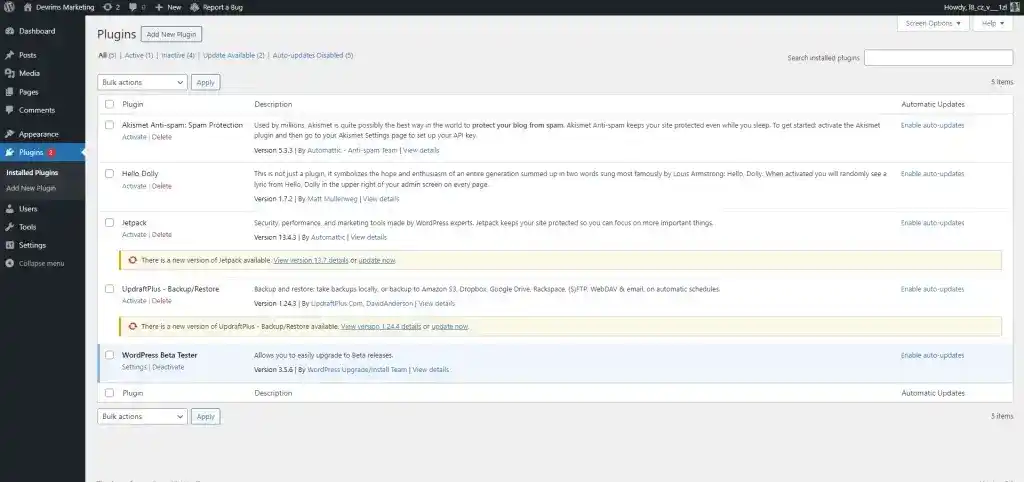
- Update your WordPress themes and plugins to their latest versions. Review and strengthen your security settings to prevent future infections.
Note: If your admin dashboard is compromised, you may need to use alternative methods to install or activate the plugin, such as uploading the plugin manually via FTP.
Hiring a WordPress Malware Removal Service
For complex malware issues, consider hiring a professional malware removal service. Professionals can efficiently handle severe infections and ensure your site is thoroughly cleaned and secure. Here’s how to find and hire the exemplary service:
- Look for development agencies specializing in WordPress security. They usually offer comprehensive services and have a proven track record.
- Explore freelance platforms like Upwork or Fiverr for individual experts. Review their profiles, ratings, and past work to ensure they have expertise.
- Provide specific information about the malware issues and your current site status. Mention any relevant details, such as access limitations or previous attempts at removal.
- Review the candidates’ previous work to assess their capabilities. Read client reviews and feedback to gauge reliability and effectiveness.
- Ask for recommendations from fellow developers or trusted sources if necessary.
- Choose a professional who can start working promptly since malware issues need immediate attention.
By using security plugins, your hosting provider’s tools, or hiring professionals, you can effectively manage and remove malware from your WordPress site, restoring its functionality and security.
Conclusion
Addressing a malware infection on your WordPress site requires a meticulous approach to ensure complete removal and prevent future issues. You can effectively clean your site and restore its integrity by following a systematic process—from backing up your files and checking recent changes to updating core files and strengthening security measures.
While manual removal can be thorough, leveraging automated tools and professional services can streamline the process, especially for complex infections. Post-removal, it’s crucial to implement robust security practices and educate users to prevent future breaches.
Maintaining a secure WordPress site involves regular updates, vigilant monitoring, and proactive measures. By prioritizing your website’s security, you secure your site, your visitors, and your online reputation.

Related Tutorials