Visitors love super-fast loading speeds of web pages and an effortless browsing experience. This is why it has become essential for website owners to explore optimization techniques in today’s fast-growing digital world.
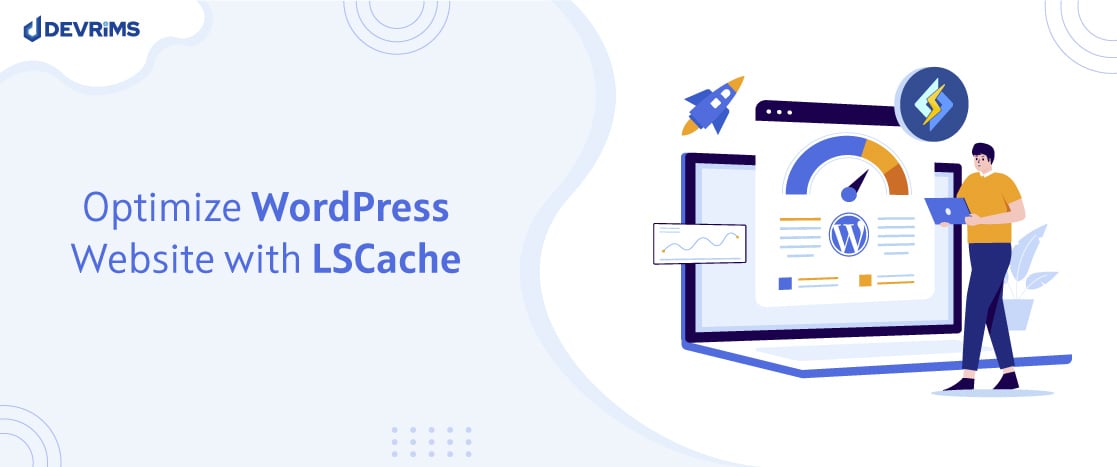
If you are a WordPress developer looking to power up your website’s performance, then LSCache (aka ‘LightSpeed’) is one of the best optimization methods for WordPress websites.
In this post, you can learn how to optimize a WordPress website with LSCache.
This easy-to-follow guide will cover the installation and optimization process of the LSCache Plugin to revolutionize how your WordPress website operates.
Imagine a website that loads within the blink of an eye, delivering content to your users at extraordinary speeds. Imagine reducing server load and bandwidth consumption, leading to cost savings and improved scalability.
These things can be done with LSCache, but optimization is not just about speed – it’s about enhancing the overall user experience, improving search engine rankings, and maximizing your website’s potential.
So, what are you waiting for now? Let’s get started!
What is LiteSpeed?
LiteSpeed is a high-performance web server software that is designed to improve the speed and efficiency of websites.
It is an alternative to popular web servers like Apache and Nginx. LiteSpeed Web Server (LSWS) is known for its exceptional speed and low resource usage, making it an ideal choice for websites with high traffic volumes. There’s a tech stack based on the OpenLiteSpeed web server, learn more about in this guide on the LOMP tech stack.
LSWS employs advanced caching techniques, such as full-page and object caching, to deliver content to users quickly and efficiently.
It also supports technologies like HTTP/3 and QUIC, enhancing website performance. In addition, LSWS is compatible with commonly used web server features and configurations, making it easy to migrate existing websites without significant modifications.
LiteSpeed is not just limited to WordPress websites. It can be used with various content management systems (CMS) and web applications. It supports multiple programming languages, including PHP, Python, Ruby, and Perl, allowing developers to create dynamic and feature-rich websites.
What is LSCache?
The LSCache is a WordPress caching plugin created by LiteSpeed Technologies. It was created to help users of the LiteSpeed web server with the optimization of their websites.
LSCache functions by caching dynamic content, such as HTML pages and database queries, and serving them to users without repeated processing. This significantly reduces server load and enhances the overall efficiency of the website.
One of the key features of LSCache is its ability to purge and update cached content intelligently. When changes are made to a website, LSCache will automatically refresh the updated pages, ensuring that users always served with the most recent content.
Why do we need to optimize WordPress with LSCache?
There are multiple reasons why we need to optimize WordPress with LSCache.
Optimizing your WordPress website with LSCache offers:
- Faster loading speeds
- Reduced server load
- Improved SEO rankings
- Enhanced user experience
- Potential cost savings
It’s a great solution to unlock the full potential of your WordPress site, enhance its performance, and deliver an exceptional browsing experience to your visitors.
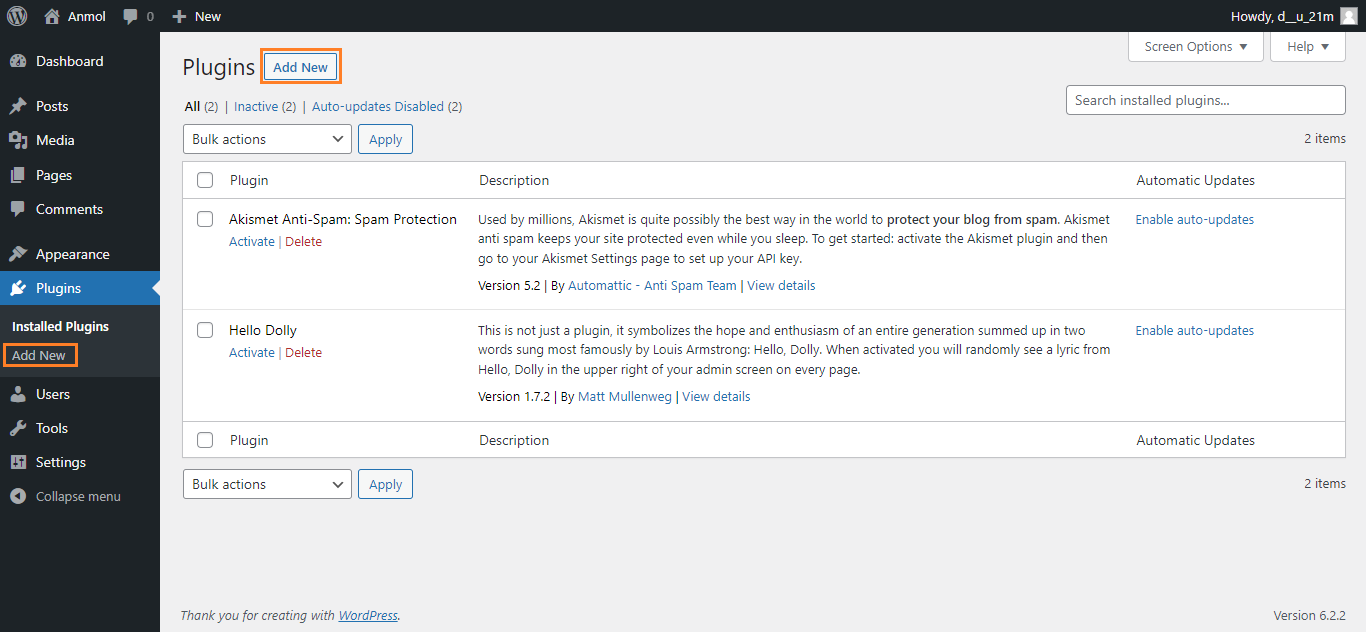
Install the LSCache plugin on your WordPress website
Install the LSCache plugin on your WordPress website by following these steps.
- First, log in to your WordPress admin dashboard.

- Navigate to the “Plugins” section on the left-hand side menu and click the “Add New” button at the top or select it from the menu bar.
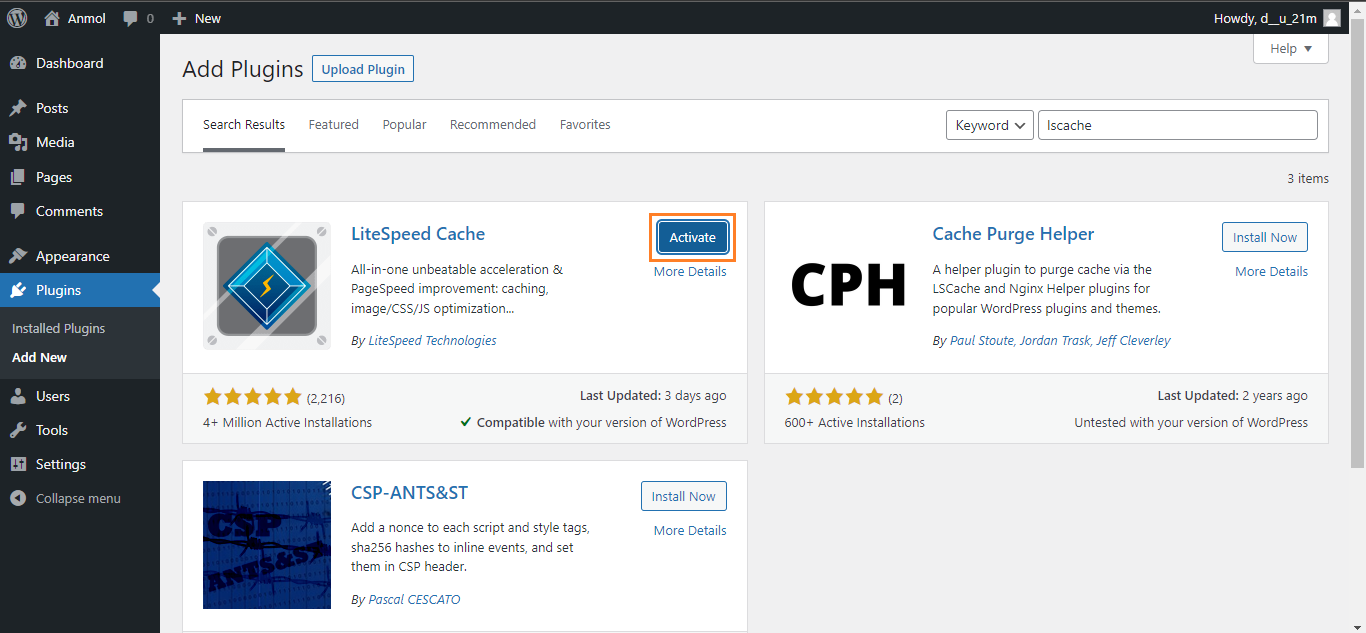
- Now, search for the LSCache plugin by entering its name in the search bar. Once it shows results click on the “Install Now” button.

- After the installation, click the “Activate” button to activate the plugin.
- Once activated, you will see a new section in the left side menu bar with the name of the “LiteSpeed Cache.” Click on it to access the LSCache plugin settings.
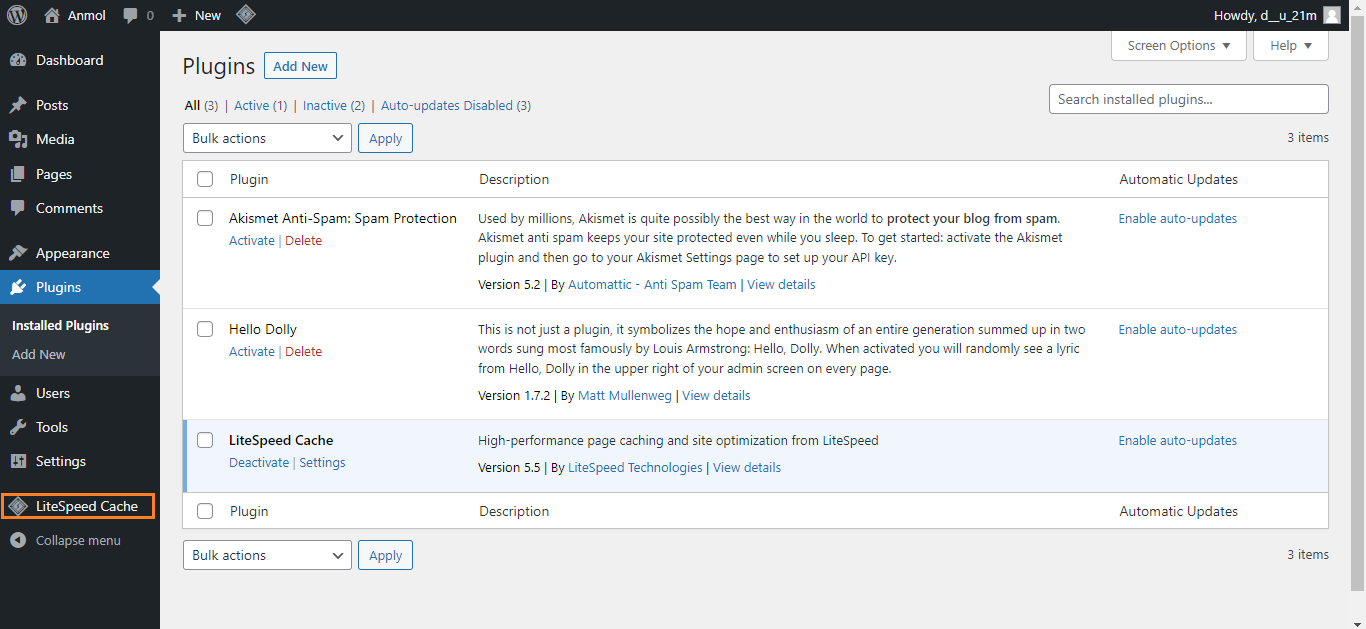
Congratulations! You have successfully installed and activated the LSCache plugin on your WordPress website.
Optimize WordPress with LSCache Plugin Configuration
Once you are done with installing and activating the LSCache Plugin, you need to configure it. On the left sidebar of the dashboard, you will see the LiteSpeed Cache section, click on it and start configuring each section and tab.
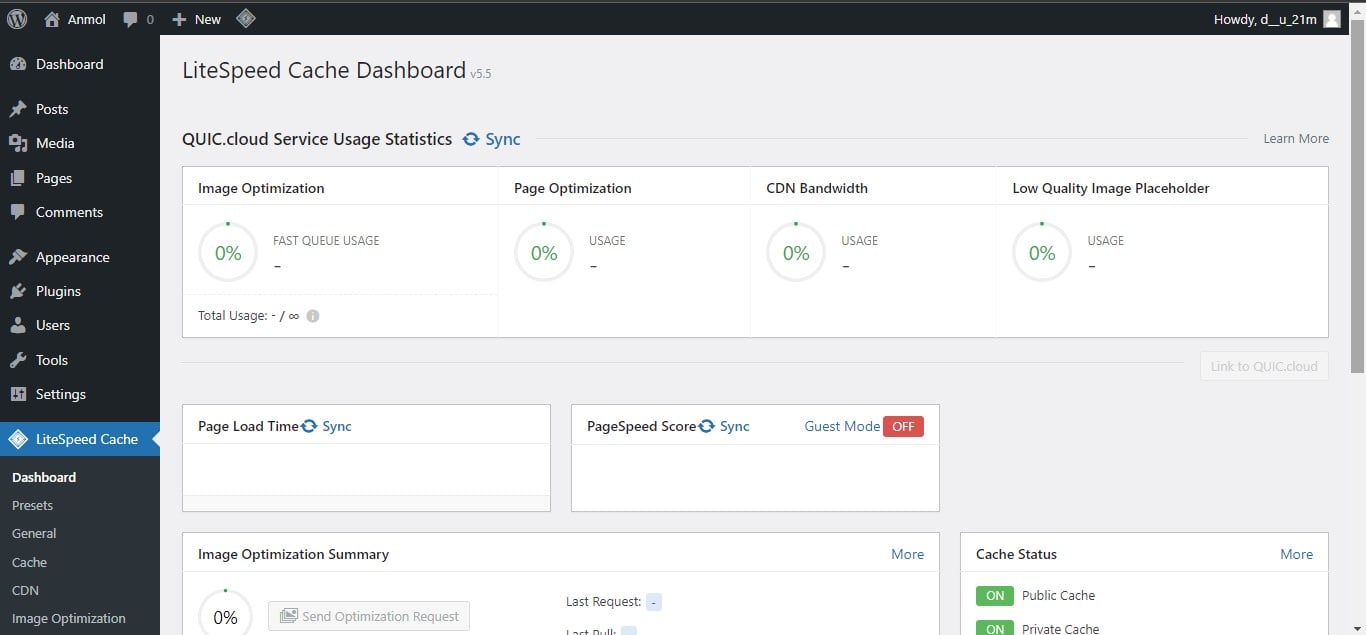
Dashboard
The dashboard is the main control panel of LSCache that provides you with an overview of your caching and optimization settings. The LiteSpeed Cache Dashboard allows you to see the status of your LSCache and QUIC.cloud services, including Image Optimization, Critical CSS Generation, Low-Quality Image Placeholders, Cache Crawler, etc. You can also see your page load time and your page speed score. Your PageSpeed scores are measured here more accurately than third-party browser tools like GTmetrix or PageSpeed Insights.
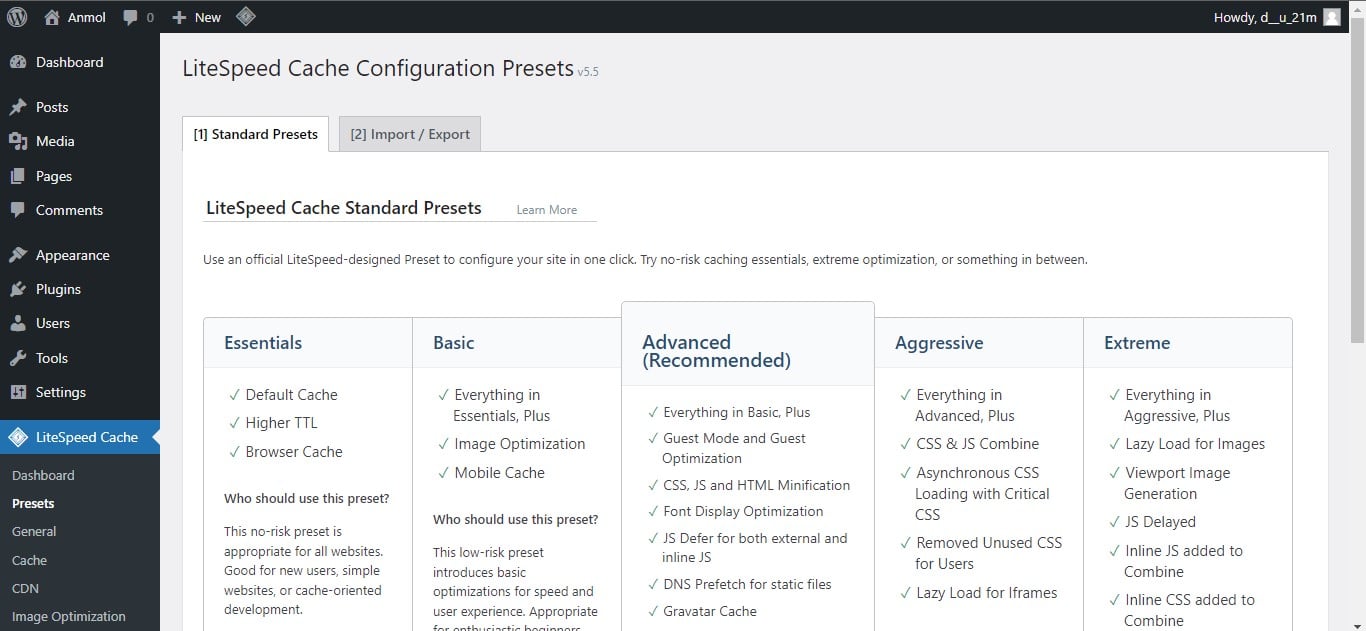
Presets
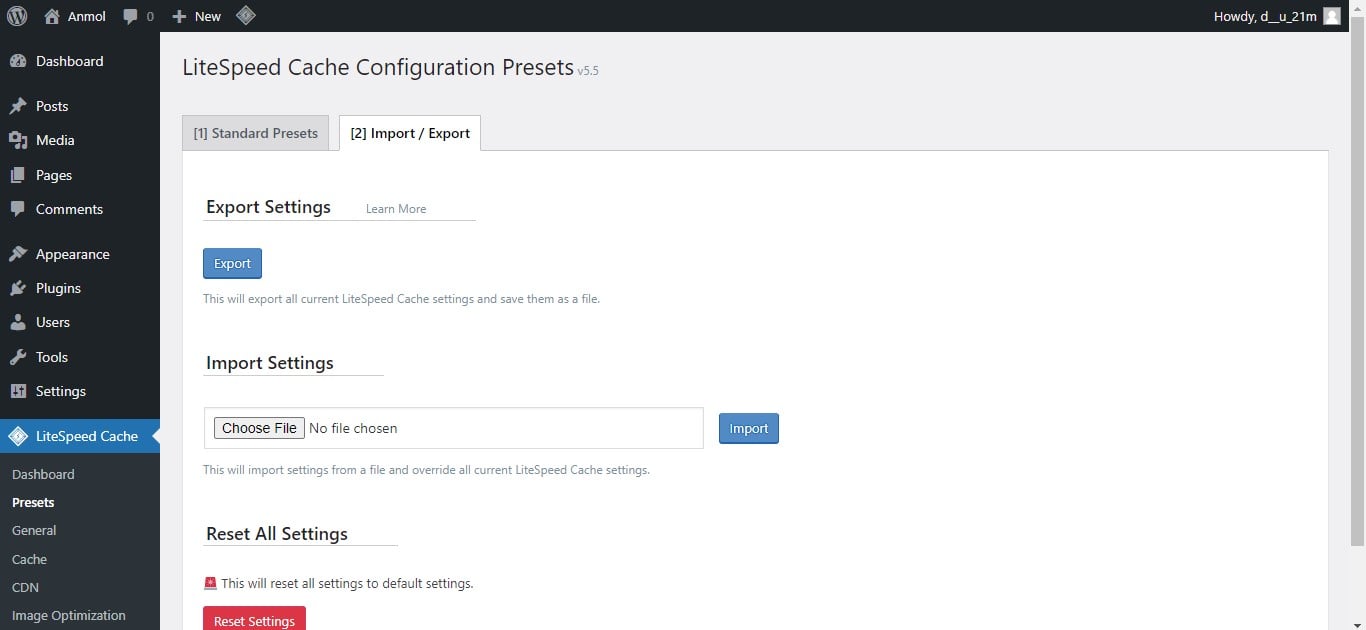
LSCache includes two types of preset settings or tabs: Standard Presets and Import/Export Presets.
Standard Presets allow you to apply recommended configurations for different types of websites in just one click. Go to the Presets section, and inside of the Standard Presets tab, you will see all the options available, from Essentials to Extreme.
Select any option as per your needs and apply a Preset.
The Import/Export tab allows you to bring in (import) or copy out (export) presets for effortless setup across multiple sites.
General
General settings allow you to turn LSCache on or off, specify the cache storage path, and set cache control headers. This section also controls your usage of QUIC.cloud services and provides options for auto-upgrading the plugin and managing dashboard messages.
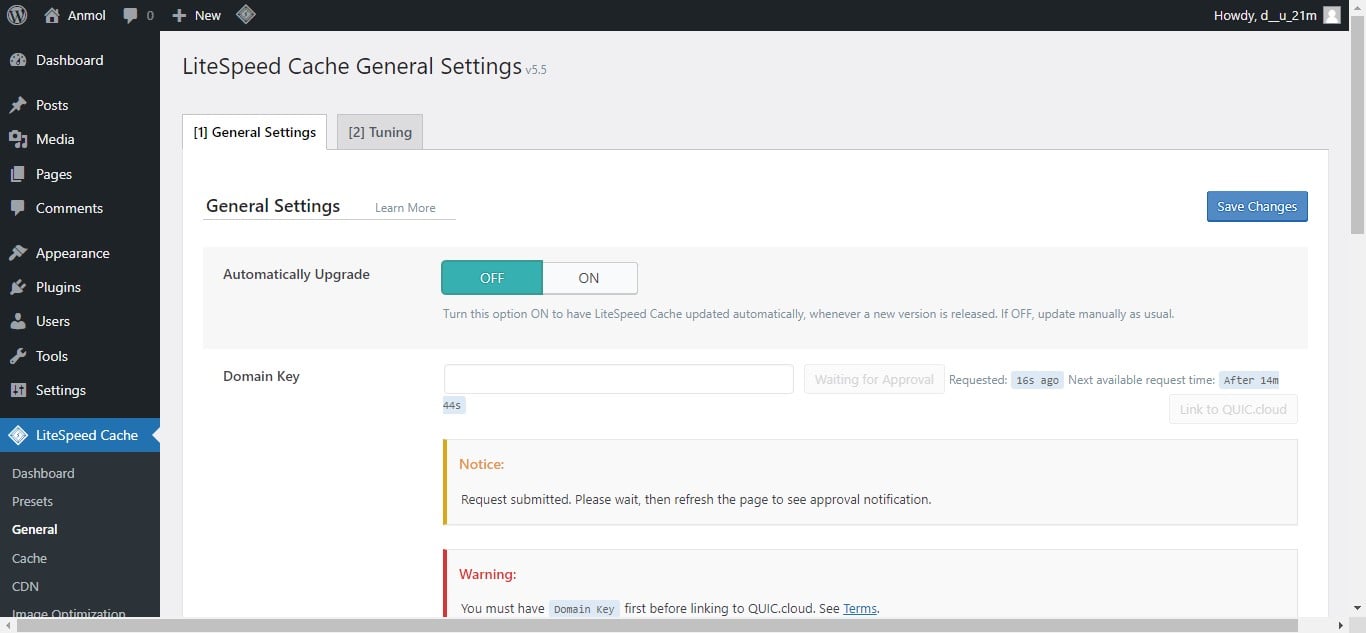
The following settings are available:
- Automatically Upgrade: This setting should be enabled (ON) if the plugin is well-maintained and regularly updated.
- Domain Key: You can request a domain key and enter it in this field to establish a connection with QUIC.cloud.
- Guest Mode: Enabling Guest Mode (ON) improves the load time for first-time visitors by reducing the time required to read cookies, search for cache varies, and process ESI (Edge Side Includes). Guest Mode + Guest Optimization has received positive feedback in Facebook Groups. Note that this setting may consume resources if crawling is enabled and is not compatible with Cloudflare APO.
- Guest Optimization: When activated (ON), this setting applies aggressive page and image optimization for first-time visits.
- Server IP: Click “Check my public IP from DoAPI.us” and copy/paste your server IP in this field.
- Notifications: Enable this setting (ON) to receive notifications from LiteSpeed, such as updates and new releases.
Ensure to configure these settings according to your specific requirements and preferences. General settings provide essential options for optimizing and managing LSCache effectively.
Cache
The Cache section is the main section for configuring the LSCache. It includes eight tabs to configure the Cache settings. So, let’s explore all the tabs and settings.
Cache
The Cache tab provides options to control the caching functionality of LSCache. The first setting turns on or off caching overall, while the remaining settings allow you to specify which types of content should be cached. Keep these settings at their default values unless you need to modify them. Here is a summary of the available options:
- Enable Cache: This option should be “On” to activate the caching functionality. You can test if the cache works using a tool like uptrends.com and check for an “x-LiteSpeed-cache” hit in the response header.
- Cache Logged-in Users: It is advisable to keep this option “Off” unless you have a membership website or similar setup where logged-in users require their cache. Enabling this option for regular websites can consume unnecessary resources.
- Cache Commenters: This option should be set to “Off” unless your website receives a high volume of comments and you want to create a separate cache for pending comments. Enabling it can consume additional resources.
- Cache Rest API: It is recommended to keep this option “On,” as many themes, plugins, and the WordPress Block Editor rely on the REST API for functionality.
- Cache Login Page: Enabling this option (“On”) helps save server resources as the login page is often a target for malicious activity. It is recommended not to change the login URL since LiteSpeed Web Server, in conjunction with QUIC.cloud, optimizes the default login page.
- Cache favicon.ico: This option should be set to “On” to cache the favicon, the small logo image displayed in the browser tab.
- Cache PHP Resources: Keeping this option “On” caches static PHP files (such as CSS and JS) loaded by your theme. Only turn it off if you have dynamic CSS and JavaScript loaded in PHP, which is unlikely.
- Cache Mobile: Enabling this option depends on whether you serve different content for mobile and desktop users or use features like AMP, CCSS, UCSS, Guest Mode, or Guest Optimization. If you have Guest Mode and Guest Optimization enabled, enabling this option is also recommended. However, note that enabling it can consume additional resources.
- Cache URIs: For most websites, it is unnecessary to configure this option since the “Cache Logged-in Users” setting handles private cached URIs, and typically there is no need to cache specific pages on the site forcibly.
- Drop Query String: This feature ignores caching for URLs with query strings often used in marketing campaigns and tracking. The default list of query strings is usually sufficient, but you can add any additional ones if needed.
TTL
TTL stands for “Time to Live” and refers to the duration in seconds that a page can remain in the cache before it is considered outdated or stale. Once the TTL expires, the page is purged from the cache. By default, LSCache provides recommended TTL settings that work well for most websites, but you can adjust them according to your needs.
- Cache TTL: The default settings for cache TTL are generally suitable for most scenarios. The cache TTL determines how long LiteSpeed Cache retains a cached file before generating a new one. A shorter TTL is useful if you frequently update your site and want to ensure that visitors see the latest cached version. However, remember that this shorter TTL can consume more server resources. On the other hand, a longer TTL preserves resources but may result in visitors not seeing the most recent content as frequently.
Purge
In some cases, there may be situations where pages need to be purged from the cache before their set expiration. This section allows you to define the rules for such behavior. The default selections are generally suitable for most websites, but you can modify them based on your needs.
For example, when you create a new post and assign it tags and categories, various pages on your site are affected, including the home page, category archive pages, tag archive pages, author archive pages, and potentially others, depending on your theme.
It is essential to configure the purge settings accordingly to ensure that these pages display the most up-to-date content and avoid serving old information.
Here are the available options:
- Purge All On Upgrade: This option should be set to “On” to automatically purge the cache whenever there is an upgrade to the WordPress core, themes, or plugins. This ensures that your site functions correctly after the upgrade. LiteSpeed recommends keeping this option enabled.
- Auto Purge Rules For Publish/Update: The default settings for this option are generally sufficient. When you publish or update a post, it is essential to purge related content, such as the blog roll and other relevant sections. This option takes care of automatically purges those elements.
- Serve Stale: It is recommended to keep this option “Off” as it serves the most recently purged (stale) copy of a page if a new cached version is not yet generated. Enabling this option consumes additional resources.
- Scheduled Purge URLs: In most cases, there is no need to add URLs here unless you require specific pages to be purged at certain times, such as during low-traffic periods. If you have such requirements, you can specify the URLs and set the scheduled purge time accordingly.
- Purge All Hooks: The default settings for this option are suitable for most scenarios. When specific hooks are triggered, the cache is purged accordingly. LiteSpeed suggests adding “comment_post” to purge the cache whenever a comment is made on your site.
Excludes
Sometimes, you may have specific pages on your website that you prefer not to be cached. LSCache provides options to exclude these specific parts of your site from being cached. However, most websites typically do not need to modify these settings. They are available to accommodate custom exceptions to the caching rules if required.
For most sites, these exclusion settings can be left untouched. Since you already have control over the cache through other LiteSpeed Cache settings, there is usually no reason to exclude any specific elements from the cache unless you have a specific requirement.
ESI
“Edge Side Includes” (ESI) is a technique that allows you to insert personalized or uncached content into public content by creating “punch holes.” These punch holes are then filled with specific content based on user requirements. ESI is particularly beneficial for implementing features like shopping cart widgets and personalized greetings. However, by default, ESI is disabled in LSCache.
- Enable ESI: This setting controls how specific elements on your dynamic pages are cached, determining whether they are cached publicly, privately, or with a custom TTL (Time to Live). Enabling ESI introduces additional complexity to the caching process, which involves managing and serving individualized content. LiteSpeed suggests that it is generally more accessible for a server to return total pages without utilizing ESI. If ESI is disabled, there is no need to modify settings for the admin bar, comment form, nonces, or vary group. It’s important to note that personal experience with the ESI feature is limited. Therefore, seeking further guidance or consulting documentation is suggested when making decisions regarding its usage.
Object
The settings found on this tab provide control over an external object cache, such as Memcached, LSMCD, or Redis. The server administrator must already be enabled and configured with the desired external cache.
- Object Cache: Enable this option to cache your database, which is particularly beneficial for dynamic sites like WooCommerce. I recommend Redis over Memcached. To pass the connection test, ensure that Redis or Memcached is enabled in your hosting account (choose only one). In cPanel, you can find this option under “Select PHP Version” → “Extensions.” Enable the Redis or Memcached extension, save the changes, and recheck the connection test.
To install and configure Redis cache on Devrims and WordPress plugins, check out this blog.
- Method: Select Redis if you have enabled the Redis extension in your hosting environment; otherwise, choose Memcached.
- Host: Leave this field as “localhost.”
- Port: Keep the default port value.
- Default Object Cache Lifetime: The default value of 360 seconds is suitable for most scenarios.
- Username/Password: Leave these fields as they are, as they are not required.
- Redis Database ID: Unless you are using Redis and need a different database ID, there is no need to modify this setting.
- Global Groups: Maintain the default settings, which determine the groups that should be cached at the network level.
- Do Not Cache Groups: Leave this section unchanged unless you want to add groups that should be excluded from the object cache.
- Persistent Connection: Enable this option to keep the connection alive, which can improve the performance of Memcached.
- Cache WP-Admin: This setting depends on your specific situation. Enabling the caching of the admin section can speed it up; however, be aware that it may present outdated data. If your admin area is slow, you can enable this option; otherwise, it is recommended to leave it turned off.
- Store Transients: It is recommended by LiteSpeed to enable this setting to receive server status notifications.
Browser
The browser cache is a client-level cache that stores static files, such as images, on the user’s device after they are initially requested. Enabling browser caching allows these files to be pulled from the local storage instead of being fetched from the server every time until the browser cache expires. The settings on this tab allow control over the browser cache behavior.
- Browser Cache: Enable this option to activate the browser cache. It is recommended to have it enabled by default.
- Browser Cache TTL: The default value is 31557600 seconds, equivalent to one year. This value aligns with Google’s recommendation to “serve static assets with an efficient cache policy” and indicates to browsers how long the cache should be stored. However, for WooCommerce or dynamic websites, it is suggested to set a shorter value of 43800 seconds (1 month).
Advanced
The “Advanced” tab is designed for more experienced users and is typically not required for regular usage. It provides additional options to address specific scenarios or conflicts with other cache plugins.
- Login Cookie: This setting can be left unchanged, as it is only necessary if you have multiple WordPress installations and need the cache to differentiate between logged-in users on different sites. It does not apply to multisite setups.
- Improve HTTP/HTTPS Compatibility: By default, this option is disabled. Enable it only if you are experiencing cache-related issues when using HTTP and HTTPS protocols. If problems persist, you can also try enforcing SSL to resolve conflicts.
- Instant Click: This feature, when enabled, functions similarly to the Flying Pages plugin and WP Rocket’s link preloading. It preloads pages in the background when users hover over a link, allowing the page to appear to load instantly when clicked. Enabling this feature may consume additional resources.
CDN
In this section, you can configure your Content Delivery Network (CDN) for optimal usage with WordPress. If you do not use a CDN, you can neglect this section, as CDN support is disabled by default in the plugin.
- QUIC.cloud CDN: Enable this option to utilize the QUIC.cloud CDN which is designed explicitly for LiteSpeed and offers robust HTML caching (similar to Cloudflare APO). To access the full functionality of QUIC.cloud, including 81 Points of Presence (PoPs) with DDoS protection, you must subscribe to their standard plan, which is priced at $.02 – $.08 per gigabyte (GB). The free plan, however, only provides access to 6 PoPs. It’s worth considering that QUIC.cloud is required for specific page and image optimizations, although it does not resize images for mobile devices. If mobile image resizing is essential, consider testing ShortPixel Adaptive Images.
- Use CDN Mapping: This setting should generally remain disabled, as QUIC.cloud CDN and Cloudflare do not require CDN mapping. Enable this option only if you use a CDN that utilizes a URL, such as BunnyCDN. In such cases, you can add the CDN URL and select the files that need to be served through the CDN.
- HTML Attribute To Replace: Leave this setting unchanged since CDN mapping is turned off.
- Original URLs: Keep the default settings unless you use a multisite setup with different domains or subdomains.
- Included Directories: By default, only the “wp-content” and “wp-includes” directories are included, which should be sufficient.
- Exclude Path: Leave this setting unchanged unless you have specific directories that you want to exclude from the CDN.
- Cloudflare API: This setting is only necessary if you use Cloudflare’s CDN instead of QUIC.cloud CDN.
By configuring the CDN settings in this section, you can control the power of a CDN to optimize content delivery and enhance the performance of your WordPress website.
Image Optimization
LiteSpeed Cache for WordPress offers image optimization options, allowing you to reduce the size of your images and improve their transmission speed. This functionality is facilitated through the QUIC.cloud service and can be configured within this section of the plugin.
To optimize images, first configure the image optimization settings and initiate an optimization request.
- Auto Request Cron: Enable this option to send optimization requests for newly uploaded images automatically.
- Auto Pull Cron: Enable this option if the previous setting is enabled.
- Optimize Original Images: It is recommended to enable this setting, but refer to LiteSpeed’s example for more information.
- Remove Original Backups: Keep this option disabled unless you are satisfied with the quality of the optimized images and want to remove the original backups.
- Optimize Losslessly: Enable this option for lossless image compression. However, you can experiment with different settings to find the optimal balance between compression and image quality.
- Preserve EXIF/XMP Data: Disabling this option helps reduce image sizes by removing EXIF data. Consider enabling it unless preserving such data is crucial for your use case.
- Create WebP Versions: Enable this option to generate WebP images served in next-generation formats.
- Image WebP Replacement: Activate this option if you have enabled the previous setting and want to replace the original images with WebP versions.
- WebP Attribute To Replace: Specify the element attributes that WebP versions should replace.
- WebP For Extra srcset: Enable this option to ensure that images in custom code are served as WebP.
- WordPress Image Quality Control: Set the image quality control to 85. This aligns with the PSI (PageSpeed Insights) tests, which evaluate images at 85% quality.
By adjusting these image optimization settings, you can effectively optimize your images, reduce their size, and enhance the overall performance of your WordPress website.
Page Optimization
This section allows you to implement various non-cache measures to enhance the speed of your WordPress site, and many of these measures are supported in the provided tab. These measures include CSS and Javascript minification and combination, HTTP/2 push, and asynchronous and deferred loading. By default, we have left these measures disabled.
CSS Settings
- CSS Minify: Enable this option to remove unnecessary characters from CSS.
- CSS Combine: This setting should be tested, as there are different perspectives on combining CSS files. Note that combining CSS is required for UCSS to function correctly. Test the results on your website to determine the optimal configuration.
- Generate UCSS: Only enable this if CSS combining is turned on. UCSS helps eliminate unused CSS. However, heavy CSS is often attributed to themes and plugins, which can be identified using the Chrome Dev Tools coverage report. If this option is enabled, also enable “cache mobile.” UCSS relies on QUIC.cloud and CCSS, so ensure you use QUIC if these options are enabled.
- UCSS Inline: It is recommended to keep this option off. Even if UCSS is enabled, loading it in a separate file instead of inline is better. Loading it in a separate file allows for caching and prevents an increase in HTML size. Enabling this option may improve PageSpeed Insights scores but could lead to slower visitor performance. This is similar to why FlyingPress, which loads CSS in a separate file, is faster in removing unused CSS than WP Rocket, which loads it inline.
- CSS Combine External and Inline: Only enable this if “combine CSS” is also turned on. This option combines external and inline CSS files, which can help prevent website issues.
JS Settings
- JS Minify: Enable this option to remove unnecessary characters from JavaScript.
- JS Combine: This option should remain off if you are using HTTP/2 or if you have large JS files.
- JS Combine External and Inline: Only enable this if JS combining is enabled.
HTML Settings
- HTML Minify: Enable this option to remove unnecessary characters from HTML.
- DNS Prefetch: Review the third-party code report in PSI to identify all third-party domains loading on your site. Exclude CDN URLs and fonts.gstatic.com since they should be pre-connected instead of prefetched. After excluding delayed third-party code, prefetch the remaining domains. Alternatively, refer to the provided list.
- DNS Prefetch Control: Enable this option unless you manually add domains.
- HTML Lazy Load Selectors: This feature enables lazy loading for below-the-fold elements, such as #comments and #footer. You can identify the elements by inspecting the site, copying their selectors, and pasting them into this field.
- Remove Query Strings: This option can be disregarded as it is somewhat outdated and does not significantly impact load times.
- Load Google Fonts Asynchronously: Test this option carefully and observe the difference in font load times in the GTmetrix Waterfall “fonts” tab. It is generally recommended to keep this option off.
- Remove Google Fonts: Enable this option only if you are hosting fonts locally and want to ensure that no third-party fonts are loaded on your website.
- Remove WordPress Emoji: Emojis can have a negative impact on load times, so it is recommended to enable this option.
- Remove NoScript Tags: Keeping these tags ensures better compatibility with old browsers and that your website’s JavaScript is loaded correctly.
Media Settings
- Lazy Load Images: Enable this option to implement lazy loading for images, and consider adding a fade-in effect for smoother scrolling.
- Basic Image Placeholder: This option displays an image placeholder while loading images.
- Responsive Placeholder: Enable this option if you are using the basic image placeholder, as it helps reduce Cumulative Layout Shift (CLS).
- Responsive Placeholder SVG: Specify the SVG to use as the responsive placeholder.
- Responsive Placeholder Color: The default gray color used by LiteSpeed Cache should suffice.
- LQIP Cloud Generator: Enable this option to use a lower-quality image (generated by QUIC.cloud) as a placeholder before loading the higher-quality image. Test the results for optimal configuration.
- LQIP Quality: This option determines the quality of the lower-resolution placeholder image when LQIP Cloud Generator is enabled.
- LQIP Minimum Dimensions: A size of 150×150 pixels is recommended. LQIP will only be used for images more extensive than this size when the LQIP cloud generator is turned on.
- Generate LQIP In Background: LiteSpeed suggests enabling this option, as turning it off can slow down page load times.
- Lazy Load Iframes: Enabling this option allows for the lazy loading of iframes, such as videos and maps, which improves overall speed.
- Add Missing Sizes: Enable this option to add missing image dimensions, providing explicit widths and heights.
VPI
- Viewport Images: Enable this option for QUIC.cloud to detect images loading above the fold, automatically excluding them from lazy loading to enhance Largest Contentful Paint (LCP). Lazy load images must be enabled.
- Viewport Images Cron: This option generates viewport images in the background using a cron-based queue.
Media Excludes
While the Viewport Images setting attempts to exclude viewport images from lazy loading for better LCP, you can manually exclude them from ensuring proper handling. Since page builders load background images in CSS, they are not lazily loaded by default. To address this, use the “data-no-lazy” attribute.
Localization
- Gravatar Cache: Enable this option if your site receives numerous comments with Gravatars, as it improves performance.
- Gravatar Cache Cron: This option should be enabled if the previous setting is turned on.
- Gravatar Cache TTL: The default setting of 604800 seconds (1 week) is generally recommended.
- Localize Resources: This feature allows for the localization of external JS files. Include the individual files below.
- Localization Files: Check the third-party code report to identify which JavaScript files are loading and consider delaying them (e.g., Google Analytics, Tag Manager, reCAPTCHA, etc.). Instead of delaying Google Fonts, host them locally. Delaying ads can also affect revenue.
Tuning
Most settings in this section are intended for excluding specific elements from optimization (CSS, JS, URLs, deferred JS, Guest Mode JS, and roles). Generally, you only need to use these options if a particular setting breaks your site. For instance, if minifying or combining CSS/JS causes issues, identify the problematic file in the source code and exclude it. The same principle applies to most other settings.
Database
The DB Optimization section in LiteSpeed Cache allows you to enhance the performance of your WordPress database. Optimizing the database can significantly improve the speed of your website. With LSCWP’s DB Optimizer, you can conveniently perform various tasks within your WordPress database.
In the Manage tab, it is recommended to delete unnecessary items from the database, except for post revisions and auto drafts, which serve as backups for future reference. Additionally, you have the option to optimize database tables.
Here are the optimization settings for a database:
- Revisions Max Number: Setting this value to 10 is suggested, providing you with some backup revisions while avoiding excessive storage usage. However, if desired, you can be more aggressive and choose a lower value, like 5.
- Revisions Max Age: Setting this value to 0 ensures that revisions are never automatically deleted. This can be useful when you have posts that remain unmodified for extended periods, as automatically removing backups may not be desirable.
By configuring these settings, you can effectively manage and optimize your WordPress database, promoting better website performance.
Crawler
By default, the crawler feature in the LiteSpeed Cache plugin is disabled. When activated, the crawler traverses your website and updates any expired pages from the cache. However, it’s important to note that crawling can be resource-intensive, and not all hosting providers permit it. If your hosting provider allows crawling, it can be a helpful way to ensure your cache remains up to date.
The crawler functionality is responsible for scanning your website for pages with expired cache and refreshing them accordingly. Due to its resource consumption, the ability to enable the crawler is typically restricted to server-level control. Most hosting providers often do not support it, particularly in shared hosting environments.
Therefore, in most cases, there is no need for manual intervention. However, if you manage your server, you can enable the crawler. In summary, the recommended approach involves enabling the crawler in the General settings, submitting your sitemap in the Sitemap settings, and leaving the remaining settings at their default values.
Toolbox
In the Toolbox section of the plugin, you will find various tools for manual cache purging, site settings export, and issue debugging. One handy tool is the Environment Report, which provides valuable information for troubleshooting purposes. If LiteSpeed support requests your Report Number, you can get it from this section.
The Toolbox offers several settings and features, including cache purging, import/export functionality, .htaccess editing, reports, debugging options, logs, beta testing, and more. Among these settings, let’s focus on the heartbeat settings, which govern the WordPress heartbeat feature.
Heartbeat:
- Frontend Heartbeat Control: Enable this option to control the heartbeat feature on the front end of your website.
- Frontend Heartbeat TTL: Set the value to 0, which usually allows for turning off the frontend heartbeat. However, it’s recommended to test this setting to ensure compatibility.
- Backend Heartbeat Control: Enable this option to control the heartbeat feature on the backend of your website.
- Backend Heartbeat TTL: Set the value to 0, which typically turns off the backend heartbeat. Testing is advised to confirm functionality.
- Editor Heartbeat: Enable this option to control the heartbeat feature within the post editor.
- Editor Heartbeat TTL: Set the value to 120 or adjust it as needed. This setting affects functionalities like autosaves, so consider increasing the value if necessary.
Note: Carefully configure all LSCache settings based on your specific requirements and the caching technology you have implemented.
Conclusion
In conclusion, optimizing your WordPress website with LSCache offers significant benefits in terms of speed, performance, and user experience. By leveraging LSCache’s advanced caching and optimization features, you can reduce page load times, minimize server load, and deliver content to visitors more efficiently.
Through its integration with popular content management systems and its compatibility with various hosting providers, LSCache provides a seamless and user-friendly solution for website optimization. Its comprehensive features, including full page caching, minification of CSS and JavaScript, image optimization, and HTTP/2 push, allow you to set your website’s performance and ensure optimal content delivery.
Implementing LSCache not only enhances the speed and responsiveness of your website but also contributes to improved search engine rankings and overall site usability. With its ease of configuration and server-level integration, LSCache simplifies the optimization process, allowing you to focus on delivering a seamless browsing experience to your visitors.
To learn more about optimizing your site for speed, check out this guide on speeding up your WordPress website.
In today’s fast-growing online landscape, where every second counts, optimizing your WordPress website with LSCache is a strategic choice to stay ahead. It empowers you to create a faster, more efficient, and more engaging website that leaves a lasting impression on your audience. So, take advantage of LSCache’s capabilities and unlock the full potential of your WordPress website.

Related Tutorials